Creating a menorah with children is a meaningful way to bring Hanukkah stories, symbols, and traditions into their world through play and creativity. A thoughtfully designed kid-friendly menorah project lets little hands explore colors, shapes, and pattern-making while parents and caregivers focus on safety and Jewish learning.
Why Make a Menorah Craft With Kids?
A DIY menorah project is more than a seasonal craft; it becomes a memory tied to the warmth of family gatherings and the glow of Hanukkah lights. When children help create something that represents the holiday, they feel a stronger connection to the rituals and stories shared each night.
- It gives kids a hands-on way to explore the meaning of the eight nights and the helper candle.
- It encourages creativity, decision-making, and pride in their finished piece.
- It offers a safe alternative to real flames for younger children who are not ready for lit candles.
Project Overview: A Child-Safe “Glow” Menorah
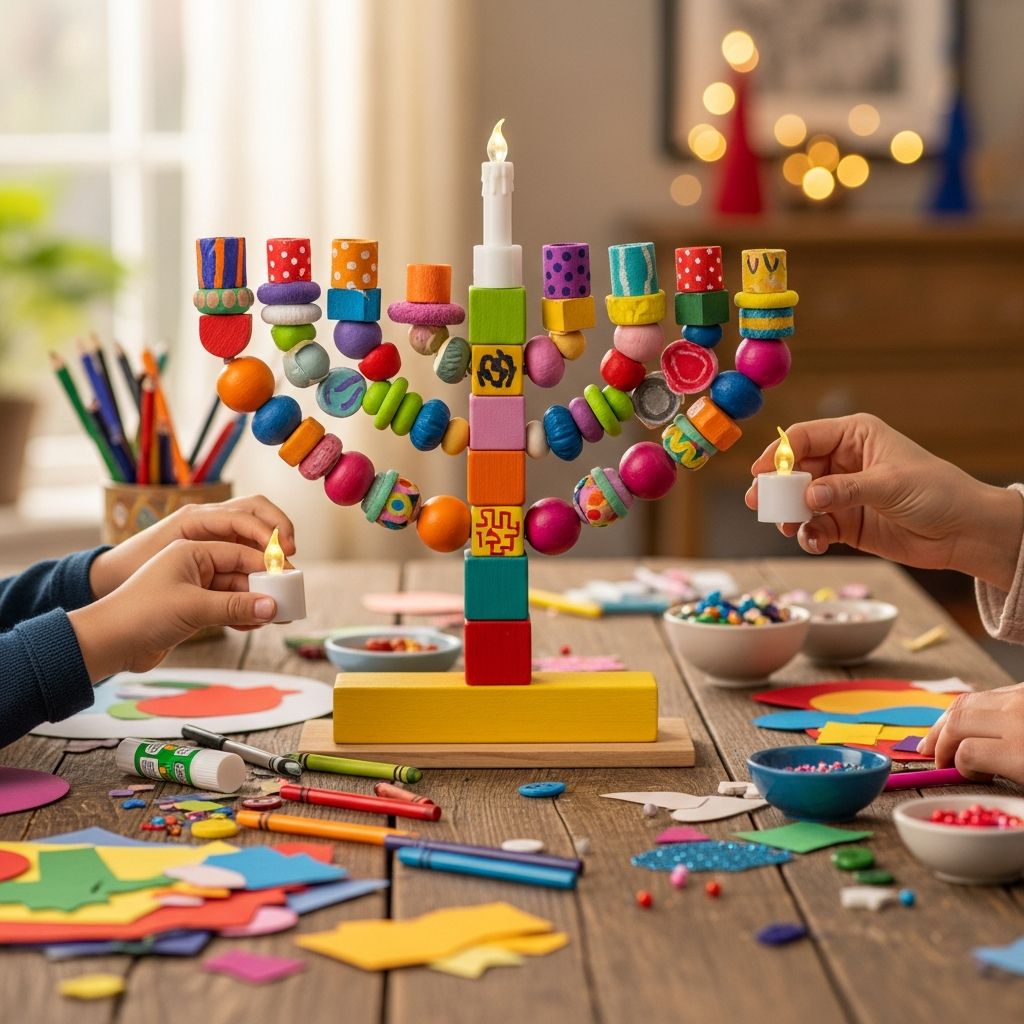
This guide focuses on a tabletop menorah craft that uses a sturdy base, colorful decorations, and removable “candles” that kids can add one by one each night. Instead of fire, you can use paper flames, stickers, or small LED lights, making the project accessible for toddlers through older elementary-aged children.
The design is intentionally flexible, so families can adapt it using whatever supplies are on hand—wood blocks, cardboard, recycled containers, foam shapes, or modeling material all work beautifully.
Suggested Materials and Alternatives
You do not need specialized craft supplies to make a successful kid-friendly menorah; most items can be found around the house or in a basic craft bin. Mix and match from the list below depending on your budget, children’s ages, and how permanent you want the finished piece to be.
Core Components
- Base: A long, stable piece such as a small wooden plank, a thick cardboard strip, a foam board rectangle, or a heavy recycled box side.
- “Candles”: Craft sticks, paper tubes, wooden dowels, sturdy paper rectangles, or modeling clay cylinders.
- Flames: Cut-out flame shapes from colored paper or foam, felt pieces, or battery-powered mini LEDs for older kids with supervision.
- Adhesive: School glue or glue sticks for kids; stronger glue for adults to secure heavier pieces.
- Color & texture: Washable paint, markers, crayons, stickers, sequins, or washi tape.
Optional Embellishments
- Glitter glue or metallic pens for sparkling details.
- Small buttons, beads, or gems for a mosaic-style look.
- Letter stickers or stencils to add names, Hebrew letters, or the year.
- Felt pads, bottle caps, or clay “feet” to help the base stand securely.
Hanukkah Learning Goals to Weave In
While working on the project, adults can gently introduce or reinforce key ideas associated with Hanukkah. The craft becomes a springboard for simple, age-appropriate conversations rather than a formal lesson.
- Explain that a Hanukkah menorah (also called a hanukkiyah) has nine branches: eight for each night and one helper candle.
- Talk about light as a symbol of hope, resilience, and community during dark times.
- Connect the act of decorating with the idea of bringing beauty and care to sacred objects and rituals.
Basic Structure: Planning the Layout
Before the glue and paint appear, it helps to sketch or loosely arrange where each candle will go on the base. Kids can participate by counting spots, lining up objects, and choosing which candle will be the special helper candle.
| Element | How Many? | Placement Tip |
|---|---|---|
| Regular candle holders | 8 | Line them up in a straight row along the base. |
| Helper candle holder | 1 | Place in the center, slightly higher or set apart. |
| Decorative elements | As many as desired | Leave space between candle holders so decorations are not in the way. |
Step-by-Step: Building the Kid-Friendly Menorah
The following steps assume a simple, linear menorah with removable candles that children can place each night. Adjust the order or details to suit your child’s age, attention span, and interest.
Step 1: Prepare the Workspace
- Cover the table with newspaper, a plastic tablecloth, or an old sheet to catch glue and paint.
- Gather all materials within easy reach so kids can focus on the creative process.
- Put children in art smocks or old T-shirts if you are using paint or washable markers.
Step 2: Decorate the Base
Starting with the base helps children see where everything will sit and gives time for any paint or glue to dry. Keep at least a narrow strip along the top of the base free of bulky decorations so the candle pieces can stand securely.
- Invite kids to paint or color the base in blues, silvers, golds, or any favorite colors.
- Add patterns such as stripes, dots, stars, or abstract designs.
- Glue on flat decorations (paper shapes, stickers, or thin foam pieces) and press them firmly.
Step 3: Create the Candle Pieces
The candle units can be as simple or elaborate as you like. For younger kids, aim for sturdy shapes they can easily pick up and place on the menorah without frustration.
- Cut nine strips of cardboard or foam, or use craft sticks or paper tubes as candle bodies.
- Invite kids to decorate each candle with stripes, faces, geometric patterns, or tiny drawings.
- Choose one candle to be the helper candle; make it slightly taller, a different color, or more decorated.
Step 4: Add the Flames
Flames can be permanently attached or designed to be removable so kids can “light” each candle by adding a flame later. Removable flames are especially fun for repeated play throughout the holiday.
- Cut out nine flame shapes from yellow, orange, or red paper or foam.
- Draw inner details with markers or glitter glue to suggest glowing centers.
- Attach the flames with small loops of tape if you want to be able to remove them, or glue them on firmly for a fixed display.
Step 5: Create the Candle “Holders” on the Base
Instead of open metal cups for real candles, this kid-friendly version uses simple supports that keep the pretend candles upright. The supports should be wide enough and strong enough that kids can insert and remove candles repeatedly.
- Draw nine evenly spaced marks along the top of the base and count them together with your child.
- Glue small bottle caps, clay blobs, foam rectangles, or folded cardboard tabs at each mark.
- Designate the center holder as the helper candle spot by making it taller or decorating it differently.
Step 6: Final Touches and Drying Time
Once everything is assembled, allow glue and paint to dry completely before any active play. When the menorah is ready, invite your child to practice placing each candle in its spot and naming the numbers one through eight.
- Add soft pads or extra cardboard under the base if it wobbles.
- Write your child’s name and the year on the back or bottom for a keepsake touch.
- Place the finished menorah in a visible but safe location where kids can access it daily during Hanukkah.
Adapting the Craft for Different Ages
The same general concept can be tailored for toddlers, early elementary children, and older kids with only minor adjustments. Changing the level of detail, tools, and responsibility keeps the project developmentally appropriate and enjoyable.
For Toddlers and Preschoolers
- Pre-cut all shapes and use large, easy-to-grip candle pieces.
- Focus on simple actions such as gluing, sticking, and placing objects in holders.
- Keep sessions short and consider decorating the base one day and the candles on another.
For Early Elementary Children
- Invite kids to help design the layout and choose colors or themes for the menorah.
- Introduce more detailed decorations like patterns, symbols, or simple Hebrew letters.
- Encourage them to tell or retell the Hanukkah story in their own words while crafting.
For Older Kids
- Let them handle more measuring and planning, such as evenly spacing holders or designing a layered base.
- Explore mixed media, such as combining paint with collage materials or creating a faux-stone or metallic effect.
- Invite them to design a small instruction card or display sign explaining the symbolism of each part of their menorah.
Safety Considerations for a Child-Friendly Menorah
Because this project is designed primarily for play and learning, real open flames should be kept completely separate from the craft. Families who also use a traditional menorah with candles can display the two side by side but treat them very differently.
- Never insert real candles into a craft menorah made of cardboard, foam, or other flammable materials.
- Store strong glues, cutting tools, and small embellishments out of reach when not in direct use.
- Choose flame alternatives—paper flames, LEDs, or simply counting aloud—for any child too young to be near lit candles.
Turning the Menorah Into a Nightly Ritual
Once the menorah craft is complete, it can become part of a short, predictable ritual that children look forward to each evening of Hanukkah. Pairing a simple action with a few repeated words or a quiet moment of gratitude can give kids a sense of continuity and calm.
- Each night, have your child add one more candle or flame while counting the night number.
- Invite them to share something they are thankful for or something kind they did that day.
- Display the menorah on a shelf or side table where children can proudly show it to visitors.
Ideas to Customize Your Menorah Theme
Personalizing the menorah helps every child feel that the project truly belongs to them and reflects their interests. Themes can be subtle—such as color choices—or very literal, such as turning each candle into a favorite animal or character.
- Color story: Choose one or two main colors and repeat them throughout the base and candles.
- Nature-inspired: Add leaf shapes, small pebbles, or paper flowers (secured safely) for an earthy look.
- Stars and space: Use star stickers, planets, and swirling galaxies to suggest light in the night sky.
- Family story: Decorate each candle to represent a family member, friend, or ancestor.
Sample Night-by-Night Activity Ideas
In addition to using the menorah as a visual countdown, families can link each night to a small activity or theme. The aim is not to add pressure but to offer gentle prompts that deepen connection.
| Night | Prompt |
|---|---|
| 1 | Share one thing you are grateful for. |
| 2 | Name someone who helps you and decorate a paper star for them. |
| 3 | Tell a story about a time you felt brave. |
| 4 | Choose a toy or book to donate. |
| 5 | Draw a picture of your menorah and label the helper candle. |
| 6 | Call or message a relative to wish them a bright holiday. |
| 7 | Act out a short scene from the Hanukkah story with toys or puppets. |
| 8 | Look at the completed menorah and talk about your favorite moment of the holiday. |
Frequently Asked Questions
Can this craft be used in a classroom or group setting?
Yes, the project adapts easily for schools, community centers, or religious education programs. Provide each child with an individual base or have them collaborate on one large communal menorah with shared decorations.
How long does the project usually take?
The time varies depending on the complexity and the number of children involved, but most families can complete a simple version in one extended afternoon. For younger kids or groups, breaking the craft into two or three shorter sessions—base one day, candles another—keeps energy levels and focus manageable.
What if we do not have many craft supplies?
The heart of the project is the idea, not fancy materials. Plain cardboard, scrap paper, crayons, and tape are enough to create a meaningful menorah that kids will enjoy and remember.
Is it okay to let kids handle a traditional menorah after doing this craft?
Many families introduce a craft menorah as a practice tool and keep real candles strictly under adult control. As children grow older and show readiness, adults can invite them to participate in specific, supervised tasks such as helping place candles in a traditional menorah.
How can we store the menorah after Hanukkah?
Once the holiday ends, wrap the menorah in tissue paper or bubble wrap and store it in a labeled box with other seasonal decorations. Bringing out the same handmade menorah next year can spark conversation about growth, memories, and new ideas for small updates or additions.
Bringing Light to the Holiday Through Creativity
A kid-friendly menorah craft invites children to participate fully in Hanukkah by giving them an object they designed and built with their own hands. Through color, texture, and playful ritual, the project transforms the concept of light into something tangible, comforting, and uniquely theirs.
Whether you choose simple materials or add intricate details, the real glow comes from the time spent together and the stories shared as the menorah takes shape and shines throughout the festival of lights.