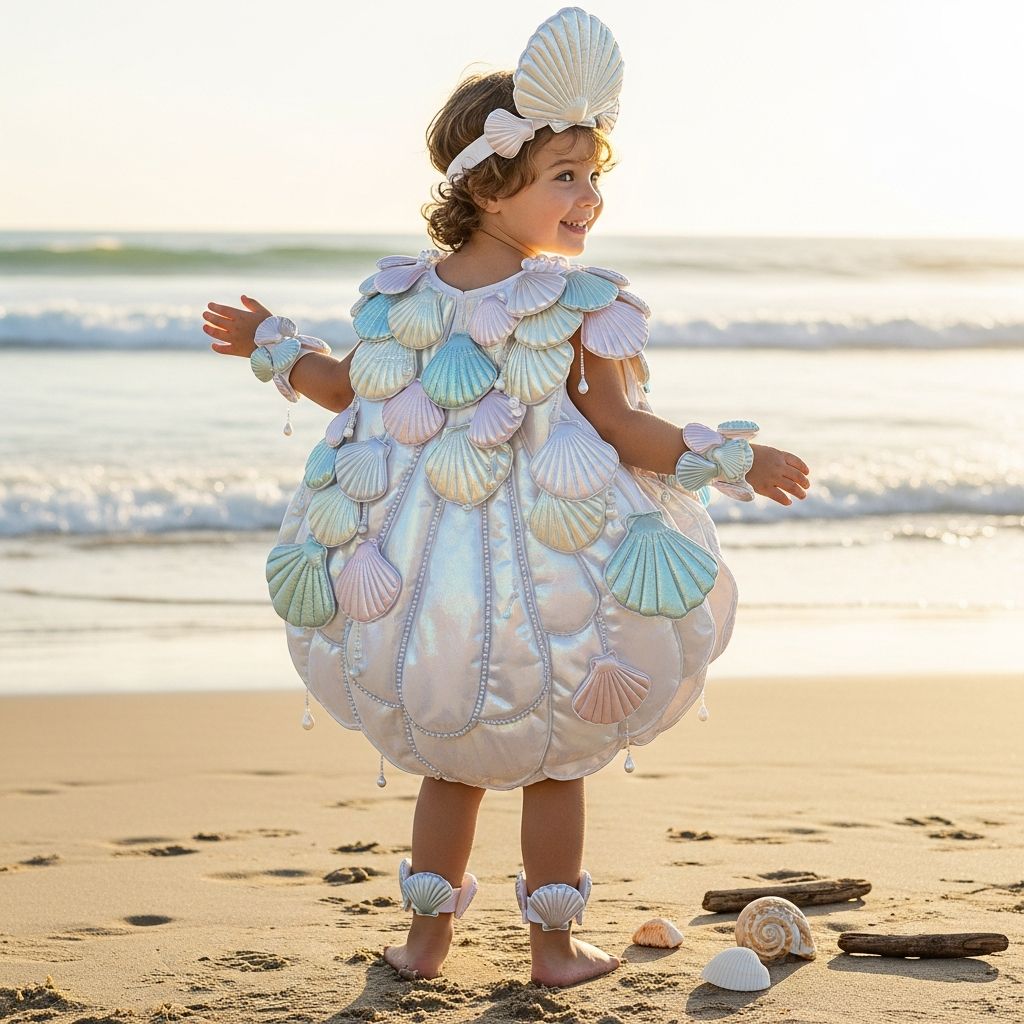
Few costumes feel as magical as an under-the-sea seashell outfit. With a bit of cardboard, paint, and imagination, you can turn a regular day into a beachy adventure your child will remember for years. This guide walks you through every step of creating a seashell costume that is safe, lightweight, and comfortable for kids.
Instead of relying on store-bought costumes, this project lets you customize colors, details, and accessories so the final look matches your child’s personality—sparkly, pastel, bold, or anything in between.
Why Make a Seashell Costume at Home?
Building a costume from scratch offers creative freedom and a chance to craft something durable and unique. A seashell design works especially well for ocean-themed parties, school plays, Halloween, or just imaginative dress-up time.
- It uses commonly available materials like cardboard, paint, ribbon, and glue.
- The shape is simple enough for beginners but still looks impressive when finished.
- Kids can help with sketching, painting, or decorating for a fun, collaborative project.
Planning Your Seashell Design
Before cutting or painting, spend a few minutes deciding how you want the costume to look and fit. This planning stage prevents mistakes and helps you gather everything you need in one go.
Decide on the Style
The basic shape is a stylized fan shell or scallop shell. You can choose soft pastel tones, pearly white, or bright tropical colors depending on your child’s preferences and the event.
- Classic shell: Soft pinks, creams, or sandy beige with subtle shading.
- Fantasy shell: Iridescent paints, glitter, or metallic accents for a magical look.
- Bold shell: Teals, purples, and blues for a more vivid, cartoon-like style.
Back, Front, or Both?
You can build the costume as just a back piece, or as a front-and-back “sandwich board” style. Each option has pros and cons:
| Style | Pros | Cons |
|---|---|---|
| Back-only shell | Lightweight; easier to sit down; faster to make. | Less dramatic from the front; may twist if straps are loose. |
| Front-and-back shell | Very eye-catching; looks complete from every angle. | A bit heavier; needs careful strap placement for comfort. |
| Small chest shell | Minimal bulk; pairs well with leggings or a dress. | More like an accessory than a full costume. |
Materials and Tools
The exact list of supplies will vary slightly based on your design, but the following basics will get you started.
Core Materials
- 2 large pieces of sturdy cardboard (or lightweight foam board for a smoother finish).
- Acrylic or spray paint in at least two coordinating shell colors (light and dark).
- Wide ribbon, soft webbing, or fabric straps for shoulder straps and side ties.
- Masking tape or painter’s tape for reinforcing edges.
- Hot glue gun with glue sticks (or strong craft glue for kids to assist).
Tools and Optional Decorations
- Pencil and large sheet of scrap paper for sketching the shell template.
- Scissors or heavy-duty craft knife (adult use only for sharp tools).
- Paintbrushes in various sizes for details and shading.
- Glitter glue, sequins, flat gems, or craft foam accents for texture.
- An old headband, elastic, or hair clips if you want to add a matching headpiece.
Safety and Comfort Considerations
Even the cutest costume should never come at the expense of safety or comfort. A child who can move freely and breathe easily is far more likely to enjoy wearing the costume for an entire event.
- Ensure all sharp edges are rounded and taped or sanded smooth.
- Keep straps snug but not tight, and avoid anything that presses on the neck.
- Use non-toxic paints and let them dry fully before your child wears the costume.
Step 1: Sketch and Cut the Shell Shape
Begin by drawing a large shell outline on paper or directly onto the cardboard. Think of a fan shape with soft, rounded ridges radiating from a narrower base.
- Measure your child from shoulders to mid-thigh to estimate the shell height.
- Lightly sketch a half-circle or fan shape that matches this height plus a few extra centimeters.
- Add scalloped curves around the top edge, forming 5–7 rounded sections.
- Once satisfied, cut out the paper template and trace it onto the cardboard twice—once for the front and once for the back if you are making a full shell.
When cutting cardboard with a craft knife, an adult should work on a protected surface, making several shallow passes rather than forcing the blade through at once.
Step 2: Add Structure and Texture
Real seashells often have raised ridges and a slightly curved surface. You can mimic this with layered cardboard or strips of craft foam glued to the main shape.
- Cut narrow strips of cardboard or foam from top to bottom of the shell, slightly curved.
- Glue these strips onto the base layer, spacing them evenly like ribs.
- Reinforce the lower portion of the shell with an extra wedge of cardboard if it feels flimsy.
This simple texturing step gives the shell dimension and makes painted highlights and shadows stand out more clearly later on.
Step 3: Prepare the Surface for Paint
Cardboard can soak up paint quickly, so taking a moment to prep the surface will give your costume a cleaner, more polished look.
- Cover raw edges with masking tape to hide corrugation and prevent flaking.
- If you want a smoother finish, brush on a thin coat of white craft paint or primer and let it dry.
- Lay down old newspaper or a drop cloth if you are painting indoors.
Step 4: Paint the Seashell
Painting is where the shell really comes to life. Use at least two shades of your chosen color—one light and one darker—to suggest depth.
- Apply a base coat in the lightest color over the entire shell and let it dry.
- With a slightly darker shade, brush along the ridges and inner curves to mimic natural shading.
- Blend the darker lines gently so transitions look soft rather than harsh.
- Add small touches of white or pearly paint near the center for a gentle highlight.
If you are using spray paint, work outdoors or in a very well-ventilated area and keep children at a safe distance during spraying and drying.
Step 5: Attach Shoulder Straps
Comfortable straps are essential for a kid-friendly costume. Ideally, use wide ribbon or soft webbing to prevent digging into the shoulders.
- Hold the shell up to your child’s back to mark approximate strap locations on the top corners.
- Punch or carefully cut small holes where the straps will pass through.
- Thread ribbon through each hole, knotting on the inside and reinforcing with hot glue.
- For a front-and-back shell, connect straps over each shoulder like a sandwich board, adjusting length so the shell sits comfortably.
Check that your child can raise their arms, turn, and sit without the straps slipping or cutting into their skin.
Step 6: Secure Side Ties or Waist Strap
To keep the shell from swinging or shifting as your child moves, add ties at the sides or a single strap that wraps around the waist.
- Attach short lengths of ribbon at the lower sides of the shell and tie them loosely under the arms.
- Alternatively, create a horizontal strap that reaches around to the front and fastens with Velcro.
- Always leave enough room for breathing and easy movement.
Step 7: Add Sparkle and Under-the-Sea Details
Once the paint has fully dried and the straps are secure, it is time to decorate. This step is perfect for kids to join in, using safe, child-friendly materials.
- Outline selected ridges with glitter glue to catch the light.
- Glue on flat gems, faux pearls, or small foam shapes resembling sea stars and bubbles.
- Add subtle dots of metallic paint near the edges for a shimmering border.
Try not to overload the shell with heavy decorations; the costume should remain easy to wear for extended periods.
Coordinating Clothing and Accessories
The shell is the centerpiece, but coordinating clothes and a few accessories will complete the under-the-sea theme without much extra work.
Base Outfit Ideas
- Leggings in ocean colors like teal, aqua, or soft coral.
- A plain long-sleeve top or turtleneck that matches the shell tones.
- Comfortable shoes or rubber boots, especially if the costume is for outdoor events.
Optional Headpiece
A simple headband can be turned into a sea-inspired crown with just a few additions.
- Wrap the band in ribbon that matches the straps.
- Glue on small shells (lightweight craft versions), foam stars, or faux pearls.
- Add a small tulle bow or cluster of ribbons at one side for extra flair.
Making the Costume Easy to Store and Reuse
After the event, you may want the costume to live on in your child’s dress-up collection or be reused for siblings. A bit of planning will keep it in good shape for future adventures.
- Let any remaining glue or paint fully cure before storing.
- Hang the shell from its straps in a closet, or lay it flat where it will not be bent.
- If straps are adjustable, the same costume can fit children across several years.
Simple Variations on the Seashell Theme
Once you understand the basic structure, you can adapt this project into other ocean-inspired costumes using similar techniques and materials.
- Clam shell with pearl: Add a large faux pearl shape near the base and lean into white and cream tones.
- Rainbow shell: Divide the shell into wide vertical stripes and paint each in a different bright color.
- Sea treasure shell: Glue on plastic coins, gems, and faux gold chain to suggest hidden treasure.
SEO-Friendly FAQs About Seashell Costumes
How do I make a seashell costume comfortable for a child?
Use lightweight materials such as cardboard or foam board and keep the shell size proportional to your child’s height. Wide, soft straps and smooth edges help prevent rubbing, while a loose waist strap or side ties hold the shell in place without restricting movement.
What paint is best for a DIY seashell costume?
Acrylic paint is ideal because it adheres well to cardboard, dries relatively quickly, and is available in many colors, including metallic and pearly finishes. If you choose spray paint, apply it in a well-ventilated area and allow extra drying time before handling or decorating.
Can kids help make the seashell costume?
Yes, children can safely assist with sketching the shape, choosing colors, painting broad areas, and adding decorations like glitter glue or flat gems. Adults, however, should handle any cutting with sharp tools, hot glue, and spray paint to keep the process safe.
How do I keep the seashell costume from bending or collapsing?
Reinforce the lower portion and central ridges with extra layers of cardboard or foam, and avoid oversized shells that are too tall for the wearer. Storing the costume flat or hanging it by the straps when not in use will help preserve its structure over time.
What should my child wear under a seashell costume?
Comfortable basics such as leggings and a fitted long-sleeve shirt in coordinating colors work best under a shell costume. Choose breathable fabrics so your child stays comfortable whether the costume is worn for a short party or a full evening of trick-or-treating.