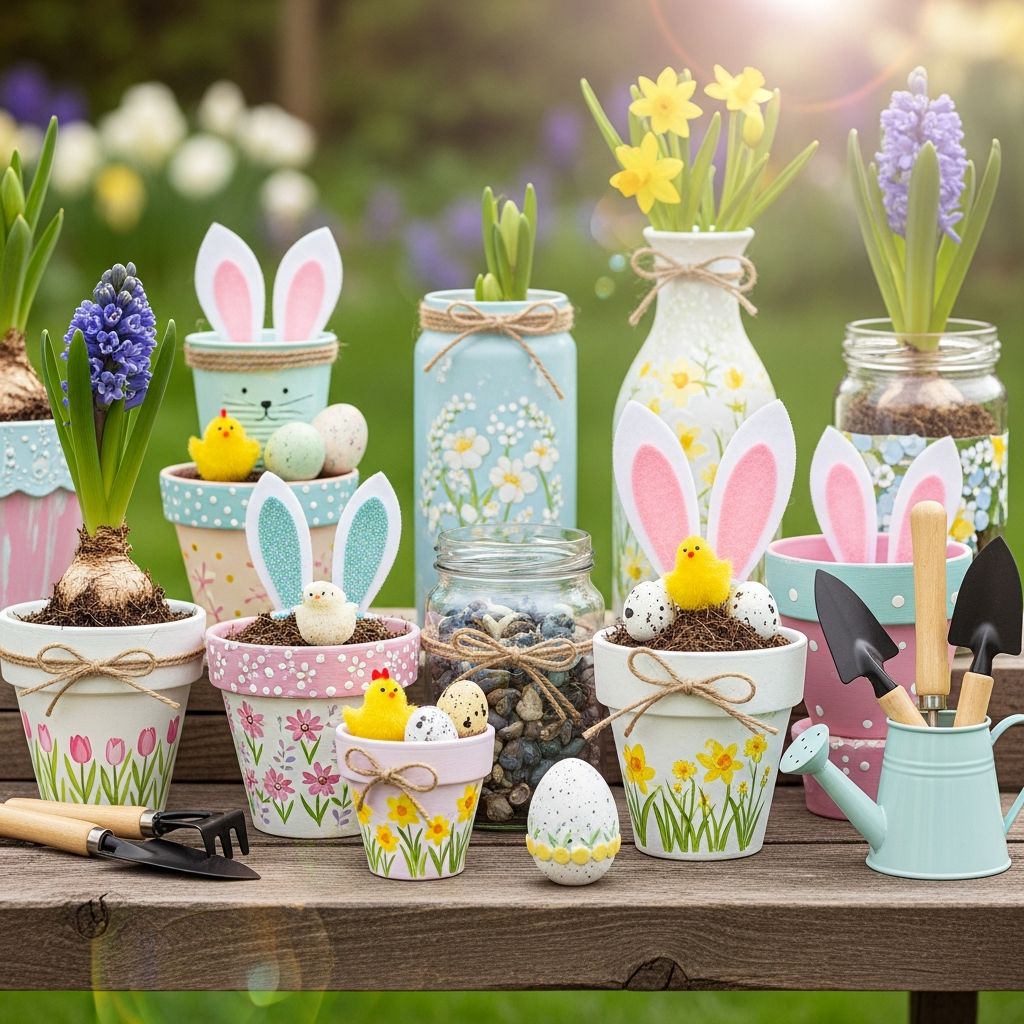
Easter is the perfect excuse to surround your home with flowers, soft colors, and playful handmade décor. Instead of buying generic decorations, you can turn simple containers into charming Easter flower pots and vases that feel personal, meaningful, and fun to make as a family.
Why Make Your Own Easter Flower Containers?
Designing your own Easter pots and vases lets you match your exact color palette, theme, and table setting while reusing materials you already have at home. It also turns decorating into an activity, not just an errand, giving kids and adults a relaxed way to be creative together.
Homemade containers work as centerpieces, mantle accents, windowsill displays, or even as thoughtful gifts for teachers, neighbors, and grandparents. Because most supplies are inexpensive and easy to find, you can create a whole collection without straining your budget.
Choosing Containers: From Recyclables to Keepsakes
Almost any waterproof container can become an Easter flower pot or vase with a little paint and imagination. The key is to think beyond store-bought planters and pay attention to shapes, sizes, and textures that will look good once decorated.
- Glass jars: Jam jars, mason jars, and sauce jars make simple, elegant vases once labels are removed.
- Metal cans: Clean food cans provide a sturdy base and take paint well when lightly sanded.
- Terracotta pots: Classic plant pots are porous, natural looking, and perfect for outdoor or indoor displays.
- Ceramic mugs: Mismatched mugs or chipped cups can become quirky, one-of-a-kind flower holders.
- Small buckets or pails: Mini metal buckets add a rustic, farmhouse feel to your Easter table.
For fresh flowers, choose containers that do not leak and can safely hold water. For faux flowers or paper blooms, you can use almost any solid container, even cardboard tubes reinforced inside another cup.
Essential Tools and Supplies
You can keep this project simple or build a more advanced setup depending on what you have. Start with the basics and then add extras if you want more detail or texture in your designs.
| Category | Examples | Notes |
|---|---|---|
| Containers | Glass jars, cans, terracotta pots, ceramic mugs | Wash thoroughly; remove labels or dirt before decorating. |
| Paint & Primers | Acrylic craft paint, spray primer, gesso | Choose non-toxic paint if kids are helping; primer improves adhesion. |
| Adhesives | Craft glue, hot glue (for adults), glue dots | Use stronger glue for 3D elements like buttons or faux flowers. |
| Decorative Elements | Ribbon, twine, lace, felt, stickers, buttons, sequins | Mix flat and 3D details for added depth and interest. |
| Fillers | Stones, marbles, floral foam, shredded paper | Stabilize stems and raise shorter flowers in deeper containers. |
| Tools | Paintbrushes, sponge brushes, scissors, permanent markers | Fine-tip markers help with faces, patterns, and lettering. |
Preparing Containers for Decorating
Preparation is the unglamorous step that makes your finished pots and vases look neat and last longer. Take a few minutes to clean, dry, and lightly condition each container before adding any paint or embellishments.
- Wash and dry: Remove labels with warm, soapy water and scrape off adhesive. Let containers dry completely to avoid peeling paint.
- Lightly sand slick surfaces: On glass, metal, or glossy ceramic, a quick rub with fine sandpaper or a sanding sponge helps paint grip better.
- Apply primer (optional but helpful): A coat of white gesso or spray primer gives you a neutral base and makes colors appear brighter.
- Protect work surfaces: Lay down newspaper, cardboard, or an old tablecloth so kids can work freely without worrying about spills.
Simple Easter Design Themes to Try
Choosing a theme before you start helps all your containers feel coordinated even if each person decorates in their own style. You can stick to one theme for the whole table or assign a different idea to each family member.
- Soft spring pastels: Use pale pinks, blues, yellows, and greens with simple dots, stripes, or color blocking.
- Bunny characters: Add cute faces, long ears made from felt or paper, and tiny painted noses and whiskers.
- Egg-inspired patterns: Cover containers with zigzags, chevrons, and small dots inspired by decorated eggs.
- Garden meadow: Paint simple flowers, blades of grass, and tiny insects like ladybugs or butterflies.
- Faith-focused motifs: Use subtle crosses, doves, or simple rays of light if your celebration includes religious symbolism.
Step-by-Step: Painting the Base Layer
The base layer is the foundation of your design. A smooth, even background color makes every other detail look more intentional and professional, even when kids are the main artists.
- Choose your base color: Select a shade that fits your theme and will contrast nicely with the flowers you plan to use.
- Apply thin coats: Use a brush or sponge to apply one thin layer of paint. Allow it to dry before adding a second or third coat instead of trying to cover everything at once.
- Let dry completely: Set containers aside in a dust-free spot while you plan the details. Rushing this step can cause smudges and fingerprints.
- Seal if needed: For outdoor displays or high-moisture areas, add a clear, water-based sealer to protect your work.
Adding Easter Details and 3D Accents
Once the base is dry, the fun really begins. You can keep things minimal with a few subtle accents or go all-out with layered textures and bright, playful decorations.
- Painted patterns: Use smaller brushes to add stripes, polka dots, tiny hearts, or simple flowers around the container.
- Faces and characters: Draw bunny or chick faces with permanent markers, then add ears, wings, or tails made from felt, paper, or pom-poms.
- Wraps and borders: Glue on ribbons, lace, or twine around the rim or base for a soft, finished edge.
- Lettering and messages: Add words like “Spring”, “Joy”, or short names for place settings using stencils or freehand script.
- Layered embellishments: Attach buttons, sequins, or small wooden shapes to create dimension and sparkle.
Kid-Friendly Crafting Tips and Safety
Easter flower pot projects are ideal for children when the setup is thoughtful and safe. Adjust tools and techniques to match the age and attention span of each child, and keep the focus on fun rather than perfection.
- Offer washable, non-toxic paints and child-safe scissors for younger kids.
- Pre-tape or pre-draw simple shapes so children can paint inside guidelines if they like structure.
- Reserve hot glue, glass cutting, or spray paints for adults or older teens, keeping small helpers at a distance.
- Place smocks or oversized T-shirts over clothing and have a damp cloth nearby for quick cleanups.
Filling Your Pots: Fresh, Faux, and Beyond
Once the containers look festive, it is time to decide what goes inside. You can keep things simple with a grocery store bouquet or assemble a more elaborate arrangement that stays on display for weeks.
- Fresh flowers: Fill watertight containers with clean water, trim stems at an angle, and mix greenery with blooms for a full, natural look.
- Potted plants: Nestle small spring plants like mini daffodils or herbs inside your decorated pots for longer-lasting color.
- Faux flowers: Use silk blossoms, paper flowers, or felt florals for reusable centerpieces that store easily.
- Non-floral fillers: Try wrapped candies in cellophane, dyed eggs, or pastel-colored candles for an unconventional twist.
If a container is not waterproof, tuck a smaller glass or plastic cup inside to hold water, or stick with faux stems and dry fillers like shredded paper or moss.
Display Ideas for Tables, Mantles, and More
Thoughtful placement can turn a handful of simple pots into a complete Easter decorating scheme. Grouping containers and varying heights creates a sense of movement and interest that looks intentional and polished.
- Line three to five small vases down the center of your dining table, alternating flower colors and container styles.
- Cluster varied heights on a mantle or sideboard, mixing taller vases with shorter pots and a few candles.
- Place a mini pot at each place setting with a name tag tied around it to double as a favor and place card.
- Brighten a windowsill with lightweight jars or mugs where natural light will highlight the colors and textures.
Using Easter Pots as Gifts and Favors
Handcrafted flower pots and vases make thoughtful gifts that feel personal without requiring complex skills. They are easy to customize with names, favorite colors, or small details that reflect the recipient.
- Fill a small pot with a mini plant, then tie a tag with a short message such as “Thanks for helping me grow” for teachers or mentors.
- Create a set of coordinating vases as a host or hostess gift, wrapped together in tissue paper and placed in a reusable basket.
- Let kids each decorate one container for a grandparent, then deliver them along with fresh flowers as part of the Easter visit.
Common Issues and Easy Fixes
Even simple crafts sometimes come with small challenges. Fortunately, most problems with painted flower pots and vases are easy to correct with a few quick tricks and a bit of patience.
| Problem | Likely Cause | Quick Solution |
|---|---|---|
| Paint streaks or uneven coverage | Paint applied too thickly or surface not primed | Let dry, sand lightly if needed, and add one or two thin coats. |
| Paint peeling from glass or metal | Surface too smooth or greasy | Clean with soap and water, lightly sand, use primer, and repaint. |
| Decorations falling off | Glue not strong enough for heavy embellishments | Switch to stronger craft glue or hot glue (for adults) and press firmly. |
| Water damage on paint | No sealant or container not watertight | Use an inner liner cup for water or seal the outer surface with a clear coat. |
Frequently Asked Questions
Do I need special paint for flower pots and vases?
Acrylic craft paint works well on most surfaces, especially when paired with a primer. For outdoor pieces, choose paints labeled for multi-surface or outdoor use and add a clear sealer to help them withstand moisture and sunlight.
How can I protect my designs from chipping?
Allow each paint layer to dry fully before handling, and consider sealing the finished design with a water-based clear coat. Avoid scrubbing the decorated areas and wash gently by hand instead of using the dishwasher.
What if I do not have real flowers?
You can still create beautiful arrangements using faux stems, dried flowers, paper blooms, or even decorative branches. Another option is to fill the containers with wrapped candies, Easter eggs, or tealight candles for a different kind of centerpiece.
Can young children participate safely?
Young children can absolutely join in if you provide age-appropriate materials and supervise closely. Offer washable paints, pre-cut shapes, and larger embellishments that are not choking hazards, and keep hot tools and sharp objects in adult hands only.
How far in advance can I make these decorations?
The containers themselves can be decorated weeks ahead of time and stored once the paint is fully dry. If you are using fresh flowers, add them one or two days before your gathering so they still look vibrant on Easter day.
Bringing It All Together
Creating Easter flower pots and vases is less about flawless technique and more about capturing the joyful, hopeful feel of spring. With a few basic supplies and a willingness to experiment, you can transform ordinary containers into meaningful decorations and gifts that reflect your family’s personality.
Whether your style leans toward soft, subtle pastels or bright, playful characters, these handmade pieces will add warmth to your celebration and become part of the traditions you look forward to repeating each year.