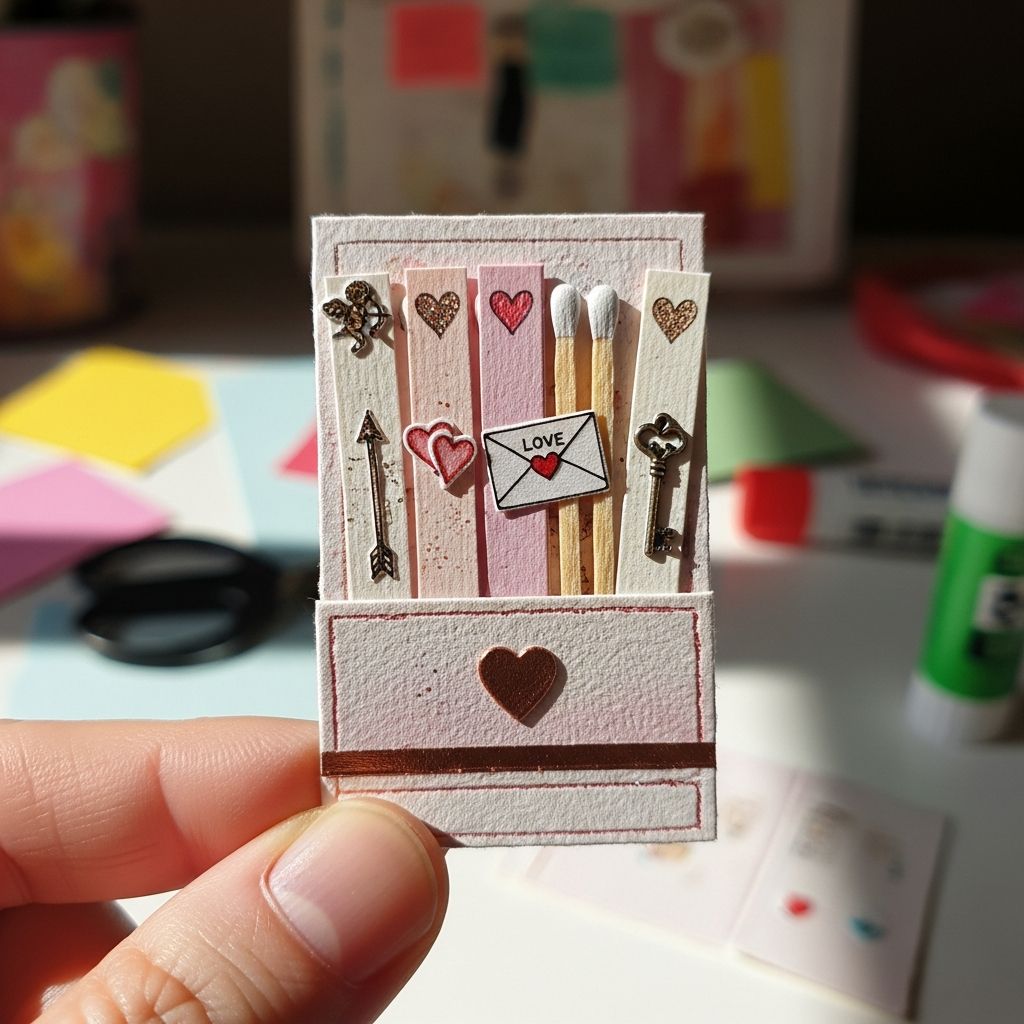
Valentine’s Day is the perfect excuse to combine creativity, color, and a little surprise factor, and matchbook-inspired cards do all three in one tiny, clever package. These miniature fold-over cards look like classic matchbooks but hide a sweet note, sticker, or treat inside instead of matches.
Why Matchbook-Style Valentines Are So Charming
Matchbook-style Valentine cards stand out because they are interactive, compact, and easy to personalize for classmates, coworkers, or family members. Instead of a flat card, the recipient opens a flap and discovers a tucked-away message or goodie, which instantly makes the card feel more special.
They are also incredibly efficient for group giving: one standard sheet of cardstock can yield multiple mini cards, and the simple folding pattern makes them suitable for both kids and adults to assemble. Bonus: they store and stack neatly, which is a lifesaver when you are making dozens for a classroom or party.
Essential Supplies and Tools
You do not need an elaborate craft room to make matchbook-inspired Valentines. A few basic tools and materials will take you from idea to finished card in an afternoon.
- Cardstock or heavy paper: Choose sturdy paper so the front flap stays closed and the inside pocket holds its shape.
- Paper trimmer or scissors: A trimmer ensures straight, repeatable cuts when making many cards at once.
- Ruler and bone folder (optional but helpful): These help score and fold crisp lines for a polished look.
- Adhesive: Glue stick, double-sided tape, or a tape runner keeps edges neat without wrinkling the paper.
- Decorative elements: Markers, colored pencils, washi tape, stickers, rubber stamps, or small die-cuts.
- Treats or inserts: Mini candies, tea bags, temporary tattoos, stickers, or folded notes.
- Safety items for kids: Blunt-tip scissors and washable markers if young children are involved.
Basic Matchbook Valentine Structure
Although designs can vary, most matchbook-style Valentine cards share a core layout: a long rectangle folded into three sections so that a lower flap locks the top cover in place. Once you understand that structure, you can resize and embellish freely.
| Section | Approximate Size Ratio | Purpose |
|---|---|---|
| Bottom flap | About 20–25% of total height | Folds up to create a lip or pocket; often stapled or glued to hold the insert. |
| Middle body | About 45–55% of total height | Holds the message area or treat; can be flat or slightly raised. |
| Top cover | About 25–35% of total height | Folds down and tucks into the bottom flap, forming the front of the “matchbook.” |
You can cut a test strip from scrap cardstock to experiment with proportions before committing to a full batch. Once you like the fit, use that strip as a master guide to trace or measure additional pieces.
Step-by-Step: Classic Candy-Filled Matchbook Cards
This version mimics the familiar feel of a small candy pack, making it perfect for classroom exchanges. Adjust colors and decorations to match your recipient group or theme.
- Plan your finished size.
Decide what will go inside—such as a flat mini chocolate, wrapped gummy, or sticker sheet—then measure it. Add a little extra space on each side so the cover closes comfortably without bulging.
- Cut the card base.
From cardstock, cut long rectangles wide enough to cover your treat and tall enough to accommodate the three-fold design. For example, a strip around 5–6 inches tall and 2–2.5 inches wide works well for many mini candies.
- Score and fold.
Score one line for the bottom flap (about 1 inch from one end) and another line for the top cover (about halfway to two-thirds up from the opposite end). Fold along both lines, sharpening the creases with a bone folder or the flat edge of a ruler.
- Create the bottom pocket.
Fold the bottom flap upward and secure it along the edges with a small strip of double-sided tape or a staple in the center. Leave enough clearance for the top cover to tuck behind the staple or under the glued strip.
- Attach the treat or insert.
Place your chosen treat or note inside the middle section. Use a tiny piece of removable tape, a glue dot, or a small adhesive square to keep it from sliding out when the card is opened.
- Decorate the front cover.
Add a bold greeting, simple illustration, or patterned paper panel to the top cover. Keep the design fairly flat so the card still closes neatly; reserve dimensional embellishments for the inside if desired.
- Customize the inside message.
Write a short Valentine note on the inside panel above or below the treat. For mass gifting, consider printing a single message on multiple strips and gluing them into each card.
Kid-Friendly Variations for Classrooms
Matchbook-inspired cards are ideal for school celebrations, especially where you need many inexpensive yet memorable Valentines. Children enjoy the tiny-book feel and the tactile action of opening and closing the flap.
- Sticker surprise: Instead of candy, tuck in a small sheet of themed stickers. This keeps the project allergy-friendly and classroom-safe.
- Mini coloring cards: Print or draw a simple outline (heart, animal, robot) on a small insert that kids can color after opening the card.
- Classmate appreciation notes: Have children write one kind sentence about the recipient on a slip of paper and tuck it into the matchbook for a boost of positive connection.
- Reward coupons: Include fun, non-material “coupons” like extra story time, choosing a game, or a special classroom job.
To streamline a group activity, pre-cut the bases and pre-score the folds, then let kids focus solely on decorating and assembling. Provide a sample card so they can see how the top flap tucks into the bottom.
Grown-Up Designs: Elegant and Minimal
Matchbook-style Valentines are not just for kids. With refined materials and a restrained color palette, they transform into sophisticated mini gifts suitable for peers, partners, or coworkers.
- Monochrome palettes: Use shades of one color (for example, blush, rose, and deep burgundy) with a touch of metallic foil or gold ink for lettering.
- Tea or coffee tuck-ins: Fit a single tea bag or instant coffee sachet inside and label the front with a pun or simple sentiment like “You are my cup of tea.”
- Photo mini-book: Adhere a tiny photo strip inside and use the front flap for a short personal message or date reminder.
- Hand-lettered quotes: Letter a short romantic or friendship quote inside using brush pens, adding a subtle border or light watercolor wash.
For a more polished finish, trim corners with a corner rounder, layer textured paper on the front cover, or add a narrow ribbon band that slides off like a belly band instead of using a staple.
Creative Themes and Phrases
If you enjoy wordplay, matchbook-style cards provide endless opportunities for themed designs. The small front cover is an ideal spot for a short phrase paired with an image or treat that completes the idea when opened.
- Sweet treats: Pair candy with friendly puns, using images of hearts, donuts, or lollipops.
- Science and space: Use planets, rockets, or atoms on the front and tuck in star stickers or glow-in-the-dark shapes.
- Animals and pets: Create matchbooks featuring cats, dogs, or woodland creatures, each with a tiny accessory sticker inside.
- Hobbies and fandoms: Design cards around books, games, or music by using simple icons and matching the color scheme to a favorite series or team.
To keep designs cohesive, select two or three main colors per theme and repeat them in backgrounds, lettering, and embellishments.
Printing Tips and Template Suggestions
If you plan to make a large number of cards, creating a basic digital template can save time. A simple layout with faint cut lines and clear fold indicators makes batch production smoother and more consistent.
- Use light guide lines: Keep cut and fold lines subtle so they do not show once the card is finished; they should be easy to follow yet disappear under trimming or decoration.
- Leave blank spaces: Reserve empty areas for children to write names, or for you to add hand-drawn or stamped elements later.
- Test on regular paper first: Print a sample on standard printer paper to confirm dimensions before committing to heavier cardstock.
- Consider double-sided printing: Place patterns or soft colors on the reverse side of the cardstock so the inside of the matchbook looks finished without extra layers.
Safety, Classroom Rules, and Allergy Considerations
Whenever you are crafting for a group—especially children—take a moment to check school or event guidelines. Some places limit food items, require individually wrapped treats, or prefer non-food alternatives.
- Check for food restrictions: If nuts or certain candies are not allowed, substitute stickers, pencils, erasers, or small paper toys.
- Avoid loose glitter: Many classrooms discourage glitter because it is messy and hard to clean; consider glitter glue pens or metallic gel pens instead.
- Supervise staples and small items: If children are making the cards themselves, a grown-up should handle stapling, or swap staples for tape to prevent pinched fingers.
- Label clearly: If any card includes food, clearly mark the treat type somewhere discreetly on the back.
Displaying and Gifting Your Matchbook Valentines
These tiny creations are fun to hand out individually, but they also look delightful when displayed together. Their uniform size and shape make them easy to arrange in rows, stacks, or clusters.
- Valentine mailbox: Place them in a decorated box or basket at home or in the classroom so recipients can choose their favorite design.
- Ribbon garland: Clip each matchbook by the bottom flap to a string or ribbon using mini clothespins, creating a banner that doubles as decor.
- Desk surprises: Leave one on each coworker’s keyboard, or at each place setting for a Valentine’s brunch or dinner.
- Gift add-ons: Tie a matchbook card to the handle of a mug, a small plant, or a wrapped gift for an extra layer of thoughtfulness.
Because they are so compact, you can tuck a few extras into your bag to hand out spontaneously to friends or neighbors you see throughout the day.
Frequently Asked Questions
How long does it take to make one card?
Once you have a template and basic layout ready, a single matchbook-style Valentine typically takes only a few minutes to cut, fold, and decorate. For classroom quantities, consider working in stages—cut all bases first, then score and fold, then add decorations—to speed up the process.
What if I do not have a paper trimmer?
Scissors work perfectly well, especially if you lightly draw cut lines with a pencil and use a ruler as a straightedge. If you are crafting with kids, pre-drawing or pre-cutting the strips helps keep shapes consistent and prevents frustration.
Can I make these without candy?
Absolutely. Non-food options like stickers, temporary tattoos, friendship bracelets, confetti-filled envelopes, or mini activity prompts are all excellent fillers. This is particularly useful when you need allergy-friendly or sugar-free Valentine ideas.
How can I store finished cards before Valentine’s Day?
Keep them flat in a shallow box or tin, stacking them in rows like a deck of cards. If your design uses dimensional embellishments, place sheets of tissue paper between layers to prevent snagging or smudging.
Can matchbook-inspired cards be reused?
Many people keep them as keepsakes, especially if the inside message is personal or includes a favorite photo. If you craft them with removable inserts or coupons, recipients can refill them, add their own note, and pass the love along to someone else.
Final Inspiration: Make It Your Own
The appeal of matchbook-inspired Valentine cards lies in their flexibility: once you grasp the simple fold-and-tuck structure, you can scale, decorate, and fill them in endless ways. Whether you envision bright, whimsical cards for a classroom, minimalist designs for friends and coworkers, or a one-of-a-kind mini keepsake for a partner, this tiny format adapts to your style and supplies.
Gather your cardstock, choose a color palette, and create a small test card to refine your measurements. After that, turning a whole stack of paper strips into pocket-size Valentine joy becomes a satisfying, assembly-line project you will want to repeat year after year.