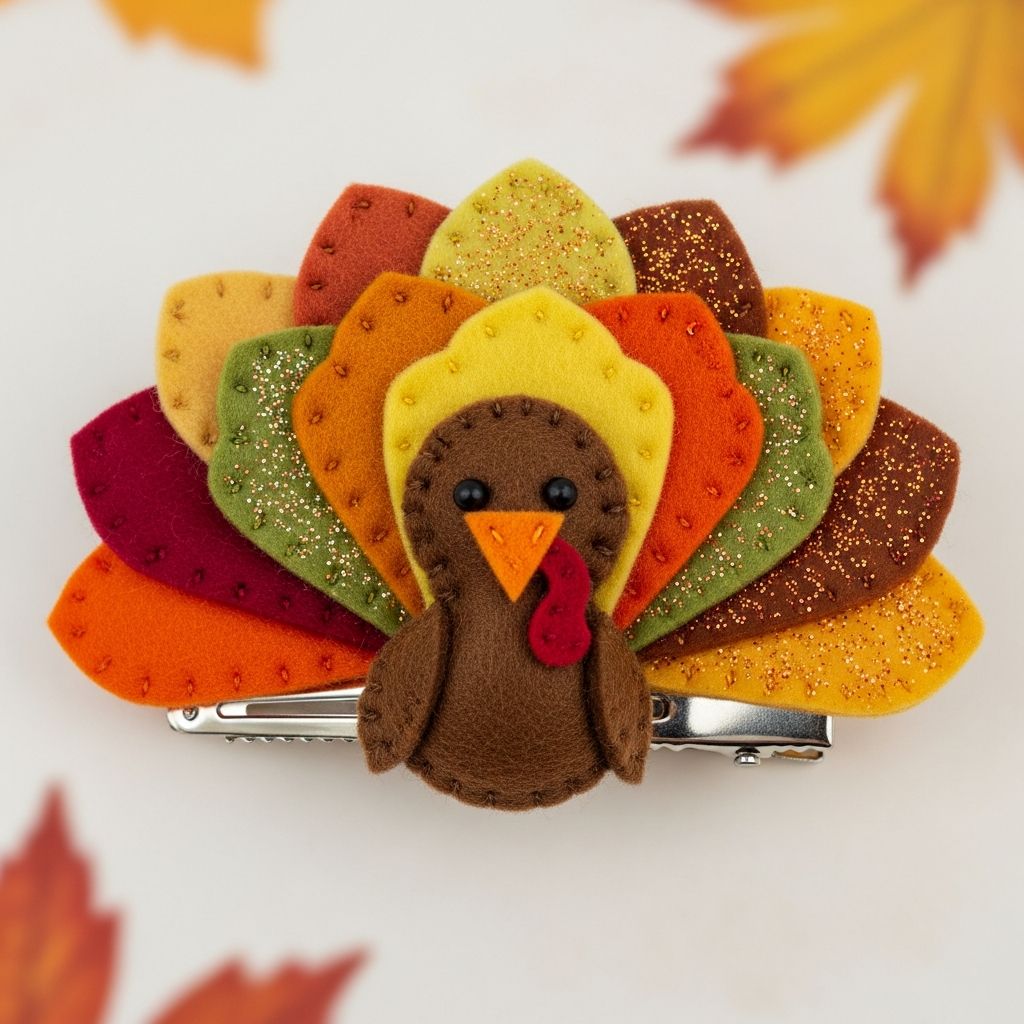
Thanksgiving is the perfect time to mix gratitude with creativity, and a handmade turkey hair clip is a fun way to do both. This project turns simple supplies into a playful accessory that kids love to wear and adults enjoy gifting or displaying. Whether you are preparing for a classroom celebration, a family dinner, or holiday photos, a turkey hair clip adds personality and charm to any outfit.
This guide walks you through everything you need to know: from gathering materials and cutting feathers to assembling the turkey face and attaching it safely to a hair clip. It is written to be easy enough for beginners but flexible enough for experienced crafters who want to customize colors and details.
Why Make a Turkey Hair Clip?
Handmade holiday accessories make celebrations feel more memorable, and a turkey hair clip is small enough to finish in one sitting but festive enough to stand out. Children enjoy watching a pile of ribbons, felt, or cardstock transform into a cheerful turkey they can actually wear.
- Great for using up leftover ribbon, fabric scraps, or small craft odds and ends.
- Simple to customize for different ages, outfits, or color schemes.
- Ideal as a party favor, place card embellishment, stocking stuffer, or classroom craft.
Materials and Tools You Will Need
You can adapt this project to supplies you already have, but the list below offers a reliable starting point. The exact colors and textures are up to you, so feel free to mix traditional fall shades with bright accent colors for a modern twist.
Basic supplies
- Plain metal hair clip or alligator clip
- Assorted ribbon or felt in at least three colors (browns, oranges, yellows, reds work well)
- Small piece of orange felt or foam for the beak
- Small piece of red felt or foam for the wattle
- Googly eyes or small black beads
- Hot glue gun and glue sticks (or strong craft glue for older kids)
- Sharp scissors suitable for fabric or ribbon
- Optional: thin cardboard or craft foam for backing
Optional embellishments
- Glitter glue or metallic paint pens for accent details
- Small flat-back rhinestones, sequins, or tiny buttons
- Fabric markers for drawing feathers or facial expressions
- Thin elastic headband if you prefer a headband instead of a clip
Planning Your Turkey Design
Before you plug in the glue gun, take a moment to decide what style of turkey you want to create. The overall look depends mainly on the shape of the feathers and the face, as well as how large or small you make the design.
- Classic look: Brown body, red wattle, orange beak, feathers in warm autumn shades.
- Playful look: Mix bright rainbow ribbons with patterned pieces like polka dots or chevron.
- Minimal look: Two or three feather colors, simple round body, and tiny beak.
Sketch a small outline on scrap paper if you like: a half-circle or fan shape for the feathers, and a circle or pear shape for the body. This doesn’t have to be detailed; it just helps you visualize size and placement before cutting into your materials.
Step-by-Step Instructions
The instructions below describe one straightforward method using ribbon feathers and a felt body, but you can swap in paper, cardstock, or foam if that better suits your supplies. Read through the steps first, then work at a pace that feels comfortable.
Step 1: Prepare the Feathers
The feathers create the fan-like backdrop for your turkey. Using multiple colors and textures will make your clip stand out and look fuller.
- Cut several strips of ribbon in equal lengths, usually between 3–4 inches for a child-sized clip.
- Use at least three colors. Aim for 8–12 strips for a full tail, adjusting depending on the width of your clip.
- Fold each strip into a loop with the ends overlapping slightly, then secure the ends together with a small dot of glue.
- Set the finished loops aside and allow the glue to cool or dry completely.
Step 2: Create the Feather Fan Base
To keep the feathers secure, glue them onto a small backing piece rather than directly onto the clip. This makes the turkey easier to handle while you work and helps it last longer.
- Cut a small oval or half-circle from thin cardboard, craft foam, or stiff felt. This should be slightly wider than your clip.
- Arrange a few ribbon loops around the top edge of the backing in a fan shape, with the folded ends at the center and the loops pointing outward.
- Glue the folded ends to the backing, spacing them evenly. Hold each loop in place for a moment so it sets firmly.
- Layer more loops in between the first row if you want a fuller turkey tail, staggering the colors as you go.
Step 3: Build the Turkey Body
The body sits in front of the feather fan and hides all the glued ends. A rounded shape tends to look cute and friendly, especially for children’s accessories.
- Cut a circle or rounded teardrop shape out of brown felt or foam, roughly the height of the feather fan.
- Cut a smaller circle or oval for the head if you want a two-piece design, or keep the body and head as one piece.
- Glue the head onto the body, overlapping slightly, and press gently until it holds.
Step 4: Add the Face and Details
This is where the turkey’s personality shines. Small variations in eye placement or beak size can make the bird look surprised, sleepy, or silly.
- Glue two googly eyes or small beads onto the head, leaving a small gap between them.
- Cut a tiny triangle from orange felt or foam for the beak and glue it just below the eyes.
- Cut a curved or teardrop-shaped strip from red felt or foam for the wattle and glue it next to or slightly under the beak.
- Optional: Add a dab of glitter glue around the feathers or trace a simple smile using a fabric marker.
Step 5: Attach the Body to the Feathers
Once the face and body are complete, you are ready to combine them with the feather fan. Make sure everything from earlier steps has dried or cooled before you move on.
- Place the turkey body over the feather fan to check the position. Adjust it until the ribbon loops frame the head evenly.
- Add a generous line of glue on the back of the body and press it onto the center of the feather backing.
- Hold the pieces together for several seconds, then set them aside until completely secure.
Step 6: Secure the Turkey to the Clip
The final step is attaching the finished turkey to your hair clip or headband. This is where neat, generous glue application matters most for durability.
- Open the clip and decide which side will face outward when worn.
- Apply a line of glue on the top flat side of the clip.
- Press the backing of the turkey firmly onto the glue, keeping the turkey centered and upright.
- Allow the glue to set completely before trying the clip in your hair.
Suggested Sizes and Proportions
To help you plan your project more precisely, the table below gives rough guidelines for different turkey sizes. You can adjust these as needed based on the thickness of your ribbon and the age of the person who will wear the clip.
| Clip Size | Recommended Turkey Height | Ribbon Length per Feather | Ideal Age Range |
|---|---|---|---|
| Small alligator clip | About 2 inches | 3 inches | Toddlers and young kids |
| Standard snap clip | 2.5–3 inches | 3.5–4 inches | School-aged children |
| Wide barrette | 3–3.5 inches | 4–4.5 inches | Teens and adults |
Tips for Crafting With Kids
This turkey hair clip craft is particularly fun as a group activity with children, but it does involve small pieces and hot glue. With a few simple adjustments, you can make it both safe and enjoyable for young helpers.
- Let adults or older teens handle the hot glue gun, while younger children place ribbons and choose colors.
- Pre-cut feather strips and body shapes before beginning a group activity to save time and reduce scissor use.
- Offer kid-friendly craft glue as an alternative, but add extra drying time to ensure the clip is secure.
- Use larger eyes and bigger felt pieces for toddlers to reduce choking hazards.
Creative Variations to Try
Once you have made one turkey hair clip, it is hard to stop at a single design. Change colors, materials, and themes to build a whole flock of turkeys with different personalities.
- Glittery Thanksgiving turkey: Use metallic ribbon or add glitter glue touches to feather tips.
- Monochrome turkey: Choose different textures in one color family, such as all golds or all browns.
- Character turkey: Give your turkey glasses, eyelashes, or a little felt bow tie for extra charm.
- Headband version: Glue the turkey onto a fabric-wrapped headband instead of a clip for younger kids who lose small pieces easily.
How to Style and Use Your Turkey Clip
Although it is designed as a hair accessory, your finished turkey can do more than decorate a ponytail. Its small size and flat back make it versatile for many Thanksgiving decorations.
- Clip it near a high ponytail or side bun for Thanksgiving dinner photos.
- Attach it to a fabric napkin to double as a playful napkin ring at the table.
- Use it as a decorative accent on a gift bag or homemade treat box.
- Display it on a bulletin board or wreath when not being worn.
Storage and Care
With a little care, your turkey hair clip can return to the celebration year after year. Avoid crushing the ribbon loops or exposing the glue to extreme heat.
- Store the clip in a small, rigid box or on a piece of cardboard to keep the feathers from bending.
- Keep it away from direct sunlight when not in use to prevent fading.
- If the feathers get wrinkled, smooth them gently with your fingers; do not use an iron directly on the ribbon or glue.
Frequently Asked Questions
Can I make this turkey clip without a hot glue gun?
Yes, you can use strong liquid craft glue or fabric glue, especially if you are crafting with children who should not handle hot tools. The main difference is drying time; allow several hours for the glue to cure fully before wearing the clip so the pieces do not shift.
What materials work best for the turkey body?
Felt, craft foam, and faux leather all work well for the body because they do not fray and hold their shape. Cardstock can be used in a pinch, but it is more likely to bend or tear, so it is better for decorative displays than for repeated wearing.
How can I adapt this project for a classroom?
For large groups, simplify the design by using fewer feather layers and pre-cut body shapes. Replace hot glue with child-safe glue sticks or liquid craft glue, and consider using paper clips or clothespins instead of metal hair clips to keep the project budget-friendly.
Is the turkey hair clip suitable for toddlers?
The design includes small parts, so extra care is needed for toddlers and babies. If you choose to make one for a very young child, use larger, securely glued pieces, supervise them closely while wearing it, and never let them sleep with the clip attached.
Can I wash the turkey clip if it gets dirty?
Most turkey clips are not washable in a machine because the glue and ribbon may not withstand agitation and water. Instead, spot-clean gently with a slightly damp cloth and allow the clip to air-dry completely before using it again.
Bring a Little Turkey Charm to Your Holiday
A handmade turkey hair clip is a small project with a big payoff: it encourages creativity, uses simple supplies, and adds a playful finishing touch to any Thanksgiving look. Once you create one, you may find yourself making additional versions as gifts, decorations, or keepsakes for family and friends.
Gather your ribbons, plug in the glue gun, and invite your household or crafting group to design a tiny turkey or two. It is a delightful way to slow down, make something with your hands, and welcome the holiday season with color, laughter, and imagination.