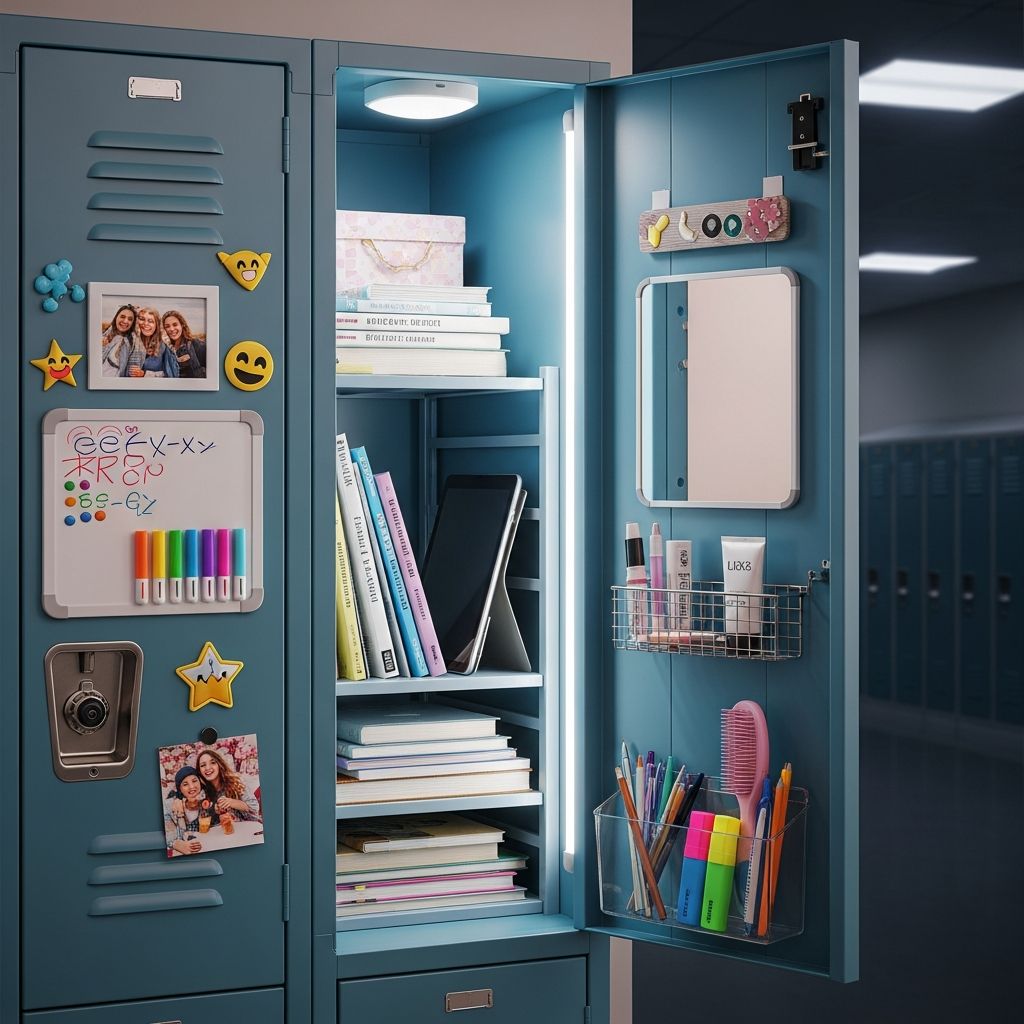
Your school locker is more than a metal box; it is the one tiny space that is completely yours during the school day. Decorating and organizing it can make mornings calmer, classes less stressful, and the whole year feel more fun.
This guide walks through how to plan a locker makeover, choose a style, create simple DIY decorations, and keep everything organized using affordable supplies and easy craft techniques. It is designed for kids, tweens, and teens, but parents can easily jump in and help.
Why Decorating Your Locker Matters
Locker decor is not just about looking cute; it also helps you keep track of books, homework, and supplies so you waste less time digging around between classes. A tidy, cheerful locker can even boost your mood during long school days.
When you treat your locker like a mini room, you start thinking about what you need every day: a calm color scheme, helpful storage, a place for reminders, and a few small things that just make you smile.
Step 1: Take Stock and Clean the Space
Before you add a single decoration, clear everything out of your locker. Toss old papers, broken pens, and snack wrappers, then wipe down shelves and walls with a damp cloth or wipes so your decorations will stick properly.
- Remove all items and sort them into three piles: keep, move to backpack, recycle/trash.
- Check school rules about decorations, tape, and magnets so you do not damage the locker or break any policies.
- Measure the height, width, and depth of your locker to avoid buying or making items that do not fit.
Step 2: Pick a Locker Style or Theme
Choosing a general style helps you avoid random clutter and keeps your locker looking pulled together. You do not need to follow a strict theme, but having a main look or color palette makes shopping and crafting easier.
Popular Style Ideas
- Minimal & Calm: Neutrals, clean lines, simple magnets, clear organizers.
- Bright & Fun: Bold colors, playful patterns, quirky magnets, and statement pieces.
- Nature Inspired: Soft greens, faux plants, wood-look paper, and earthy tones.
- Sporty: School colors, mini pennants, team photos, and bold typography.
- Artsy & Creative: Washi tape borders, mini sketches, and rotating art postcards.
| Style | Main Colors | Best For | Key Items |
|---|---|---|---|
| Minimal & Calm | White, beige, gray, soft blue | Students who get overwhelmed by visual clutter | Clear bins, simple mirror, plain magnets |
| Bright & Fun | Neon or bold primary colors | Anyone who wants their locker to feel energetic | Patterned background, colorful magnets, fun rug |
| Nature Inspired | Green, tan, soft browns, sky blue | Plant lovers and outdoor fans | Faux plants, wooden-look contact paper, leaf prints |
| Sporty | School colors and black/white accents | Team members or super fans | Mini pennants, schedule chart, small trophy shelf |
| Artsy & Creative | Mixed colors with one main accent | Artists, doodlers, and craft lovers | Mini corkboard, washi tape frames, rotating art |
Step 3: Plan the Inside Layout
A locker that looks great but does not function well will only frustrate you. Plan where books, supplies, and decorations will go before you start sticking things to the walls.
- Decide which shelf is for heavy textbooks and which area is for light items such as lunch or a sweater.
- Use the inside of the door for flat items: photos, a small whiteboard, a weekly schedule, and slim organizers.
- Leave a clear spot near the bottom or side for your backpack so it is easy to grab and go.
Step 4: Create a Background (No Paint Needed)
You can change the feel of your locker just by lining the back and sides. Instead of paint, rely on removable options so you can switch things up or move items without leaving a mess.
- Wrapping paper or scrapbook paper: Cut panels to size and attach with small magnets or removable putty.
- Fabric panel: Stretch cotton fabric over thin cardboard to make a removable wall that slides into place.
- Contact paper: Only use removable kinds, and avoid covering hinges or vents so the locker still functions.
If you are nervous about committing to a full background, start with a single panel in the back and see how it looks before adding more.
Step 5: DIY Magnets With Personality
Magnets do a lot of work in a locker: they hold schedules, keep reminders in sight, and act as tiny pieces of art. Making your own is an easy craft with big impact.
Simple Magnet Ideas
- Button magnets: Glue strong magnets to the back of flat buttons or enamel pins.
- Bottle cap magnets: Fill caps with a circle of pretty paper and seal with clear glue, then add a magnet to the back.
- Mini picture magnets: Print small photos of pets, friends, or hobbies, laminate or tape them, and attach magnets.
- Word magnets: Write short words or quotes on cardstock strips and glue to magnets to create your own phrases.
Group magnets in small clusters by color or style instead of spreading them randomly, which will keep your locker looking intentional instead of messy.
Step 6: Smart Storage That Looks Cute
The best locker is both stylish and easy to use. Focus on a few key storage pieces that match your style and actually solve problems you face during busy school days.
- Use a sturdy shelf to split tall lockers into upper and lower levels for books and supplies.
- Add a lightweight bin or basket for gym clothes, snacks, or items that usually end up in a heap.
- Stick a magnetic cup or caddy on the door for pens, highlighters, lip balm, or earbuds.
- Hang removable hooks for keys, ID lanyards, or a small bag.
| Problem | DIY or Store-Bought Fix | Where It Goes |
|---|---|---|
| Pens and pencils always lost | Magnetic pencil cup or decorated tin can with magnet strip | Inside of the door at eye level |
| Textbooks stacked in a heavy pile | Adjustable metal or plastic locker shelf | Center of locker, between floor and top |
| Loose papers everywhere | Vertical magazine file or slim plastic folder | Side wall or against back corner |
| Gym clothes and shoes smell | Ventilated basket with baking soda packet inside | Bottom of locker on one side |
| No place for reminders | Mini whiteboard, cork tile, or laminated to-do list | Top half of the door |
Step 7: Add a Tiny Comfort Zone
Small comfort items turn your locker into a place you actually enjoy opening between classes. The goal is to add a hint of coziness without wasting precious space.
- Stick a shatterproof mirror inside the door for quick checks before class or photos.
- Add a mini rug or piece of felt at the bottom to cover scuffs and catch dust.
- String a short length of battery-powered fairy lights along the top if your school allows it.
- Display one or two favorite photos in simple frames or washi tape borders.
Step 8: Think Safety and School Rules First
Before you commit to any decoration, check that it is safe, allowed, and respectful. Your locker decor should never block doors from closing, cover important labels, or create fire hazards.
- Avoid glass or heavy items that could fall and break.
- Use battery lights only, and never alter the school’s electrical system.
- Skip permanent glues, nails, or anything that scratches or dents the metal.
- Keep decorations appropriate and kind since teachers, staff, and classmates see your locker daily.
Step 9: A Five-Minute Daily Reset
A locker can go from neat to chaotic in a week if you ignore it. A short daily routine helps your decorations and systems actually work all year.
- At the end of each day, toss trash and move unneeded papers into your backpack or a folder.
- Put books back in their usual spots so you are not scrambling in the morning.
- Check your whiteboard or schedule and update any deadlines or practice times.
- Once a week, do a quick wipe-down and tighten or re-stick any decorations that are sliding.
Easy DIY Projects for Your Locker
If you want to go beyond store-bought accessories, try a few simple crafts that can be customized for any style or color scheme. These projects use basic supplies and can be finished in an afternoon.
1. Fabric-Covered Magnetic Board
This project gives you a soft-looking pinboard without using push pins or damaging the locker walls.
- Cut a piece of thin cardboard slightly smaller than your locker door.
- Wrap it tightly in fabric, securing the back with tape or glue.
- Glue several strong magnets to the back of the board.
- Stick it to the door and use decorative magnets to hold photos and notes.
2. Washi Tape Photo Frames
Washi tape lets you create colorful borders around photos without leaving residue. Pick one or two patterns that match your overall theme.
- Print out small photos or quote cards on thick paper.
- Use washi tape to create a simple rectangle or angled frame around each edge.
- Attach the finished pieces with magnets or removable putty.
3. Customized Supply Caddy
A decorated caddy keeps all your small items together and adds a pop of color to your locker door.
- Start with a plain magnetic pencil cup or a small plastic container.
- Cover the outside with patterned paper, fabric, or stickers.
- Seal with clear tape or a thin coat of craft glue so it can handle daily use.
Locker Decor FAQs
How can I decorate my locker on a small budget?
Focus on low-cost materials you might already have at home, such as wrapping paper for the background, recycled jars or cans for organizers, and hand-drawn art instead of store-bought posters. A few homemade magnets and one sturdy shelf often make a bigger difference than a pile of expensive accessories.
What if my school does not allow tape or adhesives?
Look for decorations that rely on magnets, tension, or removable panels. You can attach magnets to cardboard or foam boards covered in paper or fabric, then slide those panels in and out without sticking anything directly to the metal.
How do I keep my locker from getting smelly?
Use a small, ventilated container for gym clothes and remove them as soon as you get home. You can also place a tiny box of baking soda or a charcoal deodorizer on the bottom shelf to help absorb odors, as long as your school allows it.
Can I decorate my locker if I share it with someone?
Yes, but talk to your locker partner first and agree on a color scheme or divide the space vertically or horizontally. You can each have your own door section while keeping shared shelves neat and neutral.
How much decoration is too much?
If decorations make it hard to reach your books quickly, shut the door, or see what you have at a glance, it is probably too much. Aim for a balance: about half of the space for function and storage, and the rest for personality and decor.
Final Touches: Make It Yours
The best locker is not the one with the most decorations but the one that feels like it belongs to you and makes your school day easier. Mix a few meaningful items with smart organization and a simple daily reset, and your locker will stay both stylish and practical all year long.
Start small, change things as your schedule and interests shift, and remember that you can always refresh your design with a new photo, a different strip of washi tape, or a fresh set of DIY magnets.