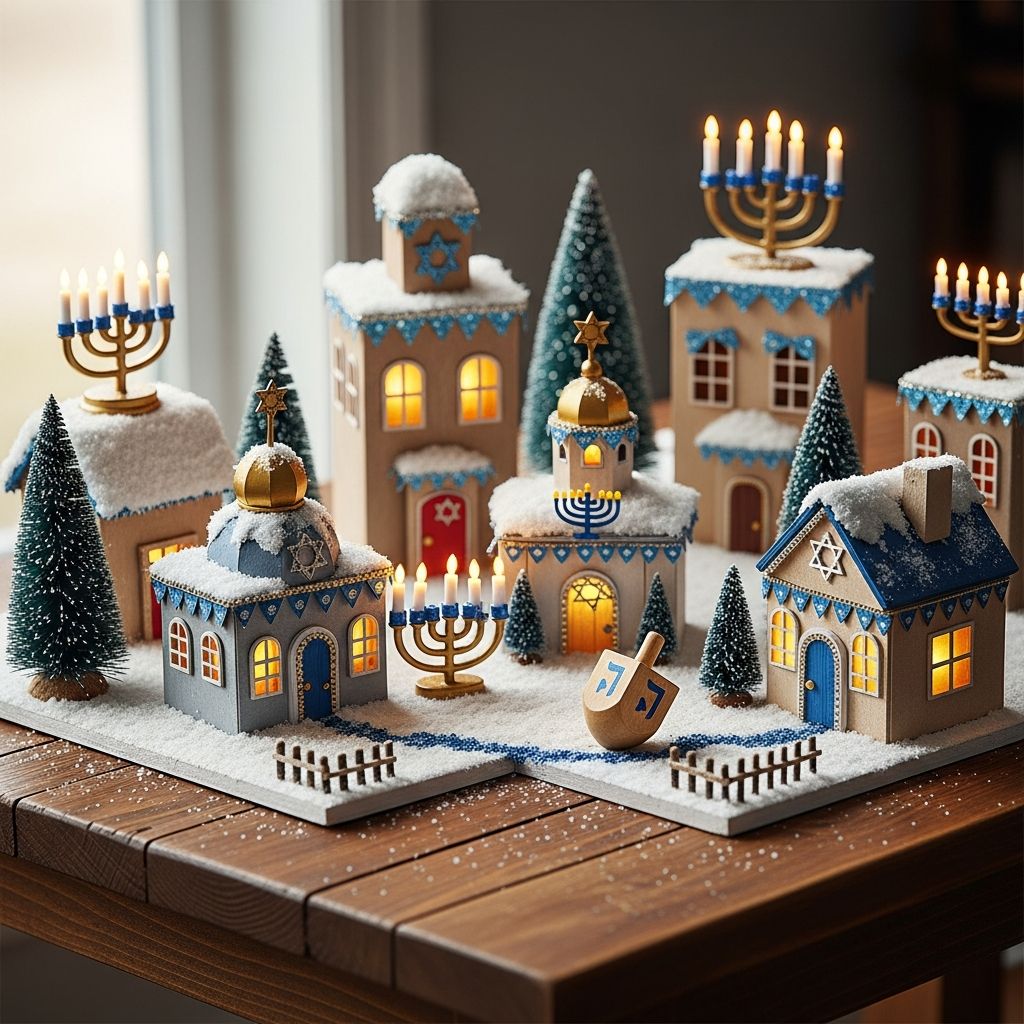
Transform a quiet corner of your home into a glowing, miniature Hanukkah village. This craft is inspired by the spirit of the Festival of Lights and turns simple materials into a cozy neighborhood of tiny homes, glowing windows, and shared light.
Beyond being adorable decor, a mini Hanukkah village can help children visualize community, practice fine motor skills, and learn about the themes of light, perseverance, and togetherness in a playful way.
Why a Mini Hanukkah Village Is a Special Craft
Hanukkah celebrates the rededication of the Second Temple in Jerusalem and the miracle in which a small amount of oil, enough for one day, burned for eight days. Many families mark the holiday with candles, songs, games, and foods fried in oil.
A miniature village builds on these traditions by:
- Highlighting light: Each little house can have a glowing window, lamp, or paper flame to recall the candles on the menorah.
- Emphasizing community: Kids can imagine neighbors visiting one another, sharing latkes, and lighting candles together.
- Encouraging storytelling: Every house can belong to a character or family with their own Hanukkah customs.
- Using simple, accessible materials: Cardboard, paper scraps, and recycled items keep the project low-cost and eco-friendly.
Planning Your Tiny Hanukkah Neighborhood
Before you begin cutting and gluing, take a few minutes to design your village together. This planning stage helps kids think about space, sequence, and design.
Decide on the Size and Setting
Pick a base that will hold your neighborhood:
- A sturdy piece of cardboard or foam board
- A shallow tray or box lid (easy to move or store)
- A windowsill or mantel, if you prefer to build directly on a surface
Talk about how many homes you want and what else belongs in a Hanukkah scene: a menorah in a window, a dreidel on a front step, or a pathway of tiny paper lanterns.
Sketch a Simple Village Layout
On paper, draw a quick top-down map of your village. Invite kids to help decide:
- Where each little house or building will sit
- Where walkways, trees, or lampposts might go
- Which house might host latke night or a dreidel game
This sketch does not have to be perfect; it simply helps everyone visualize the project.
Gathering Materials: Simple and Flexible
You can make this project almost entirely from items you already have at home. Mix and match from the ideas below.
| Category | Examples | Notes |
|---|---|---|
| Base | Cardboard, foam board, tray, box lid | Should be stiff enough to hold several small houses. |
| House Structures | Small boxes, cardstock, folded heavy paper, paper rolls | Different sizes create a more interesting “skyline.” |
| Decorative Paper | Colored paper, gift wrap scraps, tissue paper | Tissue paper makes glowing windows and lanterns. |
| Adhesives | Glue stick, white glue, double-sided tape | Use low-mess options for very young children. |
| Detail Materials | Markers, crayons, stickers, sequins, buttons | Perfect for doors, windows, and tiny decorations. |
| Optional Lights | Battery tea lights, LED string lights | Never use open flames with paper crafts. |
Step-by-Step: Building Your Tiny Houses
There are many ways to construct miniature houses. Choose one method or try a mix so your village feels varied and alive.
Method 1: Folded Paper Houses
Folded houses are quick and ideal for younger crafters with some help.
- Cut rectangles from cardstock or thin cardboard.
- Fold the rectangle into a square tube (like a box without top and bottom) and secure with tape or glue.
- Make a roof from another rectangle folded in half and attach it across the top.
- Draw or glue on windows and doors before fixing the house to the base.
Invite kids to vary the height and width of each house to suggest apartments, shops, or townhomes.
Method 2: Upcycling Small Boxes
If you have empty tea boxes, jewelry boxes, or small packaging, they can quickly become buildings.
- Cover the box with colored paper or paint.
- Add paper rectangles for doors, squares for windows, and a strip of tissue paper inside for a lit window effect.
- Use a marker to add bricks, shingles, house numbers, or mezuzot on the doorframe.
Reusing packaging encourages kids to think about sustainability while they craft.
Method 3: Rolled-Tube Buildings
Paper tubes (like toilet rolls) can become round towers or modern high-rises, similar to other holiday crafts that use tubes for candles or menorahs.
- Stand the tube upright on the base.
- Wrap it with colored paper or paint it.
- Cut out small paper windows and glue them on in a vertical row.
- Top with a cone or flat circle roof for variety.
Adding Hanukkah Details to Each Home
Once the basic houses are done, this is where personality and Hanukkah storytelling shine.
Windows of Light
Windows are the heart of your village, echoing the way many families display their menorahs near a window to share the miracle publicly.
- Cut small squares or rectangles from yellow or gold paper.
- Layer tissue paper behind them for a glowing effect.
- Draw silhouettes: menorahs, people, or a dreidel on a table.
If you are using battery-operated lights, place them inside or behind the houses so the windows seem softly lit.
Mini Menorahs and Dreidels
Without copying any existing project directly, you can suggest holiday objects in very simple ways:
- Use a narrow strip of paper with tiny vertical cuts to look like candles.
- Add dots of yellow or orange at the top to suggest flames.
- Draw small spinning tops in front of a door or on a path, referencing the dreidel game often played during Hanukkah.
Pathways, Trees, and Night Sky
To bring your neighborhood together as a scene:
- Draw walkways using crayons or paint.
- Glue down torn paper to suggest snowbanks or stones.
- Add small cut-out trees, lampposts, or bushes.
- Attach a dark blue or black background behind the village and decorate with tiny stars.
Turning Craft Time into Story Time
Hanukkah crafts can be a doorway into age-appropriate conversations about history, courage, and tradition. While working on your village, weave in short stories and questions.
Simple Ways to Connect Craft and Tradition
- Explain that Hanukkah lasts eight nights and that many families light a menorah each night and say blessings.
- Point out that light is a symbol of hope and perseverance, just like the oil that lasted longer than expected.
- Talk about how communities support each other, like neighbors in your miniature village sharing warmth and food.
Prompts for Kids While They Build
Use open-ended questions to get kids talking and imagining:
- “Who lives in this house, and how do they celebrate Hanukkah?”
- “What kinds of foods might they share with their neighbors?”
- “Which window do you think has a menorah, and why?”
- “If your house were in this village, what would it look like?”
Adapting the Craft for Different Ages
One of the strengths of a mini village project is its flexibility. It can be scaled up or down to suit toddlers, school-age kids, or even teens and adults.
For Toddlers and Preschoolers
- Pre-fold or pre-cut house shapes and let them focus on decorating.
- Offer large stickers, chunky crayons, and glue sticks.
- Keep the village small—just a few houses—to avoid overwhelming them.
For Elementary-Age Kids
- Let them design house shapes and plan the layout more independently.
- Invite them to write family names on mailboxes or add small signs to shops.
- Encourage them to include symbolic details they know from Hanukkah at home or school (like sufganiyot, dreidels, or gelt).
For Teens and Adults
- Experiment with more intricate architecture: balconies, stairways, or multi-level buildings.
- Incorporate more advanced techniques like paper scoring or simple LED circuitry for lights.
- Discuss historical Jewish neighborhoods or cities and use them as visual inspiration.
Display, Play, and Evolve Your Village
Once your tiny neighborhood is complete, it can become part of your Hanukkah traditions for years to come.
Choosing a Safe Display Spot
- Place the village on a shelf, sideboard, or windowsill away from real candles or hot surfaces.
- If you have pets or toddlers, use a tray that can be moved to a higher surface when needed.
- Consider adding a clear plastic cover or a shallow frame if you want to preserve it.
Interactive Ideas for the Eight Nights
To make the village part of your nightly celebration, you might:
- Add a new house or detail each night of Hanukkah.
- Place a small note or drawing under one house every evening with a question, activity, or blessing idea.
- Invite children to move paper “neighbors” around the village as they imagine visiting friends and family.
Educational Benefits of Crafting a Hanukkah Village
Holiday crafts are not just fun; they support several areas of child development, including creativity, fine motor skills, and cultural understanding.
- Fine motor skills: Cutting, folding, and gluing help strengthen hand muscles and coordination.
- Spatial thinking: Planning where houses and paths go invites kids to think in two and three dimensions.
- Cultural literacy: Connecting the craft to Hanukkah stories and practices teaches children about Jewish traditions and history.
- Social-emotional growth: Imagining communities and neighbors encourages empathy and a sense of belonging.
Frequently Asked Questions (FAQs)
Do I need special craft supplies to make a Hanukkah village?
No. You can build an entire village from recycled boxes, scrap paper, markers, and glue. Optional items like battery lights or stickers can add extra charm but are not required.
How can I safely include light in the village?
Use only battery-operated tea lights or cool LED strings and keep them away from loose paper edges. Never place real candles or open flames near paper crafts, especially around children.
Can this craft be used in a classroom or community program?
Yes. Teachers and group leaders can assign each child or family a single house to decorate, then combine them into one shared village. This works well alongside lessons about Hanukkah history, Jewish communities, and the symbolism of light.
How long does it take to make a complete village?
A simple setup with a few houses can be finished in an hour, while a more detailed neighborhood can be built over several evenings. Some families enjoy adding new elements each night of Hanukkah.
What if my family does not celebrate Hanukkah?
You can still create a winter village focused on themes of light, kindness, and community, and use it as a way to learn respectfully about Jewish traditions from books or trusted educational resources.
References
- Hanukkah — U.S. Library of Congress. 2019-12-17. https://www.loc.gov/item/guide-to-law-online/usa-holidays/hanukkah/
- Hanukkah Crafts to Celebrate the Festival of Lights — Care.com. 2023-11-15. https://www.care.com/c/hanukkah-crafts/
- Celebrate the holy holiday with these Hanukkah crafts for kids — Gathered by Immediate Media. 2022-11-22. https://www.gathered.how/arts-crafts/hanukkah-crafts
- 12 Hanukkah Activities We Love — PJ Library. 2016-11-01. https://pjlibrary.org/beyond-books/pjblog/november-2016/hanukkah-activities