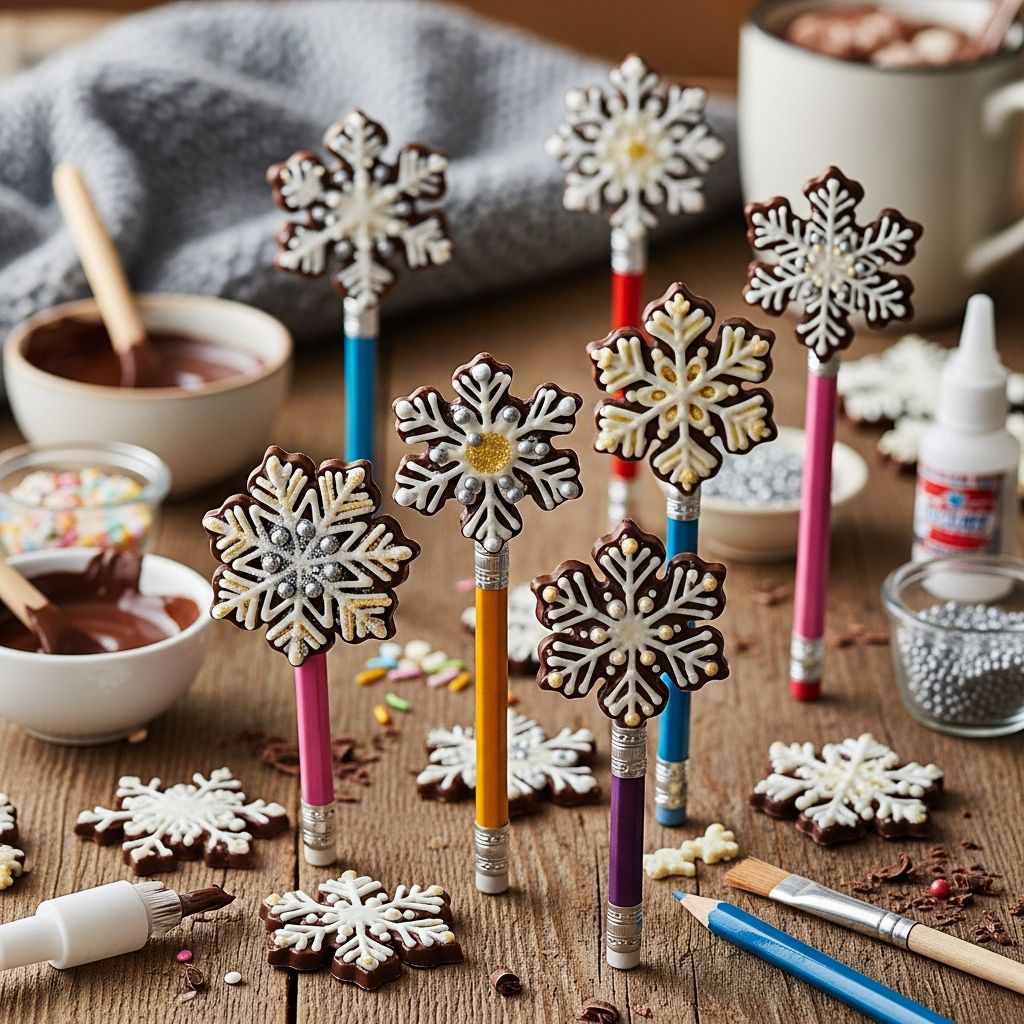
Chocolate snowflake pencil toppers are a delightful way to dress up everyday writing tools for winter, turning simple pencils into frosty, edible mini-gifts. These easy toppers combine basic candy-making techniques with kid-friendly crafting, making them perfect for holiday classrooms, parties, and cozy weekends at home.
This guide walks through the full process: from choosing the right chocolate and molds to packaging, storage, and creative ways to use your finished toppers. Whether you are planning a school celebration or just want a fun kitchen project on a snowy afternoon, these pencil toppers add a playful, tasty twist to the season.
Why Make Chocolate Snowflake Pencil Toppers?
Chocolate toppers perched on pencils offer a charming mix of practical and fun: kids get something they can use every day, plus a little treat to enjoy later. Unlike ordinary candy, these toppers feel special because they are personalized, handmade, and tied to a specific winter memory or event.
- Perfect for classroom winter parties, holiday favor bags, and stocking stuffers.
- Simple enough for beginners while still looking polished and festive.
- Customizable with different colors, sprinkles, and flavored candy coatings.
- Easy to assemble in batches, which is ideal for large groups of children.
Materials and Tools You Will Need
Before melting the first piece of chocolate, gather all the supplies so the project runs smoothly. Having everything ready makes the process more relaxed, especially when crafting with children.
Core Ingredients
- Chocolate or candy melts (white, milk, or dark)
- Colored candy melts (blue, silver, or pastel tones for accents)
- Edible sprinkles or sanding sugar (sparkly or snow-like)
Essential Tools
- Snowflake-shaped silicone or plastic candy molds
- Microwave-safe bowls or a double boiler
- Spoons, piping bags, or small squeeze bottles
- Sturdy pencils, pens, or novelty writing tools
- Small food-safe plastic bags and ribbon or twist ties (for packaging)
Optional Extras
- Food-coloring gels designed for chocolate (oil-based only)
- Edible glitter or shimmer dust for a frosty finish
- Flavor oils such as peppermint, orange, or vanilla
Step-by-Step: Making Chocolate Snowflake Toppers
The basic process involves melting chocolate, filling snowflake molds, inserting the pencil ends, and letting everything set. Follow these steps and adjust details to suit your schedule and tools.
1. Prepare Your Workspace
Start by clearing a flat, cool surface where the molds can rest undisturbed while the chocolate sets. Lay out parchment or a silicone mat to catch any drips and to make cleanup easier.
- Wash and dry the molds thoroughly; any moisture can cause chocolate to seize.
- Arrange unsharpened pencil ends within reach so you can insert them quickly into the soft chocolate.
2. Melt the Chocolate Safely
Chocolate scorches easily, so gentle heat is essential. For most home crafters, the microwave is the simplest option, while a double boiler offers more control if you are comfortable working on the stovetop.
- Place chopped chocolate or candy melts in a microwave-safe bowl.
- Heat in short intervals (about 15–20 seconds), stirring thoroughly after each burst.
- Stop heating once the chocolate is almost, but not entirely, melted; the remaining bits will melt from residual heat as you stir.
If using a double boiler, keep the water at a bare simmer and ensure no steam or droplets reach the chocolate. Stir gently until smooth and glossy.
3. Add Color and Flavor (Optional)
To create snowflakes in wintery hues, divide the melted chocolate into smaller bowls and tint each portion with oil-based candy color. Water-based dyes can cause thickening or clumping and are best avoided for chocolate.
- Stir in a few drops of peppermint or vanilla flavor oil for a seasonal twist.
- Swirl two colors together lightly in the bowl for a marbled snowflake effect.
4. Fill the Snowflake Molds
Carefully spoon or pipe the melted chocolate into each snowflake cavity. Lightly tap the mold on the counter to remove trapped air bubbles and to even out the surface.
- Fill each cavity about three-quarters full, leaving space for the pencil tip and a little extra chocolate on top.
- Sprinkle sanding sugar, tiny pearls, or snowflake sprinkles over the surface for added texture.
5. Insert the Pencil Ends
This is the moment when the topper transforms from “candy” into “pencil decoration.” Insert the unsharpened end of each pencil into the center of a soft snowflake cavity, pushing just deep enough that the chocolate will grip it once firm.
- Rotate each pencil gently to coat the sides with chocolate for better stability.
- Top off the cavity with a bit more melted chocolate if needed so the pencil base is completely covered.
6. Chill and Unmold
Place the filled molds carefully in the refrigerator until the chocolate is fully firm. Depending on thickness and refrigerator temperature, this usually takes 15–30 minutes.
- Test one snowflake first; if it releases cleanly and looks glossy, the rest are ready.
- Gently flex silicone molds or tap rigid molds on the counter edge to help the snowflakes slide out.
Safety and Working with Kids
Chocolate pencil toppers are a fantastic family project, but they do involve warm bowls and some precision work. By assigning age-appropriate tasks, adults can keep the process safe while letting kids enjoy the creative aspects.
- Adults handle melting chocolate and moving hot or heavy bowls.
- Younger children can sprinkle decorations and help place pencils into the molds.
- Older kids can assist with piping chocolate into molds under supervision.
- Remind everyone to wash hands thoroughly before touching edible components.
Decorating Ideas and Variations
Once the basic technique is mastered, the toppers can be customized for nearly any winter theme or color palette. Consider matching school colors, holiday party décor, or even favorite characters by choosing coordinating shades.
- Classic winter white: White chocolate snowflakes dusted with clear sanding sugar or edible glitter.
- Frosty blue: Light blue candy melts with silver dragees for a shimmering, icy look.
- Peppermint swirl: Red and white marbled chocolate with crushed candy cane pieces on top.
- Dark chocolate snowstorm: Dark chocolate snowflakes with white chocolate drizzle and small star sprinkles.
Usage Ideas for Parties and Classrooms
Finished toppers can do more than decorate pencil cups. With a bit of planning, they can double as place cards, cupcake decorations, or small incentives for winter reading programs and homework challenges.
- Slip a labeled tag onto each pencil and use them as seating markers for a winter party.
- Place topped pencils in jars for a festive centerpiece that guests can take home.
- Hand them out as rewards during a classroom “snowflake challenge” or reading contest.
Storage, Transport, and Shelf Life
Proper storage helps keep the chocolate fresh and glossy. While these toppers are meant to be enjoyed relatively soon, careful packaging allows you to prepare them several days in advance of an event.
| Aspect | Best Practice |
|---|---|
| Room temperature storage | Keep in a cool, dry place away from direct sunlight and heat sources. |
| Refrigeration | Use only if your kitchen is very warm; seal in airtight bags or containers to prevent moisture. |
| Transport | Lay pencils in a single layer in a shallow box; cushion with tissue paper or bubble wrap. |
| Estimated shelf life | Typically 1–2 weeks at room temperature when stored properly. |
Eco-Friendly and Allergy-Aware Alternatives
For classrooms or groups with dietary restrictions, consider adapting the basic idea with allergy-friendly or non-edible materials. The goal is the same: a fun topper that makes writing tools feel festive and personalized.
- Use dairy-free or nut-free chocolate alternatives when allergies are a concern.
- Create snowflake toppers from air-dry clay or craft foam for a non-edible version.
- Label each bag clearly if some toppers are safe for specific allergies and others are not.
SEO-Friendly Tips for Sharing Your Project Online
If you plan to share this project on a blog or social platform, a few structural tweaks help it reach more readers. Clear headings, descriptive image captions, and keyword-rich text make it easier for people to find your tutorial when searching for winter crafts.
- Include key phrases such as “chocolate snowflake pencil toppers,” “winter classroom treats,” and “holiday kids craft” naturally in your text.
- Add step-by-step photos with descriptive alt text for accessibility and search visibility.
- Offer a concise printable version of the instructions for busy parents and teachers.
Frequently Asked Questions
Can sharpened pencils be used?
It is strongly recommended to use unsharpened pencils so children do not accidentally poke themselves while handling the toppers. Once the chocolate is eaten, the pencil can be sharpened and used as normal.
What type of chocolate works best?
Candy melts or couverture designed for molding are the most reliable, because they melt smoothly and release cleanly from molds. Regular chocolate bars can work if carefully tempered or handled gently, but they may be more prone to dull finishes or bloom.
How do you prevent chocolate from sticking to the mold?
Ensure the molds are completely dry and clean, and avoid using any oily sprays unless the manufacturer recommends them. High-quality silicone molds tend to release molded chocolate easily once it is fully set and chilled.
Are these safe for very young children?
The toppers themselves are edible, but pencils should not be given to children who still put non-food items in their mouths. For toddlers, consider removing the chocolate from the pencil before serving or using non-edible foam toppers instead.
Can the toppers be reused?
Because they are made of chocolate, these toppers are intended to be eaten rather than reused. For a reusable option, replicate the snowflake design with durable craft materials such as polymer clay, felt, or foam and secure the decorations to pencil tops without edible components.
Bringing Winter Magic to Everyday Writing
Chocolate snowflake pencil toppers turn routine pencils into tiny celebrations, whether they are lining classroom desks or tucked into holiday gift bags. With simple ingredients and basic candy-making techniques, families and teachers can create a memorable project that blends creativity, treats, and useful school supplies.
Experiment with colors, flavors, and decorations to suit your own winter traditions, and enjoy the smiles when kids discover that their new pencil comes topped with an edible, sparkling snowflake.