Thanksgiving is about more than a big meal; it is also a chance to slow down, gather in the kitchen, and create memories over simple projects that invite everyone to participate. Feather-shaped cookies bring a playful, colorful twist to traditional holiday baking and turn dessert into a creative canvas. These treats are easy enough for beginners yet flexible enough for experienced bakers who want to experiment with color, pattern, and texture.
This guide walks you through planning, baking, decorating, and serving whimsical feather cookies. You will find step-by-step ideas, kid-friendly shortcuts, and customizable variations so your cookie platter can be as unique as your holiday table.
Why Feather Cookies Belong on Your Thanksgiving Table
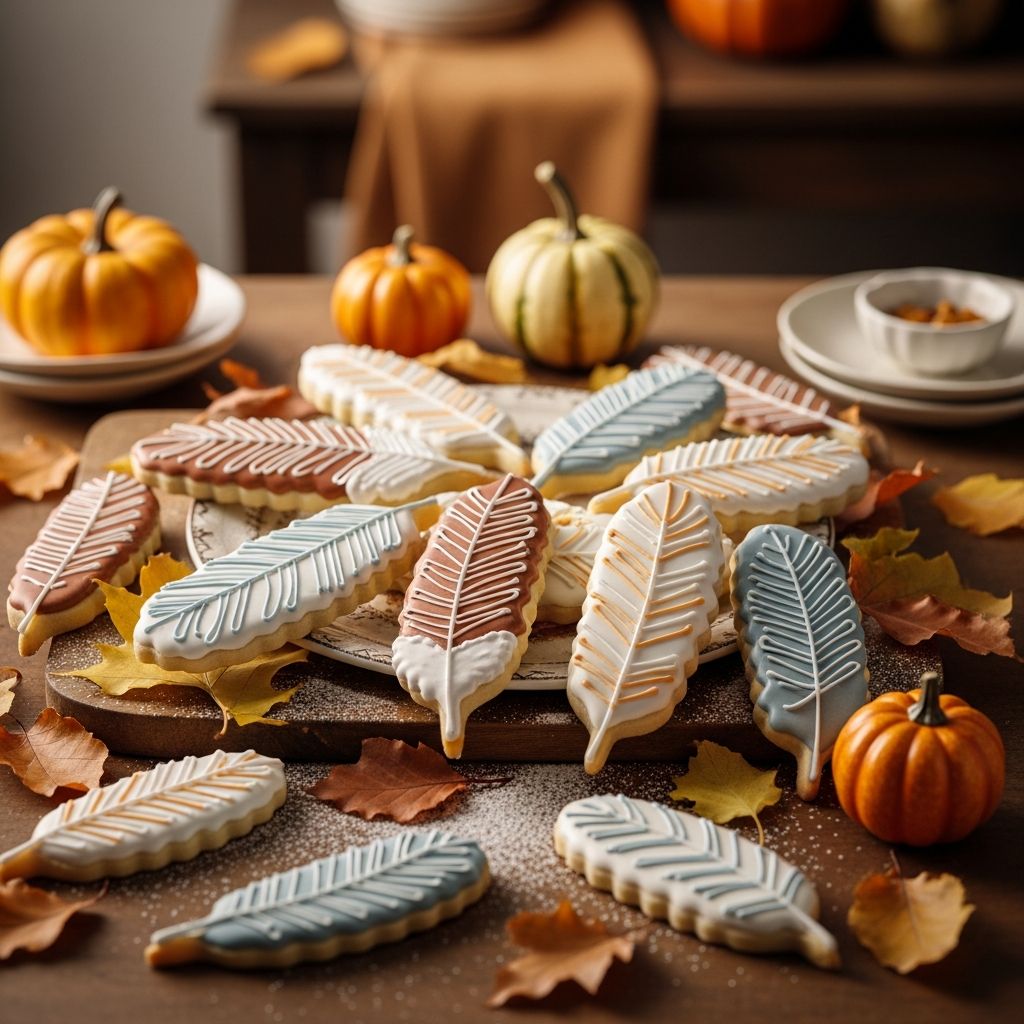
Feather cookies offer a fresh way to represent gratitude and abundance, echoing the beauty of autumn foliage and traditional Thanksgiving imagery without requiring complicated decorating skills. Their long, curved shape provides plenty of space for stripes, ombré color blends, and marbled patterns that children and adults can design together.
- They work as snacks, place-setting accents, or party favors that guests can take home.
- The design is adaptable to different color schemes, themes, or dietary needs without losing its charm.
- The cookie shape encourages creativity, making it a perfect project for a family afternoon or a classroom celebration.
Planning Your Feather Cookie Project
Before turning on the oven, spend a few minutes planning your baking session so the experience feels relaxed rather than rushed. Decide how much of the process will be from scratch and where shortcuts can help, especially if young children are involved.
- Choose whether to use homemade sugar cookie dough, store-bought dough, or a gluten-free mix, depending on your schedule and guests.
- Gather decorating supplies in advance: piping bags, small bowls, food coloring, toothpicks, and any edible decorations.
- Plan for drying time if you use icing that needs to set before packaging or stacking the cookies.
Suggested Timeline
| Step | Approximate Time | Best For |
|---|---|---|
| Mix and chill dough | 30–45 minutes (plus chilling, if needed) | Adults or older kids |
| Cut and bake cookies | 20–30 minutes | All ages with supervision |
| Cool cookies completely | 30 minutes | Waiting time; set up decorating station |
| Decorate and detail feathers | 45–60 minutes | Kids, teens, and adults |
| Dry and store cookies | 1–3 hours (depending on icing) | Passive time |
Essential Tools and Ingredients
You can create beautiful feather cookies with basic kitchen tools, but a few extra items make decorating easier and more precise. Consider this list a starting point; you can improvise with what you already have.
Basic Baking Tools
- Mixing bowls and a sturdy spatula or mixer.
- Rolling pin with adjustable thickness rings if available.
- Feather-shaped cookie cutter or a knife to cut feather outlines freehand.
- Baking sheets lined with parchment paper or silicone baking mats.
- Cooling racks to help cookies cool evenly before decorating.
Decorating Supplies
- Royal icing, glaze icing, or thickened colored frosting.
- Gel food coloring in autumn shades such as gold, rust, cranberry, moss green, and chocolate brown.
- Piping bags or plastic sandwich bags with the corners snipped off.
- Small round piping tips (optional but helpful for details).
- Toothpicks, skewer sticks, or scribe tools for marbling and feather effects.
- Optional decorations: edible glitter, sugar pearls, sprinkles, or luster dust for shimmer.
Shaping the Perfect Feather Cookie
The distinctive feather shape is what makes these cookies stand out on a Thanksgiving platter. If you do not own a feather cutter, you can easily create the design using a simple template and a small knife.
Option 1: Using a Feather Cookie Cutter
- Roll out your cookie dough to an even thickness, typically about 0.6–0.8 cm, to avoid fragile edges.
- Press the cutter firmly into the dough, rocking slightly to ensure clean edges.
- Transfer shapes to the baking sheet using a spatula to prevent stretching or distortion.
Option 2: Freehand Feather Shapes
- Draw a simple feather outline on cardstock, cut it out, and use it as a template.
- Place the template on rolled dough and trace around it with a paring knife.
- Add small angled notches along one side to mimic the barbs of a feather, keeping the tip rounded for strength.
Tips for Baking Tender, Even Cookies
Once your feathers are shaped, focus on consistency. Even baking keeps the cookies sturdy enough for decorating but still pleasant to bite into. Small adjustments in temperature, thickness, and timing can make a noticeable difference.
- Chill the cut shapes on the baking sheet for 10–15 minutes before baking to help them maintain crisp outlines.
- Bake one tray at a time in the center of the oven for more predictable browning.
- Remove the cookies when the edges are just turning light golden and the centers appear set but not browned.
- Let cookies cool on the baking sheet for a few minutes before transferring to a rack.
Creating a Palette of Autumn Colors
Color is what turns simple feather shapes into mini works of art. Choosing a limited color palette keeps the cookies cohesive and elegant, while varying the patterns on each feather prevents the design from feeling repetitive.
Suggested Color Combinations
| Theme | Colors | Best For |
|---|---|---|
| Classic Harvest | Burnt orange, deep red, gold, chocolate brown | Traditional Thanksgiving dinners |
| Neutral & Elegant | Ivory, taupe, slate gray, metallic accents | Formal or minimalist tablescapes |
| Kids’ Table Fun | Bright teal, yellow, magenta, lime green | Playful family gatherings and classroom parties |
| Nature Inspired | Moss green, rust, mustard, soft sky blue | Outdoor or rustic celebrations |
- Divide white icing into small bowls and tint each with a tiny amount of gel color, adding more gradually until you reach the desired shade.
- Reserve some uncolored icing to lighten overly intense shades or to create subtle gradient patterns.
Decorating Techniques for Feather Designs
The decorating stage is where feather cookies truly shine. You can choose from simple striping, marbling methods, or layered details, depending on the age and patience level of your decorators. Encourage experimentation; no two feathers in nature look exactly alike, and your cookies don’t need to, either.
Simple Stripe and Drag Method
- Outline the feather with a slightly thicker icing to create a barrier, then fill the interior with a thinner version of the same color.
- While the base icing is still wet, pipe thin lines of contrasting colors across the feather shape.
- Use a toothpick to drag through the stripes from one side to the other in a gentle zigzag, creating a soft, feather-like texture.
Layered Tip Highlights
- Flood the entire feather with a single base color and let it set until surface-dry.
- Add a second icing color in short strokes near the tip and along one edge to simulate layered barbs.
- Finish with small dots or short lines in metallic or contrasting colors to mimic subtle quills and highlights.
Bold Block Feathers for Kids
- Divide each feather into 3–4 sections using curved lines drawn with icing.
- Fill each section with a different bright color for a stained-glass effect.
- Sprinkle edible glitter or colored sugar on selected sections while the icing is still wet.
Making the Project Kid-Friendly
Feather cookies are ideal for involving children in holiday preparations. With a little planning, kids can help at nearly every step, from measuring ingredients to choosing colors and patterns. Structure the activity so each child has a clear role and enough space to work.
- Pre-bake the cookies if you have very young helpers and focus the session on decorating only.
- Use squeeze bottles or small bags fitted with wider openings for little hands that may struggle with precision piping tips.
- Cover the table with kraft paper or a disposable tablecloth to simplify cleanup.
- Offer a practice sheet with parchment so kids can test designs before decorating actual cookies.
Serving Ideas and Presentation
How you display feather cookies can enhance your table setting and reflect the tone of your celebration. Because the cookies are naturally elongated, they layer beautifully and can be used as edible decorations beyond the dessert plate.
- Arrange cookies in a fan shape on a round platter to echo a full tail of feathers, placing lighter colors at the top for contrast.
- Slip a single wrapped cookie onto each dinner plate with a small tag bearing a guest’s name to double as a place card.
- Fill a low basket with shredded paper or linen napkins and stand the cookies upright for a centerpiece that is both decorative and edible.
- Package leftovers in clear bags tied with twine or ribbon for guests to take home as a sweet reminder of the evening.
Flavor Variations and Dietary Adjustments
The feather design works with many dough flavors and icing styles, so you can customize the cookies to meet your guests’ needs and preferences. Small recipe tweaks can also introduce seasonal flavors without changing the decorating process.
Flavor Ideas
- Citrus vanilla: Add orange or lemon zest to the dough for a bright note that contrasts with the richness of the Thanksgiving meal.
- Spiced molasses: Introduce cinnamon, ginger, and a touch of molasses for a cookie that tastes like a gentle gingerbread and pairs well with warm drinks.
- Maple almond: Replace part of the sugar with maple syrup and use almond extract for a nutty, aromatic twist.
Dietary Considerations
- Use a gluten-free flour blend formulated for cookies and keep decorations naturally gluten-free if needed.
- Opt for dairy-free margarine and plant-based milk in icings to accommodate lactose-intolerant or vegan guests.
- For reduced sugar options, make the cookies mildly sweet and rely on a thin layer of icing and natural colors rather than heavy decorating.
Storage, Transport, and Make-Ahead Tips
Preparing feather cookies ahead of time can help you manage a busy holiday schedule. With proper storage, they maintain both flavor and appearance for several days, making them convenient for potlucks and travel.
- Bake the cookies one or two days in advance and store them, undecorated, in an airtight container at room temperature.
- Decorate the day before serving so that any icing has time to dry; once dry, layer cookies between parchment sheets in a container.
- For transporting, choose a shallow, rigid box and pack the cookies snugly to minimize shifting.
- If freezing plain cookies, wrap tightly and thaw them completely before adding icing to prevent condensation from affecting the decorations.
Frequently Asked Questions (FAQ)
How thick should feather cookies be for decorating?
A medium thickness works best, generally around 0.6–0.8 cm. Cookies that are too thin may break at the feather tips, while overly thick ones can feel heavy and may not bake evenly.
Can I decorate feather cookies without piping bags?
Yes. Small resealable plastic bags with a corner snipped off can stand in for piping bags. You can also use small spoons to spread icing and create rustic, brushed effects rather than precise lines.
How long does the icing need to dry before stacking cookies?
The drying time depends on thickness and humidity, but plan on at least a couple of hours for a firm surface. For intricate designs or transport, allowing the cookies to sit overnight is often safest.
What if I do not have a feather cookie cutter?
You can easily make your own template by drawing a feather shape on sturdy paper or cardboard and tracing around it on the dough. A leaf cutter can also be adapted into a feather by trimming small notches along the edges.
How can I involve kids who are very young?
Let young children help with simple tasks such as pressing cutters into the dough, choosing colors, or adding sprinkles onto wet icing. Offer a few “practice” cookies so they can decorate freely without worrying about neatness.
Can feather cookies be used outside of Thanksgiving?
Absolutely. Change the color palette and they suit many occasions, from spring celebrations with pastel feathers to birthday parties with bright, rainbow hues. The shape is versatile enough to represent wings, leaves, or even fantasy-inspired designs.
Turning a Recipe into a Tradition
Feather-shaped cookies start as a simple baking project, but they can grow into a yearly ritual that marks the beginning of the holiday season for your family. Each year, you can introduce new colors, patterns, or flavor combinations while preserving the familiar steps that bring everyone back to the kitchen together.
- Save a few photos of your cookie platter each year to see how your designs and skills evolve over time.
- Encourage each family member to contribute a “signature” feather design and include it in the platter annually.
- Pair the baking session with a gratitude activity, such as writing thankful notes to tuck into cookie packages for neighbors or friends.
With a bit of planning and a willingness to embrace imperfection, whimsical feather cookies transform Thanksgiving baking into a shared creative adventure. The result is a tray of colorful sweets that taste delicious, look striking on the table, and carry the warmth of memories baked into every bite.