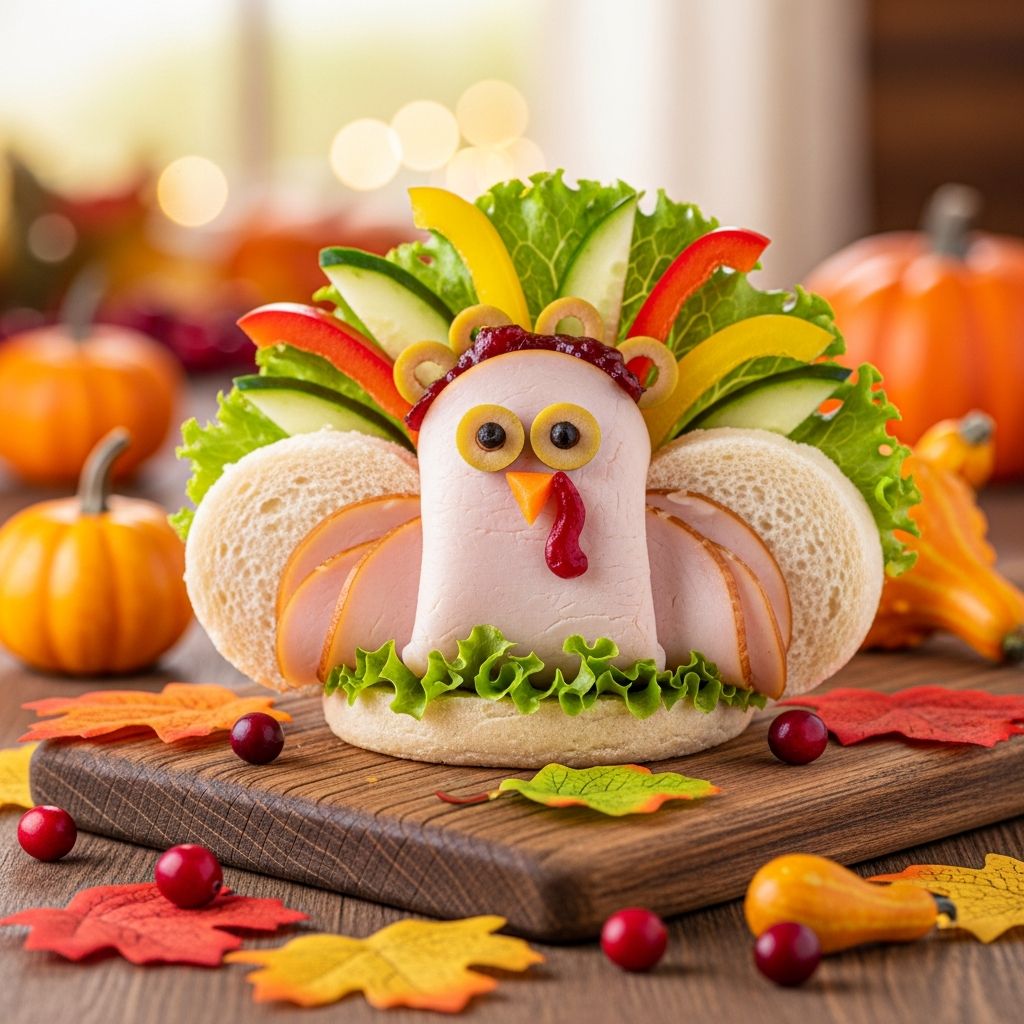
Thanksgiving is the perfect time to slow down, be playful with food, and invite kids into the kitchen in a low-pressure, creative way. A turkey sandwich food craft combines a familiar favorite with simple decorations so that children can build their own “turkey” out of everyday ingredients. Instead of focusing on complicated recipes, this project encourages imagination, fine-motor skills, and family connection around the table.
This article walks through how to design a turkey-themed sandwich step by step, plus ways to adapt it for picky eaters, allergies, and party platters. You will also find ideas for turning the project into a mini art lesson, simple STEM activity, or classroom centerpiece, all using ingredients you probably already have on hand.
Why Make a Turkey Sandwich Craft?
Transforming an ordinary turkey sandwich into a whimsical turkey character makes mealtime feel like play rather than a chore. Children are often more willing to taste new foods when they help assemble them and can proudly say, “I made this myself.” A themed sandwich can also serve as a calming, hands-on activity during a busy holiday gathering.
Because the craft relies on basic shapes and common ingredients, it is friendly for a wide range of ages. Little ones can help place large “feathers” or eyes, while older kids can experiment with symmetry, color, and balance as they decorate their edible turkey in unique ways.
Planning Your Edible Turkey Sandwich
Before starting, decide whether your turkey sandwich craft will be a single family snack, a lunchbox surprise, or a group activity for a classroom or party. The quantity and style of ingredients may change depending on the setting. For example, a party might call for several smaller, open-faced turkeys, while lunch might work better as one larger, stacked sandwich.
It also helps to think about how much control you want kids to have. Setting out a “sandwich bar” with organized toppings lets children design their own turkeys, whereas pre-assembling the base sandwich provides more structure for very young crafters.
Suggested Ingredients and Tools
The joy of this craft is its flexibility. You can stick to classic turkey sandwich ingredients or mix and match whatever your family enjoys. The list below offers a starting point; adjust based on taste, dietary needs, and what you already have in the fridge.
- Bread base: Whole wheat, white, sourdough, mini pitas, or English muffins.
- Protein: Sliced turkey breast, leftover roast turkey, deli-style turkey, or plant-based deli slices.
- Spread: Mayonnaise, mustard, hummus, cream cheese, or nut-free pesto.
- Feathers: Carrot sticks, bell pepper strips, snap peas, cucumber wedges, or baked pita chips.
- Face details: Cheese circles, sliced olives, cherry tomato halves, cucumber rounds, or edible candy eyes.
- Extras: Lettuce, spinach, apple slices, dried cranberries, or crackers for added color and texture.
For tools, you only need a cutting board, a small knife for an adult to use, and perhaps a round cookie cutter if you want neatly shaped turkey “heads” or bodies. Safety scissors designed for food can be helpful for older children to trim soft ingredients like tortillas or lettuce.
Visualizing the Turkey Layout
Before assembling, imagine the turkey as a simple diagram. The main sandwich forms the round body, the face sits near the top edge, and colorful vegetables or crackers fan out behind it to become feathers. This mental picture helps when placing ingredients and explaining the concept to kids.
You can even sketch the layout on paper first and invite children to plan their designs, matching food items to the shapes they have drawn. This adds a light design and planning element to the craft without making it feel like homework.
Step-by-Step Assembly Guide
Use the steps below as a loose guide rather than strict rules. Encourage experimentation so that each sandwich turkey looks a little different.
- Prepare the bread. Lay out slices of bread and cut into circles if desired. You can also leave them whole for a more rustic, rectangular turkey body.
- Add the spread. Lightly coat one side of the bread with your chosen spread to act as “glue” for fillings and decorations.
- Layer the turkey. Place slices of turkey on top of the spread, letting a bit peek out like feathers if using a single layer of bread.
- Close or leave open-faced. Decide whether to add a second slice of bread on top or keep it open-faced for easier decorating with younger children.
- Create the feather fan. Arrange vegetable sticks or chips in a semicircle around the top half of the sandwich, sliding the base of each piece slightly under the bread so they look attached.
- Build the face. Use rounds of cheese or cucumber for the eyes, olives or raisins for pupils, and a triangle of carrot or red pepper for the beak. A thin strip of pepper or tomato can serve as a wattle.
- Add feet or wings (optional). Two small crackers or pretzel sticks at the bottom edge can become feet, while lettuce leaves or sliced cheese triangles can serve as wings on the sides.
Simple Variations for Different Ages
One of the strengths of this project is how easily it scales for toddlers, big kids, and even adults who want a festive lunch. Adjust the complexity by changing both the number of decorative elements and the level of precision expected.
- For toddlers: Stick to large, easy-to-grab items like big cucumber slices and long pepper strips. Focus on placing just a few colorful feathers and two clear eyes.
- For school-age kids: Encourage more detailed patterns, like alternating colors in the feather fan or crafting eyebrows, hats, or bow ties from cheese and vegetables.
- For tweens and teens: Turn it into a friendly design challenge, letting them build themed turkeys, such as a “superhero turkey” or a “fancy dinner turkey” with edible accessories.
Allergy-Friendly and Dietary Swaps
With a few simple substitutions, nearly anyone at the table can enjoy a turkey-themed sandwich craft. Always check labels and ingredients if you are serving a group, especially in a classroom or party setting with a variety of needs.
- Gluten-free: Use gluten-free bread, crackers, or rice cakes as the base and choose naturally gluten-free toppings.
- Dairy-free: Skip cheese or use dairy-free slices and spreads, relying on vegetables and fruit for most of the decoration.
- Vegetarian: Replace turkey with sliced cheese, hummus, or roasted vegetable slices to keep the turkey shape without the meat.
- Nut-free: Choose safe spreads like hummus or sunflower seed butter and avoid nut-based sauces or decorations.
Turning Lunch into a Learning Moment
This craft is more than a cute plate; it can double as a gentle learning activity. As children arrange shapes and colors, they naturally explore sorting, pattern-making, and basic geometry. Counting feathers or comparing sizes of eyes and beaks can become a game while they work.
Parents or teachers can also fold in simple conversations about Thanksgiving traditions, where turkeys live, or how different cultures celebrate harvest seasons. The sandwich becomes a starting point for curious questions as well as a satisfying snack.
Ideas for Parties, Classrooms, and Playdates
Turkey sandwich crafts fit perfectly into small gatherings and larger events alike. With a bit of preparation, you can set up a self-serve decorating station that keeps kids busy while adults handle cooking or conversation. Disposable plates and pre-portioned cups of toppings simplify cleanup.
For classrooms or group playdates, consider offering only a few topping options to streamline the process. Labeling bowls with simple words or pictures also gives early readers a chance to practice recognizing ingredient names while they build.
Sample Ingredient Layout Table
The table below outlines one possible way to pair ingredient types with visual roles on your turkey sandwich. Use it as inspiration, not a rulebook.
| Turkey Part | Ingredient Ideas | Notes |
|---|---|---|
| Body | Bread rounds, English muffin halves, mini pitas | Pick something sturdy enough to hold toppings. |
| Feathers | Carrot sticks, pepper strips, snap peas, pita chips | Use a mix of colors for the prettiest fan. |
| Eyes | Cheese circles, cucumber slices, olive pieces | Secure with a dab of spread as glue. |
| Beak & wattle | Carrot triangle, tomato strip, red pepper piece | Place near the center of the face for a friendly look. |
| Feet | Small crackers, pretzel sticks | Position at the bottom edge of the bread body. |
Tips for Stress-Free Crafting with Kids
Holiday projects are meant to be fun, not perfect. The goal is not to produce identical, magazine-worthy turkeys but to give kids a chance to explore food in a relaxed, playful way. A few thoughtful guidelines can keep the activity enjoyable for everyone.
- Set expectations ahead of time that every turkey can look different, and that is part of the fun.
- Offer a small number of topping choices at once to avoid overwhelm and reduce food waste.
- Place napkins or parchment paper under each sandwich area to make cleanup quick and simple.
- Prepare extra basic sandwiches for hungry adults who may not want to decorate but still want to eat alongside the kids.
Serving and Storage Suggestions
Turkey sandwich crafts are best enjoyed soon after assembling, especially when topped with fresh vegetables that might wilt. If you need to prep in advance, consider building only the sandwich base and storing it in the refrigerator, then adding the decorative feathers and face right before serving.
For lunchboxes, choose sturdy ingredients that hold up well in transit, such as thicker carrot sticks and firm cheese slices. Packing the decorations in a separate compartment and letting kids assemble the final turkey themselves at lunchtime preserves both texture and playfulness.
Frequently Asked Questions
Can this be made ahead of time?
Yes, you can assemble the basic turkey sandwich a few hours ahead and refrigerate it, then add the visible decorations—eyes, feathers, and facial details—right before serving to keep everything looking fresh.
What if my child is a picky eater?
Start by offering ingredients you know your child already likes and add only one or two new items as optional decorations. The creative, hands-on nature of the craft often encourages hesitant eaters to at least taste something new, even if they do not finish all of it.
How can I involve very young kids safely?
Pre-cut all ingredients yourself and give toddlers large pieces to place rather than small, hard-to-grab bits. Let them press down vegetable “feathers” or add large cheese circles for eyes, while an adult handles any cutting or shaping that requires a knife.
Can I use leftovers from Thanksgiving dinner?
Absolutely. Leftover roast turkey, rolls, vegetable sticks from a crudité platter, and even cranberry sauce can all find new life in a turkey sandwich craft, reducing waste while adding holiday flavor to a playful meal.
Is this activity suitable for classrooms?
With a little preparation, turkey sandwich crafts can work well in classrooms and group settings. Pre-portion ingredients in small cups, review basic food-handling hygiene with the kids, and offer simple, clear instructions so everyone can build a turkey at their own pace.