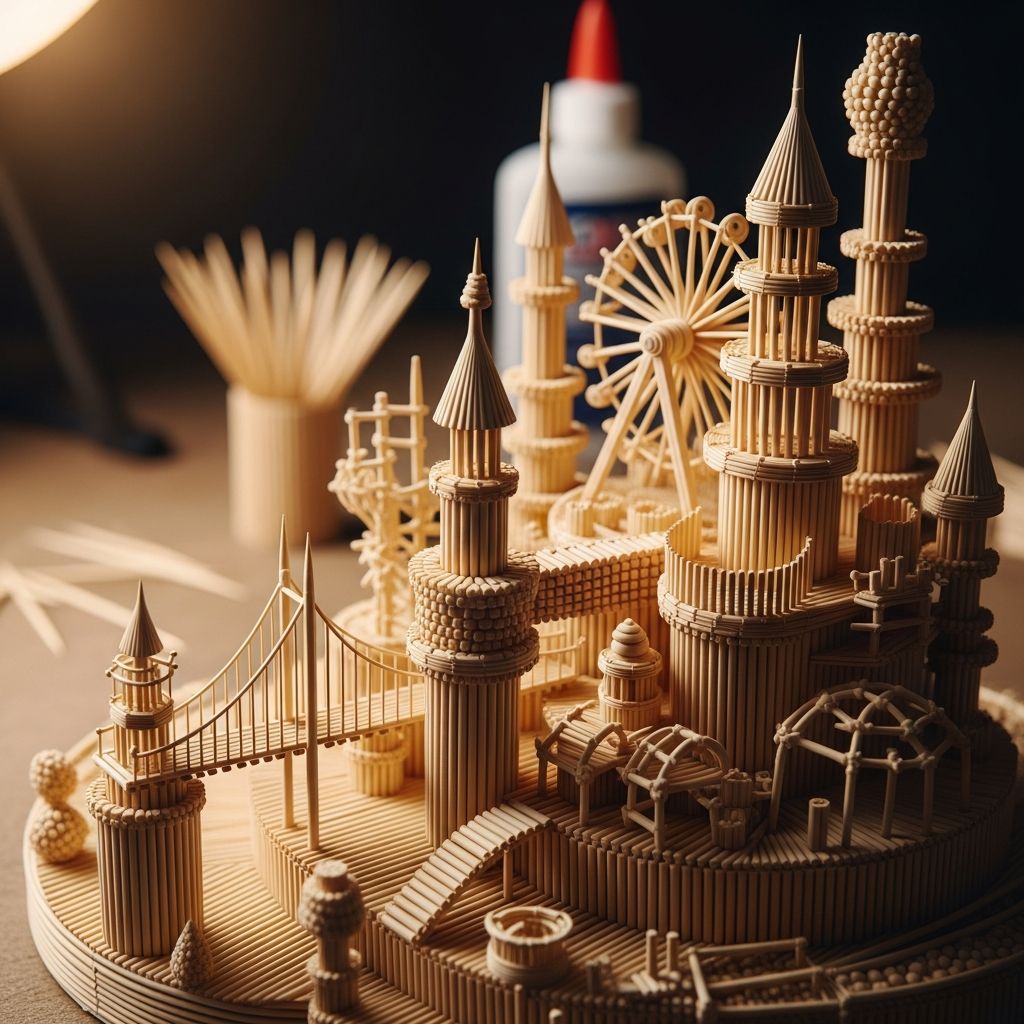
Toothpick sculptures are an inexpensive, surprisingly impressive way to explore three-dimensional art at home with kids or as a relaxing creative hobby for adults. With a bit of glue, patience, and imagination, you can turn a box of simple wooden sticks into towers, bridges, abstract shapes, or miniature worlds.
Why Toothpick Sculptures Are Worth Trying
Working with toothpicks invites builders to think in 3D, solve structural problems, and explore balance and symmetry in a hands-on way. Unlike many messy art projects, this craft uses just a few compact supplies and is easy to start and stop as time allows.
Because the materials are so inexpensive, there is no pressure to be perfect, making this a great project for experimenting, learning from mistakes, and building confidence with creative risk-taking.
- Low-cost and easy-to-find materials.
- Suitable for a wide age range with simple adjustments.
- Encourages patience, fine motor skills, and spatial reasoning.
- Produces display-worthy pieces that spark conversation.
Gathering Materials and Setting Up Your Workspace
Before building, set up a small, organized area so everyone can focus on creativity rather than hunting for supplies. A tray or a baking sheet works well to keep tiny parts contained and protect your table.
Basic Supply Checklist
- Wooden toothpicks (round or flat, plain or colored).
- White school glue or clear-drying craft glue.
- Wax paper, parchment paper, or a plastic mat as a work surface.
- Scrap paper or a small dish for a glue puddle.
- Optional: small pliers or tweezers for delicate pieces.
- Optional: paint, markers, or food coloring for decorating finished sculptures.
Kid-Friendly Add-Ons
For younger builders, consider combining toothpicks with soft, pierceable materials. These can help stabilize early attempts and make success more likely.
- Mini marshmallows or gumdrops.
- Small balls of modeling clay or homemade dough.
- Foam blocks or floral foam as a base.
Planning Your Toothpick Sculpture
While it can be fun to jump in and start gluing, taking a few minutes to sketch or talk through your idea usually leads to more satisfying results. Simple planning also helps kids think like engineers and artists at the same time.
Questions to Ask Before You Start
- Will this sculpture be tall, wide, or both?
- Should it represent something recognizable (like a bridge, tree, or tower) or be fully abstract?
- How will it stand up? Do you need a base?
- Do you want straight, geometric lines, or curvy, clustered shapes?
Simple Sketching Ideas
Encourage each builder to draw a quick side view and top view of their planned sculpture. These do not need to be fancy or accurate; they simply serve as a rough map for where to begin and how the structure might grow.
Core Building Techniques for Strong Structures
Creating a toothpick sculpture is all about connecting small units into larger, more stable forms. Learning just a few simple joins and shapes opens up many design possibilities, even for beginners.
Working With Glue
- Squeeze a small puddle of glue onto scrap paper or into a shallow dish.
- Dip only the tip of each toothpick into the glue; a tiny amount is usually enough.
- Press and hold glued joints for several seconds so they grip before releasing.
- Allow sections to dry partially before stacking heavy pieces on top.
Common Joint Types
| Joint Type | How to Make It | Best Use |
|---|---|---|
| End-to-end | Glue the pointed ends of two toothpicks together to form a longer line. | Extending beams, creating long edges. |
| Right angle | Glue one toothpick across another to form an L shape. | Building corners, frames, and box-like shapes. |
| Triangle unit | Connect three toothpicks into a closed triangle. | Adding strength and stiffness to tall forms. |
| Cross brace | Attach an extra toothpick diagonally across a square or rectangle. | Preventing wobble and twisting in larger structures. |
Project Ideas for Different Ages and Skill Levels
Toothpick sculptures can be scaled up or down in complexity to match the builder’s age and patience level. Start with simple shapes for young children and grow into more intricate designs as confidence builds.
Beginner-Friendly Projects
- Shape forests: Build many small triangles, squares, and stars, then stand them upright on a cardboard base.
- Simple towers: Stack basic square frames on top of each other with cross braces to explore height and balance.
- Marshmallow structures: Connect toothpicks using marshmallows or clay blobs at the joints for a quick, forgiving project.
Intermediate and Advanced Challenges
- Bridges: Design a span between two books or boxes, then test how much weight it can hold using small objects.
- Geometric domes: Combine triangular modules into curved surfaces that suggest domes or spheres.
- Abstract sculptures: Focus on movement and negative space, letting toothpicks twist and loop into imaginative, non-literal forms.
Teaching Art and STEM Concepts Through Toothpick Sculptures
These small-scale projects are more than just crafts; they are bite-sized engineering and design lessons. Parents and educators can easily weave educational language and ideas into the building process without making it feel like homework.
Art Concepts You Can Highlight
- Line: Each toothpick forms a line in space; clusters become patterns and textures.
- Shape and form: Flat shapes like triangles combine into full 3D forms like pyramids or towers.
- Balance: Encourage children to notice which side looks or feels heavier and how to counteract that visually.
STEM Ideas to Explore
- Forces and load: Ask which parts of the sculpture are doing the most work to hold everything up.
- Patterns and repetition: Use repeated modules (like identical triangles) to show how patterns create strength and rhythm.
- Measurement: Challenge older kids to measure height, width, or angles and record their designs in simple diagrams.
Finishing Touches: Coloring, Sealing, and Displaying
Once the glue is fully dry, adding color and finding the right display method elevates a humble toothpick project into something that looks intentional and artistic. Even very simple structures can become eye-catching with thoughtful finishing.
Decorating Your Sculpture
- Use watered-down acrylic paint for a stained-wood look.
- Try metallic markers or paint pens on exposed edges.
- Paint only a few sections to create contrast and emphasize interesting areas.
Safe Display Ideas
- Glue the finished piece to a cardboard or wood base to keep it stable.
- Place fragile sculptures under a clear plastic container or in a display box.
- Label each piece with the artist’s name, age, and a creative title to give it a gallery feel.
Safety Tips and Mess Management
Because toothpicks are small and pointed, it is important to match the project setup to the age and maturity of the builder. A few simple precautions keep the focus firmly on fun and creativity.
- Supervise young children and store unused toothpicks out of reach after the activity.
- Provide safety scissors or cut toothpicks in advance rather than allowing kids to snap them by hand.
- Cover the work surface for easy cleanup, and keep a damp cloth nearby for glue spills.
- Remind builders not to put toothpicks or marshmallow connectors in their mouths once construction starts.
Fun Variations to Keep the Project Fresh
Once the basic concept becomes familiar, it is easy to refresh toothpick sculpting with small twists. These variations can turn the craft into a weekly tradition that never feels exactly the same twice.
- Timed challenges: See what each person can build in ten or fifteen minutes using a limited number of toothpicks.
- Theme nights: Choose a theme such as “space,” “underwater,” or “cityscape” and create sculptures that fit the prompt.
- Collaborative builds: Work together on one large piece, assigning different sides or sections to each artist.
- Light and shadow play: Shine a lamp across the sculpture and trace the shadows it casts on paper.
Frequently Asked Questions About Toothpick Sculptures
How long does a typical project take?
Small, simple structures can come together in 20–30 minutes, while taller or more detailed sculptures may stretch into several short sessions. Glue drying time often becomes the limiting factor, so it helps to build in stages.
What kind of glue works best?
White school glue is usually strong enough for most projects and is child-friendly and easy to clean. For more advanced or intricate adult builds, a thicker craft glue or wood glue can offer added strength, but it may require closer supervision.
Can very young children participate?
Yes, with adjustments. Preschoolers and early elementary children do best with toothpicks combined with soft connectors like clay or marshmallows, and they may need help holding pieces steady while glue sets.
How can I prevent sculptures from collapsing?
Encourage builders to use triangle shapes, cross braces, and sturdy bases as early as possible. Working in sections and letting each layer dry before adding the next also greatly reduces the chance of dramatic collapse.
Is it possible to reuse the toothpicks?
Once glued, toothpicks are usually difficult to separate without breaking, so most projects are not reusable. However, you can encourage sustainable crafting by saving damaged pieces for collages, mixed-media art, or kindling for outdoor campfires where permitted.
Toothpick sculpting is a wonderfully flexible activity: it can be a quick rainy-day craft, an art lesson in disguise, or an ongoing design challenge that grows more ambitious over time. With just a box of toothpicks and a bit of glue, anyone can experiment with balance, structure, and imagination in a delightfully small-scale world.