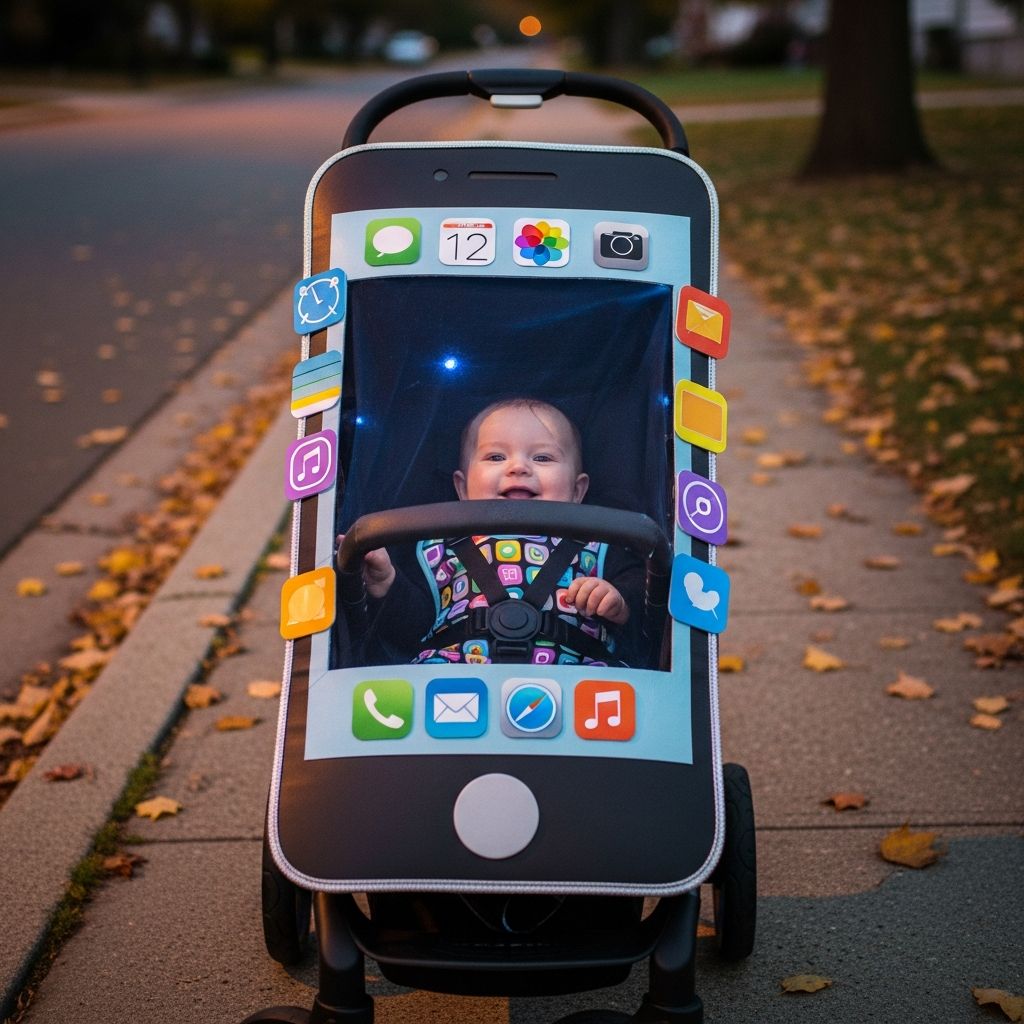
Transform your baby’s stroller into a playful, oversized smartphone and let your little one roll through Halloween like a tiny tech icon. This project uses simple craft materials, is beginner-friendly, and can be customized to match any color scheme or phone style.
Why a Smartphone Stroller Costume Works So Well
A giant smartphone wrapped around a stroller is eye-catching from a distance, yet your baby still sits comfortably in familiar gear. The large flat surface gives you a huge “screen” to decorate with icons, photos, or jokes that reflect your family’s personality.
Unlike many bulky baby costumes, this idea keeps the main structure on the stroller frame instead of your child’s body, so there is less fussing with itchy fabrics and more room for warm layers underneath.
Planning Your Design Before You Cut Anything
Spending a few minutes planning saves time and frustration later. Decide what type of smartphone look you want and how it will attach to your stroller before you start cutting foam or cardboard.
Decide on the “Phone Style”
You don’t need perfect technical proportions; you just want a tall rectangle with rounded corners and a centered screen area. Think about what will look familiar at a glance rather than obsessing over exact measurements.
- Classic smartphone: Simple black or white frame with a clean screen and a single home button.
- Colorful cartoon style: Bright borders, oversized icons, playful fonts, and glittery tape.
- Photo-theme screen: Use mini family photos, baby pictures, or pet photos as app icons.
- Halloween-themed screen: Replace app icons with ghosts, pumpkins, bats, or candy.
Measure the Stroller, Then Choose Your Board
Every stroller is different, so take quick measurements of the front panel area where the phone face will sit. You want the board tall enough to look impressive but narrow enough that wheels, brakes, and baby’s legs still have clearance.
- Measure the width between the stroller’s front frame bars.
- Measure from the top handle area down to just above the front wheels.
- Allow space so your baby can still see out, if you prefer, by keeping the lower cutout higher.
Materials and Tools You’ll Need
Most supplies are easy to find at craft stores, office supply shops, or even the school supply aisle. You can substitute based on what you already own, but a sturdy base material is important so the costume holds its shape.
| Item | Suggested Options | Notes |
|---|---|---|
| Base board | Foam core board, thick poster board, or lightweight cardboard | Large enough to cover the front of the stroller with some border. |
| Cutting tool | Utility knife, craft knife, or heavy scissors | Use a sharp blade for smooth edges and always protect your work surface. |
| Measuring tools | Ruler, yardstick, or measuring tape | Helps keep lines straight and proportions consistent. |
| Drawing supplies | Pencil, fine-tip marker, and thicker marker or paint pens | Pencil for layout, markers for final lines and details. |
| Decorative tape | Colored duct tape, washi tape, metallic tape | Great for borders, edges, and a faux metal frame. |
| Color fills | Acrylic paint, markers, or colored paper | Use to fill the screen background and icons with bold color. |
| Attachment method | Ribbon, Velcro dots/strips, zip ties, or string | Choose something that won’t damage the stroller and is easy to remove. |
| Optional extras | Printed photos, sticker letters, glitter, foam stickers | Add personality and detail without much extra work. |
Step-by-Step: Building the Giant Phone Face
This is the main visual piece of the costume. Think of it as a big, decorated shield that turns the front of your stroller into a phone screen.
1. Cut the Main Phone Shape
- Place your foam or poster board on a protected surface such as a large piece of scrap cardboard or an old cutting mat.
- Mark a tall rectangle that fits the approximate width of the stroller front with a few extra inches overhanging on each side.
- Round off the four corners by tracing around a bowl, cup, or lid, then cutting along the curved lines.
- Smooth any rough edges with another careful pass of the blade or by lightly trimming with scissors.
2. Sketch and Cut the Screen Opening (Optional)
You can either leave the board solid and draw a screen, or cut an opening so your baby can peek through like a living wallpaper image. If you choose an opening, keep plenty of structure around the edges.
- Lightly draw a centered rectangle a few inches in from each side and from the top and bottom edges.
- Use your ruler so lines stay straight and the border width looks even.
- Cut along the lines with your craft knife, removing the inner rectangle to create a window.
- If the cut edges look rough, cover them later with colored or metallic tape.
3. Add the Frame and Border Details
The border sells the illusion. A bold edge separates the screen from the outside world and makes the shape read as a phone rather than a random rectangle.
- Run metallic or colored tape around the outside edges to mimic a metal or plastic phone body.
- Use a contrasting color for an inner border around the screen opening or drawn screen.
- Consider adding a thin black inner line with marker to suggest a glass screen set into the frame.
4. Draw or Build the Home Button and Top Sensors
Small details like a home button and front camera make the design instantly recognizable. You can keep these simple and stylized.
- Trace a cup or small lid to make a neat circle for the home button at the bottom center of the screen.
- Draw a smaller circle or square inside the button, or outline it with metallic tape.
- At the top, sketch a tiny circle for the camera and a horizontal slot for the speaker.
- Fill these shapes with black or dark gray marker so they stand out but don’t overpower the icons.
Designing a Fun, Personalized Screen
This is where your creativity comes in. Think of the screen as a poster full of inside jokes, baby milestones, or family favorites, arranged in a grid like app icons.
Ideas for Custom App Icons
- Family chat: Draw word bubbles with grandparents’ names or tiny portraits.
- Snack app: Icons shaped like milk bottles, bananas, or favorite toddler snacks.
- Nap tracker: A sleepy moon or cloud icon with a silly label like “Nap Mode”.
- Pet cam: Use a sticker or mini photo of the family pet as an icon.
- Halloween hub: Icons shaped like candy, pumpkins, ghosts, and spiders.
Simple Layout That Looks Like a Real Screen
- Lightly draw a grid of rounded squares where your icons will live.
- Either draw each icon by hand, or glue in small colored paper shapes and decorate them.
- Add tiny labels under each icon using sticker letters or neat handwriting.
- Leave some empty space at the top for a signal bar, time, and battery symbol if you want extra realism.
Attaching the Phone to the Stroller Safely
Once the big phone face is done, the next step is attaching it so that it stays secure while you walk, but can still be removed without damaging the stroller.
Choosing the Right Attachment Method
- Ribbon or fabric ties: Gentle on the stroller frame and easy to untie when you’re done.
- Velcro dots or strips: Great if you want to take the costume on and off quickly, or split it into multiple panels.
- Zip ties or twist ties: Very secure, but plan ahead because you may need scissors to remove them.
- String or yarn: Works in a pinch; just double-knot for safety and keep tails short.
Where and How to Attach
- Hold the finished phone board up to the stroller front and decide the exact height you like.
- Mark small spots on the board where it lines up with the stroller’s frame bars or handles.
- Punch or carefully cut small holes in those spots for threading ribbon or ties through.
- Attach the board to the stroller frame at two or three locations on each side so it doesn’t wobble.
- Check that brakes, harnesses, and canopy still work and that your baby has room to move legs comfortably.
Comfort and Safety Tips for Baby
Costumes should never compromise safety. Think through how your baby will experience this setup and do a short test walk before heading out for a long event.
- Confirm that the stroller harness still fits securely and is not blocked by the board.
- Avoid covering the stroller ventilation or fully enclosing your child behind solid materials.
- Use lightweight materials so the stroller does not become front-heavy or difficult to push.
- Keep attachment knots and zip ties where little hands and feet can’t become tangled.
- Bring tape or an extra piece of string with you in case a corner starts to loosen while trick-or-treating.
Coordinated Costumes for the Whole Family
Once the stroller becomes a smartphone, it’s easy to build a theme around it. You can dress the adults and older kids as characters that belong in a digital world.
- App icons: Each family member dresses in a solid color with a large icon or logo on their shirt.
- Notification crew: Make simple cardboard speech bubbles with text alerts and wear them on strings around your necks.
- Tech support parents: Wear T-shirts that say things like “System Administrator” or “Battery Saver” and carry a coffee cup as your “power source.”
- Low-tech contrast: Pair the giant smartphone stroller with a family member dressed as an old-fashioned rotary phone for a funny generational mashup.
Budget and Time Checklist
This project can be as simple or as detailed as you like. Here is a quick glance at what to expect in terms of time and cost, assuming you already own basic tools like scissors and a ruler.
| Project Element | Approximate Time | Approximate Cost |
|---|---|---|
| Planning and measuring | 20–30 minutes | Free |
| Cutting phone shape and window | 20–40 minutes | Board: low cost depending on size and material |
| Decorating border and hardware details | 30–45 minutes | Tape and markers: small craft budget |
| Designing and coloring icons | 45–90 minutes | Reduced if you use printed images you already have |
| Attaching to stroller and testing | 15–20 minutes | Ribbon, Velcro, or ties: low cost |
Frequently Asked Questions
How early should this costume be prepared?
Building the smartphone stroller costume a few days before Halloween gives you time to tweak the fit, adjust the decorations, and make sure everything feels secure. Avoid leaving it until the last minute so any unexpected issues, like a board that is too wide for doorways, can be fixed without stress.
Is foam board better than cardboard?
Foam board usually stays flatter and is lighter than regular cardboard, which helps the stroller roll smoothly and prevents the costume from sagging over time. Cardboard can still work if you reinforce it with tape along the back and edges.
Can the stroller still fold with the costume attached?
Most strollers will not fold properly with a large flat board tied to the front. If you know you will need to fold the stroller frequently, attach the phone face with Velcro so it can be removed quickly and stored separately in the car.
What if my baby doesn’t like things blocking the front?
If your child prefers an open view, cut a generous window in the screen at eye level so they can see out easily. You can frame the window like a video call or photo app so it still fits the smartphone theme.
Can this be adapted for a car seat or wagon?
Yes, the same phone-face idea can be attached to a car seat base, wagon, or even a small push toy as long as the attachment points are secure and do not interfere with safety harnesses or moving parts. Always test drive the costume for a few minutes before a long event.
Make Your Baby the Cutest “App” on the Block
A smartphone stroller costume combines playful design with practical comfort, letting your baby stay cozy while still joining the Halloween fun. With a bit of board, tape, and imagination, your stroller becomes a rolling billboard of inside jokes, family icons, and sweet baby photos.
Custom colors, personal app icons, and coordinated family outfits ensure that this project can be as subtle or as over-the-top as you like. Once everything is assembled, all that’s left is to head outside and enjoy the comments as your tiny “app” rolls down the sidewalk in style.