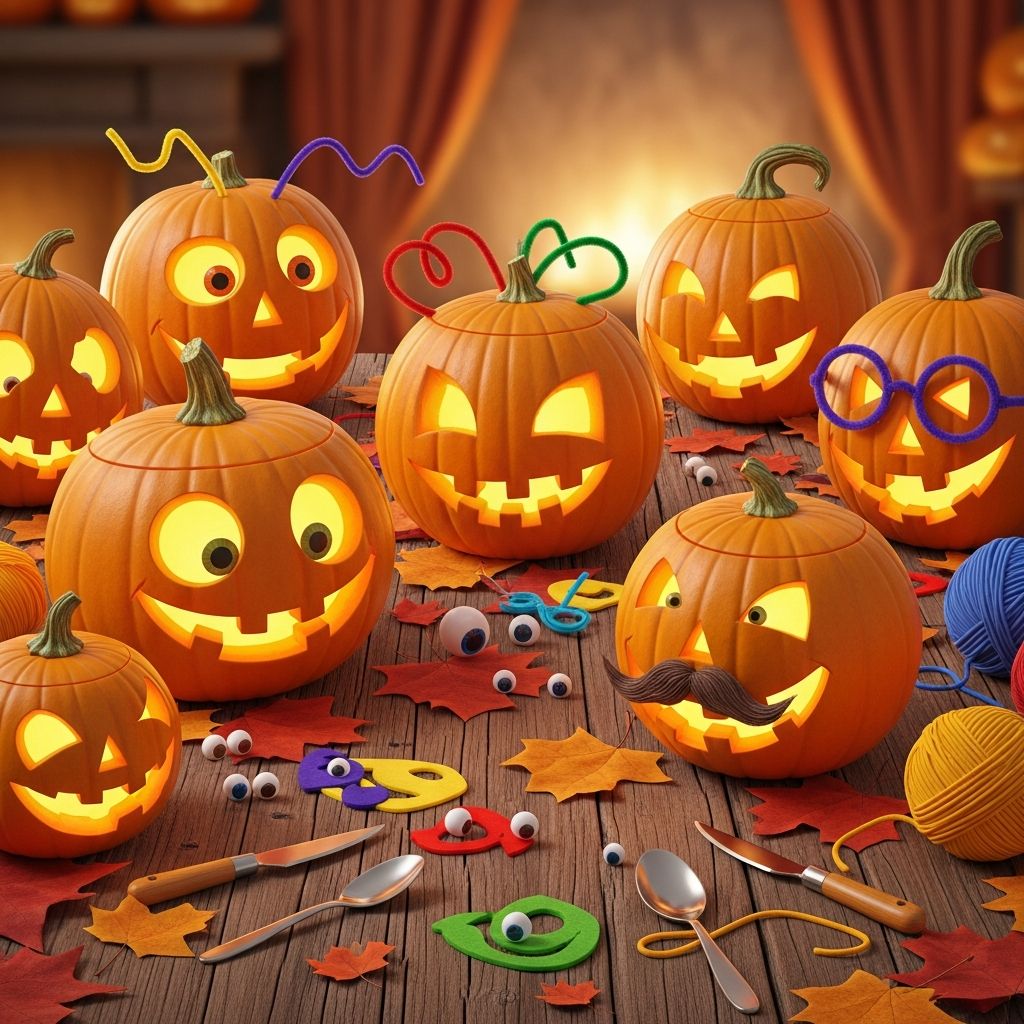
Nothing says Halloween quite like a row of pumpkins grinning from your porch, classroom, or kitchen table. Instead of aiming for spooky perfection, this guide focuses on silly, expressive pumpkin faces that kids can decorate safely and proudly display.
This article walks you through materials, set-up, design ideas, and kid-friendly techniques to turn plain pumpkins into a parade of goofy characters, all using simple craft supplies and a no-pressure approach.
Why Choose Silly, No-Carve Pumpkins?
Traditional jack-o’-lanterns are fun, but carving knives and tiny hands are not always the best match. Silly, no-carve pumpkins let children fully participate without the stress of sharp tools or late-night cleanups.
- Safer for young children because there are no blades or carving tools involved.
- Longer-lasting decorations since the pumpkins stay more intact than carved ones.
- Easier to adapt for classrooms, parties, and group activities with mixed ages.
- More room for creativity because kids can layer, rearrange, and redo their designs.
Gathering Your Pumpkin Play Supplies
You do not need specialty items to start; many of the best silly faces come from basic art supplies already in your home. Mix and match from the list below depending on what you have on hand and the ages of the children participating.
Core materials
- Fresh pumpkins in assorted sizes (mini, medium, and large)
- Washable acrylic paint or tempera paint (orange, white, black, and bright colors)
- Paintbrushes in various sizes and foam brushes
- Permanent marker for adults and washable markers for kids
- Craft glue or low-temperature hot glue (for adults to handle)
Face-building extras
- Googly eyes in different sizes
- Colored construction paper or cardstock
- Pipe cleaners (green, black, orange, and metallic colors)
- Pom-poms, buttons, and felt scraps
- Yarn or string for hair, mustaches, or beards
- Stickers, washi tape, or adhesive foam shapes
Optional finishing touches
- Spray sealant (for outdoor display, adult use only)
- Glitter glue for sparkly features
- Battery-operated tea lights to place around, not inside, pumpkins
Preparing Your Pumpkin Decorating Station
A bit of preparation keeps the project fun instead of frantic, especially with excited kids and a table full of paint. Think of your decorating area as a mini studio designed for messes and creative freedom.
- Cover the workspace with a plastic tablecloth, newspaper, or an old sheet.
- Wipe pumpkins with a damp cloth and let them dry so paint and glue adhere better.
- Pour small amounts of paint into paper plates or palettes to reduce spills.
- Place wet wipes or a bowl of soapy water nearby for quick hand cleanups.
- Assign each child a pumpkin and a spot, especially helpful for group projects.
Step-by-Step: Creating Your First Silly Pumpkin Face
The process below is flexible; you can skip steps, substitute materials, or rearrange the order to fit attention spans and available time. The goal is to keep the activity relaxed and playful.
- Choose your pumpkin “personality.”
Invite children to decide who their pumpkin wants to be: sleepy, surprised, goofy, grumpy, or giggly. This simple storytelling step gives them a direction without boxing in their creativity.
- Paint a base coat (optional).
If you want a more dramatic look, paint the entire pumpkin a solid color such as white, black, or bright green and let it dry before adding details. This can turn an ordinary pumpkin into a more cartoon-like character.
- Sketch basic face shapes.
Use a light-colored pencil or washable marker to outline the eyes, nose, and mouth. Encourage exaggerated shapes: huge round eyes, a zigzag mouth, or a wavy nose.
- Paint and glue facial features.
Fill in your outlines with paint, then layer on extra details like googly eyes, paper teeth, felt eyebrows, or yarn hair. Adults can help with glue application for younger kids.
- Add accessories and personality.
Use pipe cleaners for glasses, mustaches, or funny antennae. Paper hats, bow ties, or mini capes instantly turn a simple pumpkin into a full character.
- Let everything dry completely.
Place finished pumpkins on a protected surface until paint and glue are fully dry, then move them to shelves, steps, or party tables for display.
Five Easy Silly Face Ideas
Need some inspiration to get kids started? Try one of these simple concepts, then encourage them to modify and mix features for their own unique creations.
- The Wide-Eyed Worrier: Oversized googly eyes, a tiny round nose, and a squiggly, zigzag mouth create a perpetually startled pumpkin.
- The Laughing Pumpkin: Half-moon eyes squeezed shut and a huge open mouth with paper teeth give the impression of a pumpkin caught mid-giggle.
- The Wacky Professor: Pipe cleaner glasses, bushy yarn eyebrows, and a drawn-on bow tie transform the pumpkin into a bookish character.
- The Sleepy Dreamer: Simple painted crescent eyes, soft blush circles on the cheeks, and a gentle smile are perfect for younger kids.
- The Monster Mash-Up: Mismatched eyes, a crooked paper nose, and a mouth full of jagged felt teeth make a friendly monster that looks more silly than scary.
Ideas by Age Group
One of the best parts of pumpkin decorating is how easily it can be adapted for different ages and abilities. Use the table below to guide material and design choices.
| Age group | Best materials | Recommended activities |
|---|---|---|
| Toddlers (2–3) | Stickers, large brushes, washable paint, foam shapes | Dab paint on pumpkins, press stickers for eyes and noses, let adults add final details. |
| Preschool (4–5) | Washable markers, small brushes, googly eyes, pre-cut paper features | Draw simple faces, glue on pre-cut mouths and eyes, choose accessories like hats or bows. |
| Early elementary (6–8) | Acrylic paint with supervision, craft glue, felt, pipe cleaners | Design original characters, layer painted and glued-on features, experiment with hair and mustaches. |
| Older kids & tweens (9+) | Fine brushes, detail markers, more intricate paper cutting | Create themed sets (pirates, robots, superheroes), focus on shading, patterns, and small details. |
Turning Pumpkin Decorating into a Family Event
Pumpkin faces become more than a craft when you build a mini event around them. A simple afternoon can feel like a party with a few thoughtful touches.
- Play a Halloween-themed playlist while everyone decorates.
- Serve orange snacks like carrot sticks, cheese cubes, or clementines at a separate “no-paint” table.
- Create a “pumpkin runway” area where finished creations line up for photos.
- Hold playful awards such as “Silliest Smile,” “Goofiest Eyes,” or “Most Colorful Pumpkin.”
Display Ideas for Your Silly Pumpkin Gallery
Once the paint dries, your pumpkins deserve a proper stage. The way you arrange them can add just as much charm as the faces themselves.
- Group pumpkins by theme, such as a family of superheroes, a silly monster squad, or a crew of sleepy pumpkins.
- Place smaller pumpkins on upside-down bowls or boxes to create varying heights on a shelf or mantel.
- Use battery-operated lights or fairy lights around the base to gently highlight the faces at night.
- For classrooms, label each pumpkin with the artist’s name and a title chosen by the child.
Practical Tips to Keep the Project Stress-Free
Halloween crafts should feel fun, not exhausting. A few simple strategies can help you avoid last-minute chaos and meltdowns.
- Limit the number of supplies available at once to prevent overwhelm.
- Offer sample pumpkins or sketches as gentle inspiration, not as standards to copy.
- Encourage kids to celebrate “happy accidents” instead of erasing every smudge or drip.
- Plan a clear stopping point and a drying area so the transition from crafting to cleanup is smooth.
Cleanup and Storage Suggestions
Clean-up is easier if you think ahead. Setting expectations before you open the paint bottles can turn the end of the activity into a cooperative routine instead of a chore.
- Assign kids age-appropriate jobs such as collecting brushes, tossing paper plates, or wiping the table.
- Rinse brushes promptly with warm soapy water to keep bristles soft for future projects.
- Store indoor display pumpkins in a cool, dry spot away from heating vents or direct sunlight to help them last longer.
- Check pumpkins periodically and retire any that begin to soften or mold.
Frequently Asked Questions
How long will decorated pumpkins last?
No-carve pumpkins often last several weeks when kept in a cool, dry place, because the outer skin remains mostly intact. Heat, direct sunlight, and moisture will shorten that timeframe, so bring them indoors in extreme weather.
What kind of paint works best on pumpkins?
Washable acrylic and tempera paints adhere well to the pumpkin’s surface and dry relatively quickly. For outdoor displays, you can add a clear spray sealant once everything is dry, but that step should only be done by adults and in a well-ventilated area.
Can toddlers participate safely?
Yes, as long as adults handle any glue guns or sharp tools and provide non-toxic, washable materials. Give very young children large brushes, sponges, or stickers so they can participate through simple motions without worrying about details.
How do I keep the paint from peeling or flaking?
Cleaning and drying the pumpkin before decorating helps paint grip the surface more effectively. Avoid stacking pumpkins on top of each other or scraping them against rough surfaces once they are finished.
What if my child doesn’t like their pumpkin?
Remind kids that art is about experimenting and that silly faces are meant to be imperfect. Offer small adjustments, like adding accessories or stickers, instead of starting over completely, and focus on the fun experience rather than the final result.
Making Silly Pumpkins a New Tradition
Silly pumpkin faces offer a Halloween craft that is inclusive, low-risk, and rich in opportunities for imagination. With each passing year, children can look back at photos of their creations and see how their skills and ideas have grown, turning a simple project into a seasonal tradition your family or classroom eagerly anticipates.