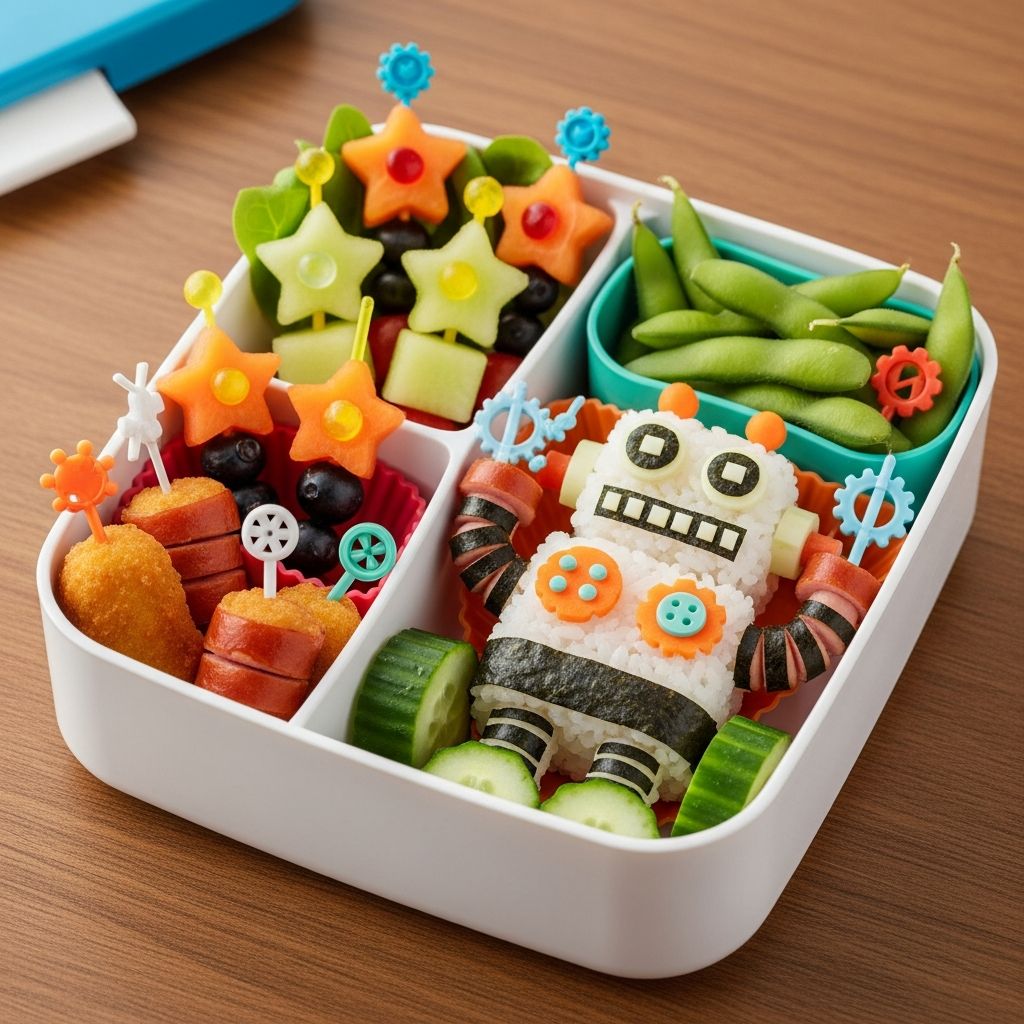
Robot-themed bento lunches turn an ordinary lunchbox into a tiny, edible sci-fi scene. They are surprisingly simple to build with basic ingredients and a bit of imagination, and they can help even reluctant eaters get excited about opening their lunch.
Why Robot Bento Lunches Work So Well
Shaping food into playful robots helps children engage with their lunch visually before they even take a bite, which can encourage picky eaters to try new foods. Parents can use familiar pantry staples to create robot shapes, avoiding elaborate recipes while still making the meal feel special.
- Robots are simple geometric shapes, so basic squares, circles, and rectangles easily become heads, bodies, and buttons.
- Robot themes work with many cuisines, from simple sandwiches to rice bowls and snack-style boxes.
- Colorful fruits and vegetables naturally mimic lights, wires, and panels, adding both fun and nutrition.
Planning a Balanced Robot Bento
Before cutting food into robot shapes, it helps to think about balance: protein, whole grains, fruits, vegetables, and some healthy fats. Once these pieces are in place, decorating and shaping them into robots becomes an extra creative step rather than the main goal.
Use the simple framework below as a guide when planning each lunchbox.
| Category | Examples | Robot Role |
|---|---|---|
| Base & Grains | Sandwich bread, tortillas, rice, mini pitas, crackers | Robot body, head, legs |
| Proteins | Cheese, beans, chicken, tofu, hummus, turkey slices, eggs | Chest plates, gears, power cores |
| Fruits & Veggies | Cherry tomatoes, grapes, carrot coins, cucumbers, berries | Buttons, lights, sensors, wires |
| Healthy Fats | Avocado, nut/seed butters, olives, cheese cubes | Robot “fuel” and shiny metallic details |
| Crunch & Fun | Pretzels, popcorn, veggie chips, whole-grain cookies | Robot tools, antennae, sidekicks |
Essential Tools and Containers
Fancy gadgets are optional; a small collection of basic tools is enough to create clear robot shapes. Using a divided lunch container keeps each piece in place so the finished robot still looks like a robot when the lunchbox is opened.
- Divided lunchbox or bento-style container with at least three compartments.
- Small cookie cutters in circles, squares, and stars for robot faces and buttons.
- Sharp paring knife for cutting rectangles and details.
- Reusable silicone cups to separate small parts like “robot bolts” (nuts, seeds, or crackers).
- Mini food picks or toothpicks (for older kids) to hold robot parts together.
Robot Sandwich Bento: Step-by-Step
This version builds a robot out of a simple sandwich and colorful sides. It works well with any soft sandwich filling and can be scaled up or down depending on your child’s appetite.
Ingredients Idea List
- Whole-grain bread or soft sandwich rolls
- Preferred sandwich filling (turkey and cheese, hummus and veggies, tuna salad, etc.)
- Cheddar or mozzarella slices for robot features
- Cucumber slices and carrot coins for buttons and dials
- Grapes or berries for colorful “power lights”
- Pretzel sticks for robot arms and antennae
Assembly Instructions
- Prepare a sandwich on whole-grain bread and cut one large rectangle for the body and a smaller rectangle for the head.
- Use cheese slices to cut out squares and strips for eyes, mouth, and chest panels.
- Arrange cucumber or carrot coins down the front of the body as control buttons.
- Attach pretzel sticks at the sides for arms and at the top for one or two antennae.
- Fill the remaining compartments with berries, grapes, or other favorite produce as “battery packs” and “energy cells”.
For very young children, skip toothpicks and simply rest the decorative pieces on top of the sandwich so there are no sharp objects in the box. Older kids may enjoy helping assemble their own robot, choosing eye shapes and button colors the night before.
Rice Robot Bento with Veggie Circuits
Rice is naturally moldable, making it ideal for creating compact robot shapes that hold together well in a lunchbox. This style works nicely if your family enjoys leftovers like stir-fried vegetables or grilled chicken.
What You Will Need
- Cooked, slightly sticky rice (white, brown, or mixed)
- Leftover chicken, tofu, or beans for protein
- Small nori (seaweed) strips or olive pieces for faces
- Steamed carrot slices, edamame, or peas for colorful wires and bolts
- A small bowl or plastic wrap for shaping the robot
How to Shape a Rice Robot
- Scoop warm rice into a small bowl or onto a piece of plastic wrap and shape it into a thick rectangle for the robot body.
- Form a smaller rice block for the robot head and gently press to firm it up.
- Place the head and body into the largest compartment of the lunchbox, snugly so they do not slide around.
- Use nori or tiny olive pieces to create eyes, a mouth, and any warning symbols or bolts on the robot.
- Scatter bright vegetables around the robot like cables, wires, and glowing panels, tucking protein pieces alongside.
If you have small silicone cups, designate one as the robot’s “power station,” filling it with edamame, peas, or corn for extra color and fiber. A light drizzle of soy sauce or a small dipping container can be added if your child likes extra flavor.
Snack-Style Robot Control Panel Box
Some days call for a snack-style lunch that offers variety in small bites. A robot control panel box uses small portions of many foods arranged like buttons, levers, and blinking lights on a dashboard.
Control Panel Components
- Crackers or mini rice cakes as base tiles
- Cheese cubes or chickpeas as power cells
- Cut fruit (kiwi, berries, apple slices) as warning lights
- Colorful veggies (bell pepper strips, snap peas, cucumber sticks) as cables and levers
- A small treat such as a dark chocolate square or mini cookie as a secret “robot upgrade”
Arranging the Control Panel
- Line one long compartment with crackers or mini rice cakes in a neat grid.
- Place cheese cubes or chickpeas on top of some of the crackers to look like raised buttons.
- Arrange fruit pieces in rows or clusters that mimic blinking lights on a screen.
- Lay long veggie strips across the top or along the sides to resemble levers and cables.
- Hide the small treat in a corner compartment as a reward for finishing the rest of the “robot mission.”
This style of bento is especially useful for kids who enjoy grazing, because it lets them mix and match combinations while still getting a balanced selection of nutrients. Parents can quickly swap items based on what is available in the fridge without changing the overall layout.
Time-Saving Strategies for Busy Mornings
Creative lunches do not need to take a long time if parts are prepped in advance. Preparing elements in batches makes it easy to build a robot-inspired box in a few minutes before school.
- Wash, chop, and store fruits and vegetables in clear containers over the weekend.
- Pre-cut cheese slices and bread into simple shapes and freeze them to use throughout the week.
- Cook a batch of rice or pasta to reuse in multiple bentos as robot bodies or side dishes.
- Keep a small container of “robot accessories” such as pretzel sticks, mini crackers, and dried fruit for fast decoration.
Older kids can help with choosing shapes and assembling robots, turning lunch prep into a short family activity. Involving them increases the chance that they will actually eat what goes into the box, because they feel invested in the results.
Safety, Storage, and School Rules
While robot-themed bento boxes are fun, food safety and school policies should always come first. Using insulated bags and ice packs keeps perishable items at safe temperatures until lunchtime.
- Check school guidelines about nuts, seeds, and toothpicks before including them in lunch.
- Cut grapes, cherry tomatoes, and other round foods in halves or quarters for younger children.
- Use leakproof containers or sauce cups for dips and dressings to prevent soggy robots.
- Label the lunchbox clearly so it finds its way back home for the next day’s mission.
If your child’s lunch will sit out for several hours, prioritize items that hold up well without refrigeration, such as hard cheeses, firm fruits, and cooked vegetables. You can also pack a frozen yogurt tube or frozen sponge wrapped in foil as an extra cooling element.
Ideas for Themed Robot Weeks
Once the basic robot concept feels comfortable, it can easily stretch into a full week of varied robot lunches. Changing only a few components each day keeps things interesting without requiring entirely new ideas.
- Metallic Monday: Use silver cupcake liners, round crackers, and olives as “metal bolts.”
- Wiring Wednesday: Focus on colorful veggie strips and noodles to represent tangled wires.
- Fuel Cell Friday: Emphasize high-energy foods like hummus, beans, and hearty grains called “fuel cells.”
Simple handwritten notes or tiny labels taped inside the lid can describe each robot’s mission, such as “collect all carrot power rods” or “protect the blueberry battery.” These stories give children something fun to read and connect with during lunchtime.
Frequently Asked Questions about Robot Bento Lunches
Do robot-themed lunches take a lot of time?
Once you have a few basic shapes and ideas, most robot lunches only take a couple of extra minutes compared to a standard sandwich and snacks. Prepping ingredients in advance, such as cut vegetables and pre-portioned crackers, keeps the creative part quick.
What if my child is a very picky eater?
Start with foods your child already likes and simply rearrange them into robot shapes to build trust. Over time, introduce one new fruit or vegetable as a small decorative piece, such as a single carrot button or a grape “sensor,” so the new food feels safe and manageable.
Can these ideas work for allergies or special diets?
Robot themes are flexible because they rely on shapes, not specific ingredients. Swap in gluten-free crackers, dairy-free cheese alternatives, or nut-free spreads as needed while keeping the same robot body, head, and button layouts.
How do I keep everything from shifting during transport?
Use a snug container with a tight-fitting lid and pack empty spaces with sturdy items like cucumber sticks or silicone cups. Keeping the lunchbox upright in an insulated bag and avoiding large empty gaps will help each robot arrive looking intact.
Are these lunches only for kids?
Robot bento boxes can be a playful option for teens and adults too, especially on busy days when a bit of fun makes lunch more appealing. Adjust portion sizes and flavors to suit older appetites while keeping a few whimsical details like “control panels” or “power cells.”
Robot-themed bento lunches offer a creative way to pack balanced meals and spark kids’ imaginations at the same time. With simple shapes, everyday ingredients, and a sense of play, any lunchbox can become a tiny robot ready to power your child through the day.