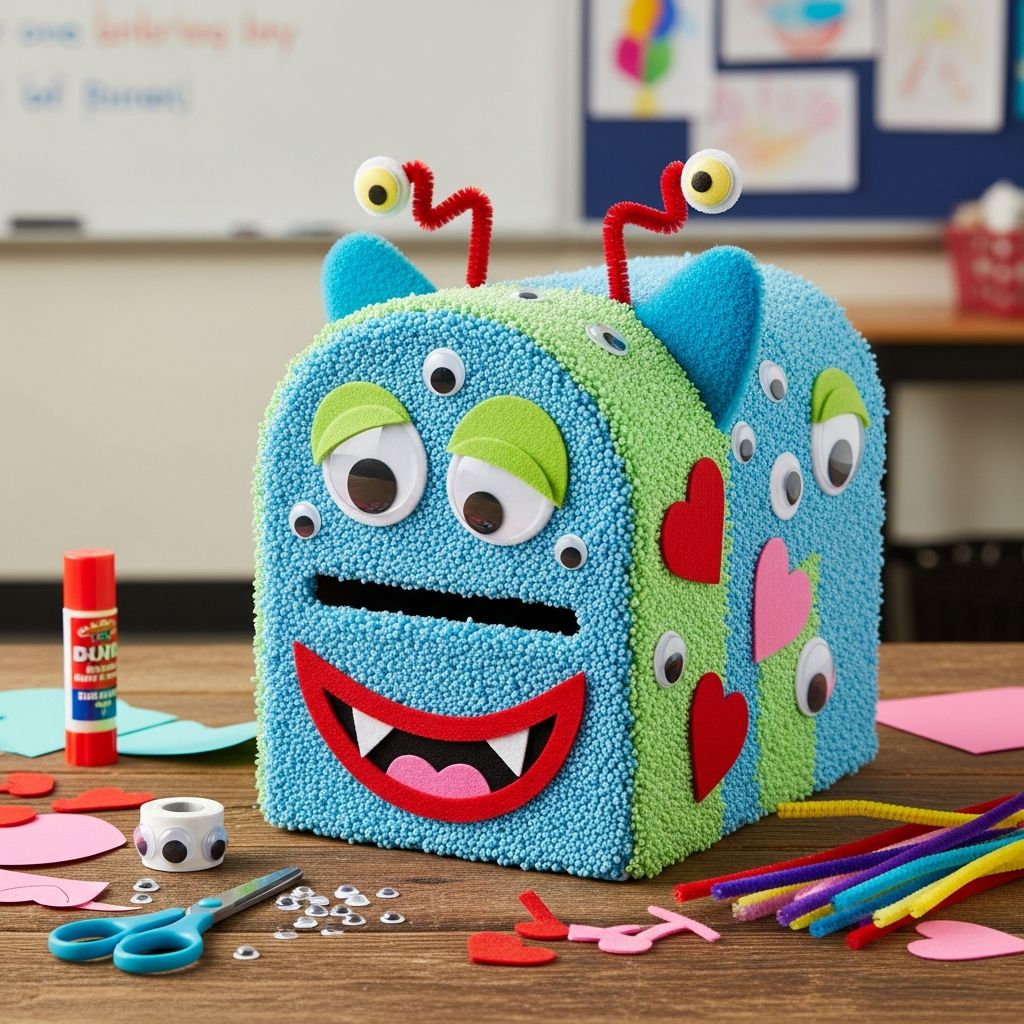
Transform simple boxes and bags into silly, not-scary monster mailboxes that make your classroom Valentine card exchange feel like a party instead of just a hand-off of paper. These fun creatures give every child a special place to collect cards and show off their creativity, using materials that are inexpensive and easy to find.
Why Monster Mailboxes Are a Great Classroom Project
Monster-themed mailboxes are a smart choice because they are playful, gender-neutral, and flexible enough to suit a wide range of ages and abilities. Each creature can look totally different, so every student’s personality can shine while still fitting into a cohesive classroom theme.
- Monsters can be cute, funny, or quirky, which avoids arguments about characters, trends, or themes.
- The project builds fine motor skills with cutting, gluing, painting, and drawing details.
- Students gain a sense of ownership and pride when they use a mailbox they created to hold their Valentines.
Suggested Materials and Budget-Friendly Substitutes
You can adapt this project to whatever you already have in the classroom or around the house. The key is to start with a container that can sit on a desk or shelf and has enough room for a card slot.
| Item | Best Option | Low-Cost Substitute |
|---|---|---|
| Base container | Empty tissue box or small shipping box | Paper lunch sack, cereal box, or shoebox |
| Covering | Colorful construction paper or cardstock | Newsprint, brown paper bags, or wrapping paper |
| Adhesive | Glue sticks or white school glue | Tape (masking or clear) for very young children |
| Eyes & details | Googly eyes, foam sheets, pom-poms, pipe cleaners | Hand-drawn eyes, paper cutouts, yarn scraps |
| Color & texture | Markers, crayons, kid-safe paint | Colored pencils, highlighters, collage from magazine scraps |
Optional “Wow” Supplies
- Glitter glue for sparkly monster fur and scales.
- Felt or fabric scraps for tongues, wings, and ears.
- Stickers and foam shapes for a quick decorating shortcut.
Planning the Activity for Different Age Groups
Before you start cutting and gluing, decide how much of the project will be prepped by adults and how much will be left open-ended for students. Younger children need more pre-cut pieces and simple choices, while older kids can handle more design responsibility.
- Preschool to Kindergarten: Pre-cut large shapes for mouths, teeth, and eyes; let children glue, color, and place the features themselves.
- Grades 1–3: Provide simple templates but encourage kids to draw, cut, and build their own monster features.
- Grades 4 and up: Offer only the basic box and materials, then treat the rest like a design challenge with sketches, measurements, and creative problem solving.
Step-by-Step: Classic Box Monster Mailbox
This version uses a rectangular tissue or shipping box and turns the mail slot into a giant monster mouth. You can modify it to suit your students’ skills and time.
Step 1: Prepare the Card Slot
If the box already has a top opening, you can use it as the mouth. Otherwise, cut a slit or rectangle on the top or side where cards will be inserted. Make sure it’s wide enough for envelopes and flat cards.
- For safety, an adult should handle cutting with a craft knife or scissors.
- If using paper bags, you can cut the opening near the top of the bag’s front side.
Step 2: Wrap the Monster “Body”
Cover the outside of the box with colored paper, wrapping paper, or paint to create a solid base color. This is the monster’s skin or fur and makes the finished mailbox look more polished.
- Use one bold color for younger kids, or let older children collage multiple colors or patterns.
- Remind students not to cover the card slot completely; if they do, an adult can carefully re-cut the opening.
Step 3: Add Teeth and Tongue
Turn the card opening into a silly monster mouth by lining it with teeth and a tongue. This detail turns an ordinary slot into a fun focal point.
- Cut triangles from white paper to make sharp, cartoonish teeth; glue them along the top and bottom edges of the opening.
- Cut a long oval or wavy strip from red or pink paper for a tongue and glue it just inside the mouth.
Step 4: Create Eyes and Facial Features
Monster eyes are where the personality really comes through. Encourage students to experiment with the number, size, and expressions of the eyes.
- For quick eyes, glue on large googly eyes or draw pupils on white paper circles.
- To change expressions, tilt the eyes inward for a goofy look or add eyebrows for an exaggerated mood.
Step 5: Add Arms, Legs, and Extras
Once the monster has a face, students can imagine what kind of body it might have. They can keep it simple or go all-out depending on time and materials.
- Cut arms, legs, horns, or wings from cardstock, then tape or glue them to the sides and back of the box.
- Use pipe cleaners, yarn, or paper strips for hair, antennae, or tails to give the monster extra flair.
Step 6: Personalize with Names
Each mailbox should clearly show the owner’s name so classmates can deliver Valentines to the right monster. Make the name label part of the design, not just an afterthought.
- Have students write their names on a contrasting piece of paper and decorate it, then glue it like a name tag on the front or top.
- For very young children, pre-print names in a large, clear font and let them decorate around the letters.
Alternative Monster Mailbox Styles
If you want variety or have a mix of ages, you can offer a few versions of the monster mailbox and let kids pick their favorite format. This also solves problems if you run short on a certain type of container.
Standing Tube Monster (Using a Can or Tube)
A tall, cylindrical container like an oatmeal can or mailing tube makes a perfect body for a standing monster that looks different from the usual box shape.
- Cut a horizontal mouth opening near the top of the tube and cover the tube in paper or paint.
- Add long paper legs at the base and a cluster of eyes and horns at the top for a towering, silly creature.
Flat-Front Wall Monster (Using a Folder or Large Envelope)
When desk space is limited, try a flat monster mailbox that hangs on a wall, cubby, or the side of a desk. This version works well in crowded classrooms.
- Decorate the front of a large envelope or pocket folder as the monster face and body.
- Cut a mouth opening on the front and tape the sides securely, leaving enough depth inside for cards.
Bag-Based Monster for Fast Prep
Paper lunch sacks are ideal when time is short or when you have a very large group. They stand on their own and are easy for small hands to handle.
- Have students decorate the front of the bag as the monster’s face, then cut a slit for the mouth near the top.
- Fold the top down to close it after the card exchange and send the monster home as a keepsake.
Classroom Management Tips for a Smooth Craft Session
A little planning can transform a messy, chaotic craft into a calm, creative workshop. Structure the activity with stations and clear expectations so students focus on creating rather than competing for supplies.
- Set up supply stations for cutting, gluing, and decorating instead of placing everything on each desk.
- Use simple visual examples to show a “finished but flexible” monster so kids know what is expected without copying exactly.
Time-Saving Strategies for Teachers
Valentine week is usually busy, so choose shortcuts that preserve creativity while cutting down on prep and cleanup. Small adjustments can save a lot of teacher energy.
- Pre-wrap boxes in colored paper a day or two ahead, then let students only handle the decorating.
- Ask families to send in clean boxes, tubes, or bags a week before the party so you are not scrambling for containers.
Integrating Learning Goals into the Craft
Monster mailboxes can be more than a holiday activity; they can support academic and social-emotional goals. Link the craft to your curriculum to make the time feel purposeful as well as fun.
- Integrate writing by having students name their monster and write a short description or backstory to display alongside the box.
- Practice math by measuring how wide the card slot needs to be or comparing box dimensions in small groups.
Display Ideas for a Festive Classroom
Once every mailbox is finished, showcase them in a way that makes the classroom feel special. A thoughtful display turns the monsters into part of your seasonal decor and builds anticipation for the card exchange.
- Line monsters along windowsills, bookshelves, or a designated “Monster Mail Street” table.
- Group them by colors or monster “families” and add simple signs with each group’s theme name.
Safety, Accessibility, and Inclusive Design
Every student should be able to participate fully, regardless of age, motor skills, or sensory preferences. Adapt the materials and steps so every child feels successful.
- Offer pre-cut pieces, peel-and-stick foam shapes, and easy-grip scissors for students who struggle with fine motor tasks.
- Provide quieter, low-mess options like crayons and stickers for kids who dislike sticky or messy materials.
Fun Variations and Themed Monster Ideas
Once the basic concept is in place, you can tweak the monster theme to match your class interests or broader curriculum themes. This keeps the traditional Valentine mailbox idea feeling fresh year after year.
- Space Monsters: Add tiny paper planets, stars, and rocket ships around the box and call it a Valentine space station.
- Undersea Monsters: Use blues and greens, add paper seaweed and bubbles, and call them sea creatures from a Valentine ocean.
- Robot Monsters: Use silver or gray paper, draw bolts and buttons, and make the mouth look like a little control hatch.
FAQ: Monster Valentine Mailboxes
How far in advance should the mailboxes be made?
It is usually best to create the mailboxes a few days before your Valentine celebration so students can enjoy looking at them and gradually start delivering cards. This also gives plenty of time for absent students to make theirs without feeling rushed.
What if a student forgets to bring a box or bag?
Keep a small stash of grocery bags, envelopes, or spare boxes on hand so every child has a base to decorate. The important part is the creative decorating and the shared experience, not having matching containers.
How can this activity be completed in less than one class period?
To fit the project into a short time block, handle the wrapping and cutting of card slots ahead of time and offer only a few types of decorations. Focus on key features like eyes, mouth, name label, and one or two extra details, rather than many small embellishments.
How do you manage the mess from glue and small pieces?
Use trays or large paper sheets under each work area to catch scraps and drips. At the end of the session, assign cleanup roles such as scrap collectors, table wipers, and supply organizers so the classroom resets quickly.
Can the monster theme work for older students?
Yes. Older students can treat the project as a design challenge by sketching blueprints, creating more detailed characters, adding moving parts like hinged jaws or flaps, and reflecting on their design choices in a short written piece. The playful monster concept can easily be scaled up in complexity to match their skills.
Making Valentine’s Day Memorable with Creative Monsters
Monster Valentine mailboxes turn a simple classroom tradition into a hands-on, imaginative experience that students remember long after the candy is gone. With a few basic supplies and some thoughtful planning, you can guide children as they design their own friendly creatures, practice important skills, and enjoy a warm sense of community when those little cards start pouring into each monster’s mouth.