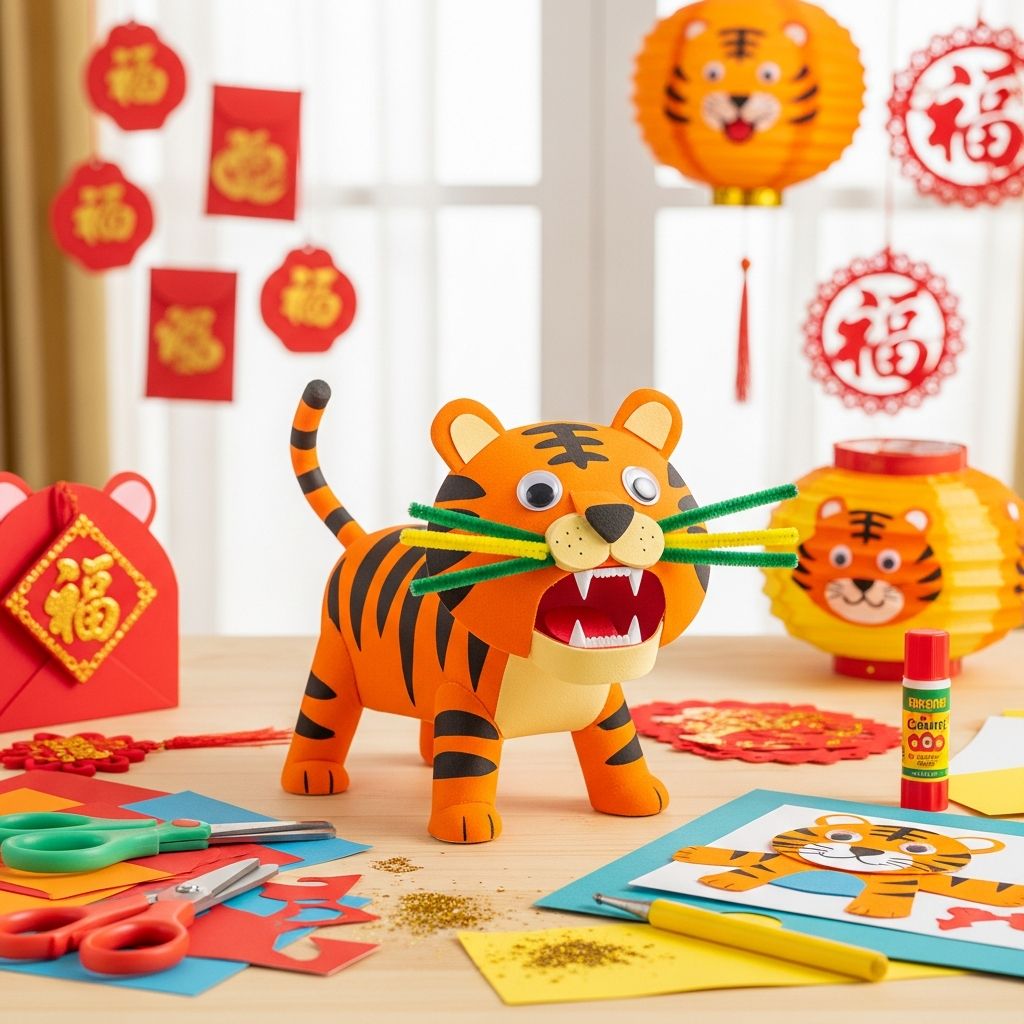
Lunar New Year is a joyful time to gather with family, honor traditions, and welcome fresh beginnings, and a tiger-themed craft offers a playful way for children to connect with the holiday’s powerful symbolism.
This guide presents a fully original, family-friendly tiger craft that emphasizes creativity, fine motor practice, and age-appropriate cultural learning, all organized in a new structure with fresh explanations and activities.
Why a Tiger Craft for Lunar New Year?
The tiger is often associated with courage, protection, and energy in many East Asian traditions, making it an inspiring subject for children’s artwork during Lunar New Year. Whether or not it is officially a Tiger year, a tiger craft can help kids explore the Chinese zodiac and its animal characters in a hands-on, approachable way.
Crafting together also gives adults an opportunity to introduce simple cultural concepts, such as lucky colors, festive greetings, and the idea of welcoming good fortune, without relying on dense explanations or formal lessons.
Setting the Scene: A Mini Lunar New Year Corner
Before making the tiger itself, create a small celebration space so the craft feels like part of a larger tradition rather than a one-off activity. This can be an end table, a low shelf, or any clear spot your family can safely decorate together.
Aim for a balance between festive elements and child-friendly simplicity, emphasizing colors and objects that invite curiosity and conversation instead of cluttering the area with too many details.
Simple Decorations to Include
- A red cloth or paper as a base to suggest luck and celebration.
- A small bowl of oranges or clementines to represent wishes for prosperity.
- Homemade paper lanterns or banners with child-drawn patterns in red and gold.
- A dedicated spot where the finished tiger craft will be displayed like a tiny guardian.
Materials for the Tiger Craft
The project is designed to use common household and classroom supplies so that families and educators can get started without hunting for specialty items. Feel free to substitute or simplify based on what you already have on hand.
| Item | Purpose | Possible Substitutes |
|---|---|---|
| Orange construction paper or cardstock | Main body and head of the tiger | White paper colored with crayons or markers |
| Black marker or black paper strips | Tiger stripes and facial details | Dark brown marker, dark paint, or colored pencils |
| White paper or foam | Eyes, muzzle, and inner ears | Light-colored scrap paper |
| Red paper | Festive background pieces or mini banners | Any bright warm color, such as yellow or gold |
| Glue stick or liquid glue | Assembly of all paper parts | Double-sided tape for quick builds |
| Child-safe scissors | Cutting shapes and stripes | Pre-cut shapes prepared by an adult |
| Googly eyes (optional) | Adds a playful, animated look | Drawn or cut-out paper eyes |
| String or craft stick (optional) | Turn the tiger into a puppet or hanging decoration | Paper straw, chopstick, or ribbon |
Step-by-Step: Building the Tiger
The following instructions guide you through creating a simple yet expressive tiger that children can easily personalize. Adjust the complexity based on age: younger kids can work with pre-cut shapes, while older children can design more detailed features.
1. Create the Tiger’s Head and Body
- Cut a large circle from orange paper for the head; for very young children, an adult can trace a cup or small bowl to provide a guiding outline.
- Cut a slightly larger oval or rectangle with rounded corners for the body, making sure it feels sturdy enough if you plan to mount it on a stick or hang it.
- Glue the head onto the top of the body, overlapping them slightly so the tiger feels like one connected character rather than two separate shapes.
2. Add Ears, Paws, and Tail
- Cut two small orange triangles or rounded ear shapes and glue them to the top of the head, either behind or in front depending on the look your child prefers.
- Create paws by cutting two short rectangles or circles, then attach them to the bottom or front of the body to suggest the tiger is standing or peeking over a surface.
- Cut a long, thin strip of orange paper for the tail; gently curve it with your fingers and glue it so it appears to swish playfully to one side.
3. Design the Face
- Cut a small white oval for the muzzle and glue it near the bottom center of the face.
- Either glue on googly eyes or cut small white circles with smaller dark circles for pupils; let children place them high, low, close, or wide apart to give the tiger a unique expression.
- Use a marker to add a triangle nose, whisker dots, and a smile or fierce roar, depending on the story your child imagines.
4. Add Stripes and Details
- Cut thin black or dark strips of paper or simply draw bold stripes directly onto the head, body, tail, and paws.
- Encourage children to look at a reference image of a tiger and notice how stripes are not perfectly even, then recreate that wild, organic look in their own way.
- Finish off with inner ears, small cheeks, or rosy dots using crayons or colored pencils to soften or dramatize the tiger’s personality.
Turning the Tiger into a Festival Star
Once the basic tiger is complete, you can transform it into a puppet, hanging charm, or part of a larger decorative scene. This step invites imaginative play, storytelling, and opportunities for children to use the craft beyond the day it was made.
Option A: Tiger Puppet
- Attach a craft stick, paper straw, or sturdy strip of cardboard to the back as a handle.
- Use the puppet to act out friendly New Year greetings, mini parades around the living room, or pretend lion and dragon dances featuring your tiger hero.
Option B: Hanging Tiger Talisman
- Punch a small hole at the top and thread ribbon, string, or yarn through it.
- Hang the tiger from a door handle, a bulletin board, or your Lunar New Year corner so it seems to watch over the celebration.
Option C: Tiger Parade Wall
- Invite each family member to make their own tiger, then tape them in a row along a wall or window to create a paper parade.
- Label each tiger with a name or a New Year wish, such as “Bravery,” “Kindness,” or “Good Health,” to reinforce the positive traits you hope the year will bring.
Adding Lunar New Year Meaning in Kid-Friendly Ways
While children craft, you can naturally introduce simple ideas related to the holiday without turning the activity into a formal lesson. Focus on a few memorable points that match their age and attention span.
Conversation Starters While Crafting
- Explain that many families follow a different calendar based on the moon, so the celebration does not always fall on the same day every year.
- Share that each year links to an animal in the zodiac, and that tigers are often seen as brave and protective, which is why your family is making a tiger today.
- Talk about red and gold as colors that symbolize happiness and good fortune, and invite children to add these colors around their tiger.
Extending the Activity: Learning Through Play
Once your tiger craft is complete, keep the learning going with simple, play-based activities that build on what children have just created. These extensions reinforce cultural understanding, vocabulary, and storytelling skills.
Storytelling with the Tiger
- Ask children to name their tiger and invent a short adventure where it helps a friend, protects the family, or brings good luck to the house.
- Encourage them to act out the story with their puppet or hanging tiger, using different voices or sound effects for extra fun.
A Simple Zodiac Animal Match Game
- Draw or print small cards with different zodiac animals and their names, then invite kids to match the animal picture with the written word.
- Use the tiger card as a starting point and talk about which family members were born in the tiger year, if you know, or simply imagine who might be a “tiger friend.”
Tips for Different Age Groups
The same basic tiger design can be adapted to toddlers, preschoolers, and older children simply by changing how much cutting, drawing, and detail work they do. This makes the craft ideal for mixed-age families and classroom groups.
Toddlers and Young Preschoolers
- Prepare large, simple shapes ahead of time and let little ones focus on gluing, placing eyes, and adding broad stripes with thick markers.
- Keep sessions brief and positive, praising effort rather than neatness so children associate the holiday with joy and success.
Older Preschoolers and Early Elementary
- Invite children to draw and cut their own shapes, encouraging experimentation with different ear and tail designs.
- Add a written New Year wish to the back of the tiger, either copied from an adult’s handwriting or invented by the child using phonetic spelling.
Tweens and Advanced Crafters
- Challenge older kids to add layered paper details, such as foldable paws, 3D ears, or a tail that can move, turning the project into a small engineering challenge.
- Introduce more nuanced discussion of symbolism, such as how different cultures interpret tigers, and encourage reflection in a short written paragraph attached to their craft.
Practical Cleanup and Storage Ideas
After the crafting excitement, a quick, organized cleanup routine ensures the activity feels manageable for caregivers and easy to repeat future years. Save what matters and recycle what you can so the experience remains positive, not overwhelming.
- Use a tray or shallow box to corral scraps as you cut, then sort what can be reused for future collage projects.
- Store finished tigers in a flat envelope or clear folder labeled with the year, turning each new Lunar New Year into a chance to look back at previous creations and notice growth.
Frequently Asked Questions About Lunar New Year Tiger Crafts
Do we need to wait for an official Tiger year to make this craft?
No, families can enjoy tiger crafts during any Lunar New Year, using the tiger as one among many zodiac animals that spark conversations about bravery, strength, and protection.
Is it appropriate to mix this craft with other Lunar New Year symbols?
Yes, combining the tiger with other festive elements such as lanterns, oranges, or simple paper firecrackers can create a richer visual environment and help children see how multiple symbols can appear in one celebration.
How can educators incorporate this activity into the classroom?
Teachers can use the tiger craft as the centerpiece of a small thematic unit, pairing it with picture books, a map showing countries that observe Lunar New Year, and a short discussion about calendars and seasons appropriate to their students’ grade level.
What if we do not share the cultural background associated with Lunar New Year?
Families from any background can approach the craft respectfully by emphasizing learning, curiosity, and appreciation, clearly acknowledging that the holiday has roots in specific Asian cultures and that your family is exploring it as guests and learners.
Can this tiger design be adapted to other materials?
Absolutely; the same layout works well with felt, cardboard, or even lightweight wood, as long as adults handle any cutting tools that are not safe for children, helping the project evolve with your child’s skills from year to year.