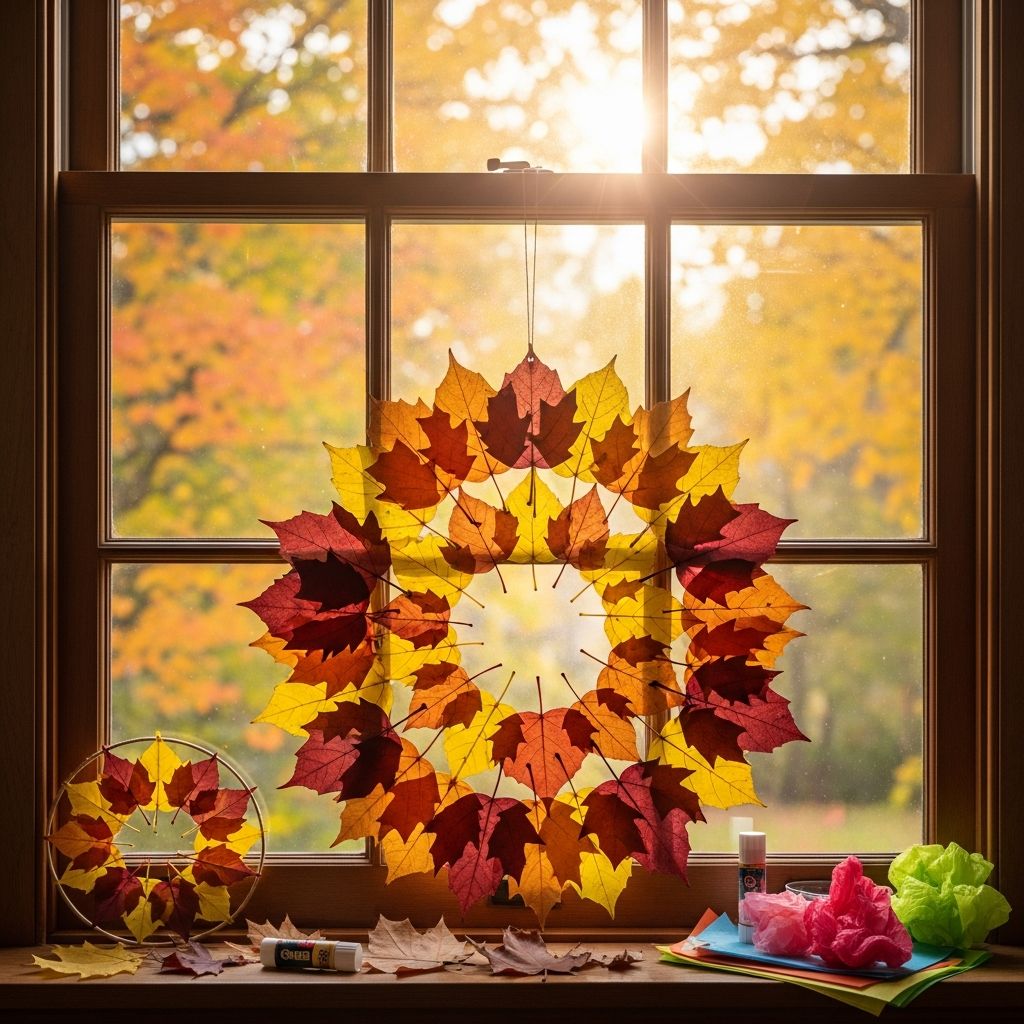
When the trees begin to blaze with reds, oranges, and golds, it is the perfect time to bring a little of that autumn magic indoors. Leaf suncatchers are a simple, low-mess craft that turns a walk outside into colorful window art children can admire every day.
Why Leaf Suncatchers Are the Perfect Fall Craft
Leaf suncatchers blend nature, creativity, and fine-motor practice into one inviting activity. They require only a few inexpensive materials, and most of the beauty comes directly from the leaves kids collect themselves.
- They turn an ordinary nature walk into a purposeful treasure hunt.
- They help children observe leaf shapes, colors, and textures up close.
- They create instant seasonal decor that brightens any window when the sun shines through.
Materials Checklist for Leaf Suncatchers
You can adapt this project based on what you already have at home or in the classroom. The core idea is to sandwich real autumn leaves between two transparent layers so the light can shine through.
- Freshly fallen leaves in various sizes and colors (not too brittle)
- Clear contact paper or self-adhesive laminating sheets
- Scissors appropriate for children’s age and skill level
- Paper plates, cardstock, or construction paper for frames
- Hole punch and yarn, ribbon, or string for hanging
- Optional: markers, crayons, or paint sticks to decorate frames
- Optional: tape for attaching suncatchers directly to windows
Step 1: Turn a Walk into a Leaf Hunt
The craft truly begins outdoors. Invite kids to head outside with a small bag or basket to collect leaves. Encourage them to slow down and really notice what they see.
- Look for a variety of shapes: round, pointed, lobed, big, and small.
- Choose leaves that are flexible and colorful, but not soaked or crumbly.
- Gently brush off any dirt or tiny bugs before bringing them inside.
Spreading the collected leaves on a table or tray gives children a moment to sort, compare, and admire their finds before they begin crafting.
Step 2: Prepare Simple Suncatcher Frames
A frame makes the finished suncatcher easier to hang and gives small hands a defined area to fill. You can cut frames from many different materials, depending on what is handy.
- Paper plate frame: Cut a large circle from the center, leaving a wide ring as the border.
- Cardstock frame: Cut a rectangle, square, or themed shape (like a pumpkin or acorn) and remove the middle to form a window.
- Construction paper frame: Fold the paper in half, cut out a simple shape, and trim the inside to create a matching front and back frame.
Let kids decorate the frames before adding the clear contact paper. This keeps markers and paint away from sticky surfaces and prevents smudging on the finished window.
Step 3: Add the Transparent Sticky Layer
The clear layer is what transforms scattered leaves into glowing window art. It holds everything in place while still allowing light to pass through.
- Cut a piece of clear contact paper slightly larger than the open area of the frame.
- Peel off the backing and gently tape the contact paper to the table, sticky side up.
- Lay the frame on top so that the sticky surface is visible within the open center.
Keeping the sticky surface relatively flat helps younger children avoid wrinkles and frustration, but slight creases will not show much once the suncatcher is hanging.
Step 4: Arrange the Autumn Leaves
This is the part most children enjoy the most. They get to design their own miniature autumn world within the frame. Give them time to experiment with different arrangements before pressing the leaves down firmly.
- Encourage overlapping leaves to create layers of color when the sun shines through.
- Invite kids to sort by color, size, or shape if they enjoy patterns and order.
- Offer prompts such as “Can you make a leaf rainbow?” or “Can you build a spiral or circle with the tips of the leaves?”
Children may want to add small treasures like thin flower petals, grass blades, or tiny ferns, as long as they are flat enough to sit between the clear sheets.
Step 5: Seal and Cut the Finished Suncatcher
Once the design is complete, it needs a top layer to keep the leaves protected and secure. This step can be a little tricky for younger kids, so adult help is useful.
- Cut a second piece of contact paper slightly larger than the frame opening.
- Peel away the backing and carefully lower it sticky side down over the leaves.
- Press from the center outward to smooth out air bubbles and seal around the edges.
- Trim extra plastic around the frame edges if needed.
For large classroom projects, it can be helpful to label each suncatcher with a child’s name before trimming, so no one’s artwork gets lost in a pile of similar shapes.
Displaying Leaf Suncatchers at Home or School
Placement matters if you want the colors to really shine. Choose windows that receive good natural light but are still easy for kids to reach or see.
- Use tape or removable adhesive to attach lightweight suncatchers directly to glass.
- Punch a hole at the top of the frame and hang suncatchers with yarn or ribbon on a suction cup hook.
- Group several pieces together to create a “leaf gallery” that spans an entire window.
In a classroom, hanging the suncatchers at different heights makes the window look like a floating forest of color, especially on bright days.
Learning Benefits Hidden in This Simple Craft
Leaf suncatchers feel like pure play to children, but they quietly support multiple areas of development and learning. Many adults are surprised by just how much is going on beneath the surface.
| Area of Learning | How the Craft Helps |
|---|---|
| Fine motor skills | Children peel backing, place small leaves, smooth contact paper, and use scissors. |
| Science observation | Kids compare leaf shapes, veins, colors, and stages of decay up close. |
| Creativity and design | They choose colors, arrange patterns, and decide how full or minimal to make their frame. |
| Language and vocabulary | Adults can introduce words like “transparent”, “veins”, “brittle”, and seasonal terms while working. |
| Emotional connection to nature | Turning found objects into cherished art helps kids feel more attached to the changing seasons. |
Pair this craft with a short discussion or story about why leaves change color, and it quickly becomes a memorable, hands-on mini science lesson.
Variations to Try with Different Ages
One of the strengths of this project is how easily it adapts to different ages, settings, and attention spans. A toddler’s version can be quick and tactile, while older children can explore complex designs and themes.
- Toddler version: Use big frames and larger pieces of contact paper, and let them simply press leaves wherever they like.
- Preschool version: Add simple shape goals, such as filling only a circle or making a border of matching leaves.
- Elementary version: Challenge kids to design scenes, spirals, or symmetrical patterns using matching pairs of leaves.
- Family project: Create one large shared suncatcher that everyone adds to after each walk all season long.
Older children might also enjoy sketching their favorite leaves on paper first, then trying to find matching real leaves outside before building their suncatcher.
Tips for Choosing and Caring for Leaves
The condition of the leaves can make a big difference in how the finished suncatcher looks and how long it lasts. A bit of advance planning makes the whole process smoother.
- Pick leaves that are dry to the touch but still flexible, not crisp or cracking.
- Flatten leaves between paper towels and a heavy book for a day or two if they are very curled.
- Avoid very thick or damp leaves, which may mold when sealed in plastic.
- If you want longer-lasting color, choose freshly fallen leaves that still glow with strong reds and yellows.
Over time, the colors will naturally fade a bit, but that gentle change can also be an interesting observation point for children as the season progresses.
Safety and Cleanup Considerations
Leaf suncatchers are generally low risk, but a few simple precautions keep the experience pleasant for everyone. Preparing the space in advance also cuts cleanup time dramatically.
- Provide blunt-tip scissors for younger children and supervise any cutting closely.
- Check leaves for insects, sap, or mold before using them in the craft.
- Cover the table with newspaper or a reusable craft mat to protect the surface from sticky contact paper.
- Gather backing papers and off-cuts into a single trash bag as you go to avoid a scattered mess.
If allergies are a concern, invite children to wear lightweight gloves or use tweezers to pick up leaves, and wash hands after the activity.
Frequently Asked Questions About Leaf Suncatchers
How long do leaf suncatchers last?
The lifespan depends on the type of leaves used and how well they are sealed. Many families find that their suncatchers look bright for several weeks and then slowly fade or dry out over the following months, making them a seasonal decoration rather than a permanent one.
Can this be done without clear contact paper?
If clear contact paper or laminating sheets are not available, you can experiment with transparent plastic sleeves or page protectors. Slip the leaves inside and tape or staple the edges, then attach the plastic pocket to a paper frame so it still looks finished.
What if I only have brown or dull leaves?
Even muted leaves can be beautiful when layered with intention. Encourage children to create patterns based on shape and texture rather than color, or let them combine neutral leaves with tissue paper pieces to add pops of brightness.
Is this activity appropriate for groups and classrooms?
Yes, this craft works well in group settings because the steps are straightforward and the materials are flexible. Setting up a leaf collection station and a separate crafting table helps manage traffic flow, and pre-cut frames save time during busy class periods.
How can I extend learning after the craft is finished?
Invite kids to write or dictate short descriptions of their suncatchers, naming the colors and shapes they used. You can also graph the different types of leaves collected, read autumn picture books, or compare the view through the window before and after the suncatchers are hung.
Bringing Autumn Light Indoors
Leaf suncatchers capture a fleeting moment in the year when the world outside glows with color. With only a handful of supplies and a little time, kids can preserve that beauty in the windows of their home or classroom and appreciate it every time sunlight streams through.
Whether this becomes a once-a-year tradition or a whole season’s worth of creative exploration, it is a simple, satisfying way to celebrate fall together.