Lapbooks are interactive, foldable learning projects that help children explore a topic in a hands-on, creative way. This guide explains what lapbooks are, why they are effective, and how to plan one from start to finish for any subject or age group.
What Is a Lapbook?
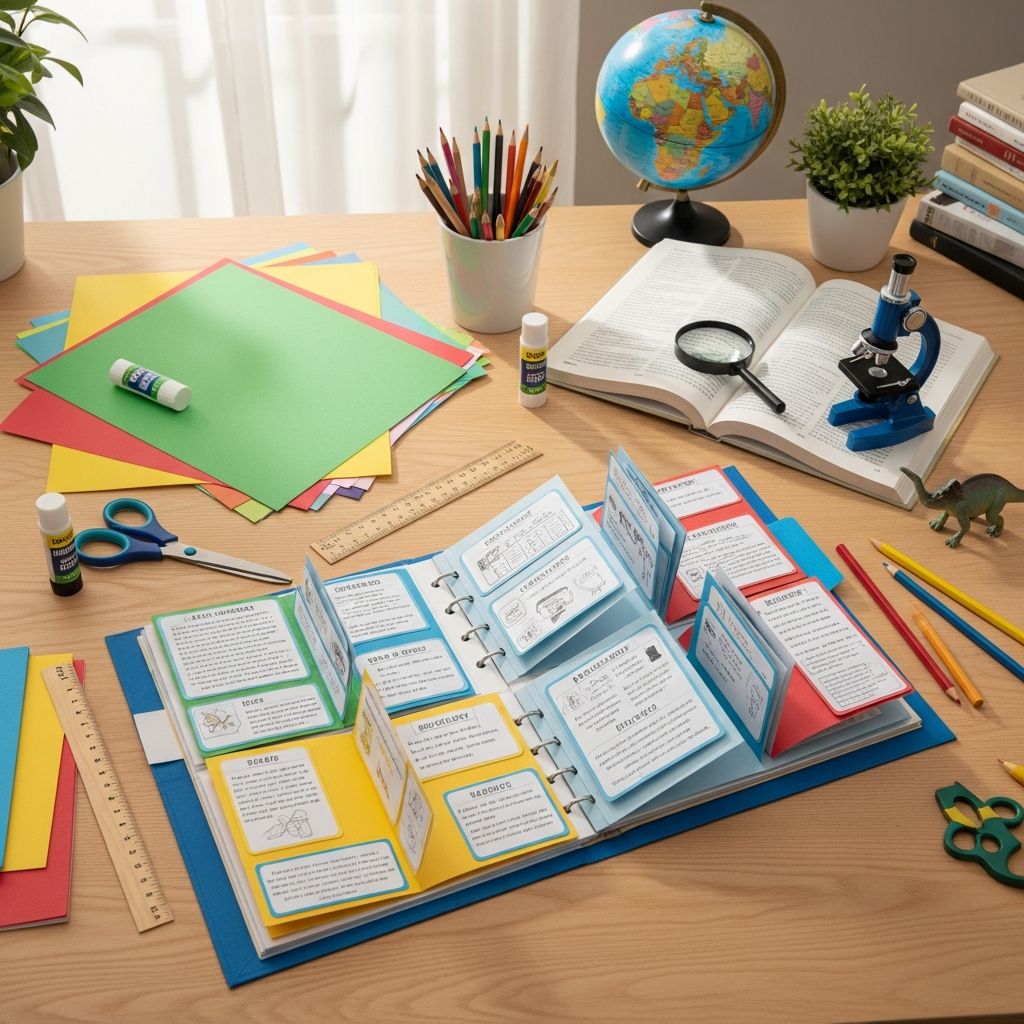
A lapbook is a collection of small, focused learning pieces such as mini-books, flaps, pockets, and diagrams, all mounted inside a file folder or similar base. Children open the folder on their laps, revealing organized information about a single theme or unit of study.
Instead of being a traditional notebook with linear pages, a lapbook opens out in panels and layers. Each piece inside usually focuses on one subtopic, such as vocabulary, timelines, diagrams, maps, or key facts, making the whole project easy to browse and review.
- Uses a file folder (or several folders) as the main base.
- Contains mini-books, pockets, charts, and other paper foldables.
- Focuses on one theme: animals, geography, a story, a historical era, or any topic you choose.
Why Use Lapbooks?
Lapbooks make learning more memorable because students actively build, cut, write, and assemble the content they are studying. This combination of reading, writing, and creating helps cement understanding better than worksheets alone.
They also provide a natural way to differentiate instruction: younger children can include more pictures and simple labels, while older students write detailed summaries, reflections, and analyses.
- Hands-on engagement: Cutting, gluing, and assembling keeps active learners involved.
- Visual organization: Each mini-book or flap highlights a key concept, making review easier.
- Personalization: Students can decorate, arrange, and expand the lapbook to match their interests.
- Built-in review tool: Finished lapbooks serve as compact study guides and portfolios of learning.
Before You Start: Key Planning Questions
Good lapbook projects begin with clear goals. Before printing templates or cutting folders, take a few minutes to decide what you want children to learn and how the lapbook will support that goal.
Reflect on the following planning questions so that the project stays focused and manageable:
- What is the main topic or theme of the lapbook?
- What specific skills or concepts should students demonstrate (facts, vocabulary, timelines, diagrams, summaries)?
- How long do you have to complete the project (a day, a week, a month, or a full unit)?
- What is the age and ability level of the learner(s)?
- Will the lapbook be used as a final project, an ongoing notebook, or a review tool for exams?
Choosing a Topic for Your Lapbook
Almost any subject can become a lapbook. The best topics, however, are narrow enough to cover in depth but broad enough to divide into several subtopics. Consider what your child is already studying or naturally interested in.
When selecting a topic, think in terms of a central question or theme that the lapbook will answer. This helps you decide which subtopics and mini-books to include and prevents the folder from becoming cluttered or random.
Popular Lapbook Topic Ideas
- Science: weather, life cycles, the solar system, animal habitats, the human body, simple machines.
- History: ancient Egypt, explorers, a specific war, famous leaders, local history.
- Geography: continents, one country, states or provinces, landforms, biomes.
- Language arts: a single novel, a fairy tale unit, poetry forms, story elements, famous authors.
- Math: fractions, geometry shapes, place value, measurement conversions.
- Themes and holidays: seasons, holidays, cultural celebrations, community helpers.
Breaking the Topic into Subtopics
Once you have a topic, list the smaller ideas that belong inside it. These subtopics become the labels for your mini-books, flaps, and charts. Brainstorm first, then narrow the list so the project remains realistic for the time available.
A simple way to break down any topic is to divide it into facts, vocabulary, processes, and connections. This method works for science, history, literature, and more.
| Category | Possible Subtopics | Mini-Book or Element Type |
|---|---|---|
| Facts | Types of clouds, kinds of storms, weather instruments | Flap book, accordion book, labeled diagrams |
| Vocabulary | Temperature, precipitation, forecast, humidity | Pocket with vocabulary cards, matchbook definitions |
| Processes | Water cycle, storm formation, reading a weather map | Flowchart mini-book, wheel book, lift-the-flap steps |
| Connections | How weather affects people, clothing choices, safety rules | Question-and-answer cards, reflection booklet |
Choosing Lapbook Components and Mini-Books
Each subtopic in your list should match a specific component inside the lapbook. Components can be downloaded from printable template collections or drawn and folded from plain paper. Mixing several types keeps the project visually interesting.
Select only as many pieces as the learner can reasonably complete. It is better to have a half-dozen thoughtful mini-books than a crowded folder filled with rushed work.
Common Mini-Book and Foldable Types
- Accordion books: Strips of paper folded back and forth to show steps, sequences, or lists.
- Flap books: Flaps lift to reveal definitions, answers, or expanded explanations.
- Matchbooks: Small booklets folded like a matchbook, useful for short notes or vocabulary.
- Wheel charts: Circular layers connected by a brad, useful for cycles or categories.
- Pockets and envelopes: Hold cards, questions, or tiny reference charts.
- Tab books: Labeled tabs along the edge for organizing related sections.
Gathering Materials and Supplies
One advantage of lapbooks is that they require only basic school and office supplies. Most families and classrooms already have what they need on hand, which makes lapbooks an inexpensive alternative to large project boards.
Before beginning, prepare a simple supply kit so children can work independently without constant interruptions to search for materials.
Basic Lapbook Supply List
- File folders or large cardstock for the base.
- Colored paper and card stock for mini-books and foldables.
- Scissors, glue sticks, and clear tape.
- Pencils, colored pencils, crayons, or markers.
- Ruler and stapler; paper fasteners (brads) for wheel charts.
- Optional: stickers, decorative tape, and printed clip art for embellishment.
Planning the Layout of the Lapbook
Before attaching anything permanently, arrange the components on the open folder. This simple step saves frustration and helps students visualize how their finished project will look. Encourage them to move pieces around until the layout feels balanced.
Think about the folder in terms of zones: center, left panel, right panel, and any additional flaps or extensions. Place the most important or frequently used elements, such as reference charts, in the center or at the top for easy access.
Layout Tips
- Group related mini-books together (for example, all vocabulary pieces in one area).
- Leave a small border of space around edges so the folder still closes easily.
- Use additional file folders or cardstock hinges to create extra flaps when needed.
- Include a title label on the front cover and a name/date area inside.
Step-by-Step Lapbook Planning Process
Once you understand the parts of a lapbook, planning becomes a simple, repeatable process. Use the steps below as a general template that you can adapt to any topic or age group.
- Define your goal: Write a brief statement of what you want the learner to know or be able to do by the end of the lapbook project.
- Choose a topic: Select a theme that fits your curriculum and the learner’s interests.
- List subtopics: Brainstorm key ideas, vocabulary, and skills to include.
- Match subtopics to components: Decide which kind of mini-book or foldable will best represent each subtopic.
- Gather resources: Collect books, articles, videos, and reference materials students will use while creating content.
- Prepare materials: Print or draw templates, cut base folders, and set out supplies.
- Draft a schedule: Divide the work over several days or weeks, assigning specific pieces to each work session.
- Guide research and note-taking: Have students read, watch, and discuss before filling in their mini-books.
- Assemble the lapbook: After components are complete, glue or tape them into the folder according to the planned layout.
- Review and present: Let students share their lapbooks with family or classmates, using them as visual aids for oral presentations.
Adapting Lapbooks for Different Ages
Lapbooks can grow with children simply by adjusting the level of reading, writing, and analysis required. Younger learners need more visual support and shorter tasks, while older students can handle open-ended responses and deeper research.
Instead of creating entirely new lapbook designs for each grade level, reuse the same basic structure and upgrade the expectations for older children.
Age-Level Adaptation Ideas
- Early elementary: Focus on coloring, labeling, tracing, and simple sentences with plenty of pictures.
- Upper elementary: Include short paragraphs, timelines, compare-and-contrast charts, and vocabulary definitions.
- Middle school: Add research notes, primary-source excerpts (rewritten in their own words), and cause-and-effect diagrams.
- High school: Use the lapbook as a compact study guide with summaries, analyses, quotations (with citations), and exam review questions.
Using Lapbooks Beyond Homeschooling
Although lapbooks are especially popular in homeschooling, they work just as well in traditional classrooms, co-ops, after-school clubs, and tutoring sessions. Teachers can assign lapbooks as alternative assessments or culminating projects instead of standard tests or reports.
Lapbooks are also useful for special education and English language learners. The visual and tactile nature of the projects supports learners who benefit from repetition, structure, and multiple representations of information.
Tips for Successful Lapbook Projects
A well-planned lapbook project is engaging rather than overwhelming. A few simple habits help keep the process manageable and enjoyable for both adults and children.
- Start small with one folder and a handful of components for your first project.
- Model how to fold and assemble one or two mini-books before expecting independent work.
- Use checklists so students know which pieces are complete and which ones remain.
- Allow room for creativity in decoration and arrangement while keeping learning goals clear.
- Store finished lapbooks where kids can revisit them for review or share them with visitors.
Frequently Asked Questions About Lapbook Planning
1. How long does it take to complete a lapbook?
The time needed depends on the scope of the project and the age of the learner. A small lapbook might take one or two focused sessions, while a complete unit-study lapbook may unfold over several weeks with short daily work periods.
2. Do I have to use pre-made templates?
Templates are convenient but not required. Many families and teachers sketch simple rectangles, circles, and flaps on plain paper and fold them into custom mini-books. Hand-drawn components often feel more personal and flexible.
3. Can lapbooks be graded?
Yes. Create a simple rubric that evaluates accuracy of information, completeness of required components, neatness, and effort. Share the rubric with students before they start so expectations are clear.
4. What if my child dislikes cutting and gluing?
Some children prefer the content side of lapbooks but not the crafting. In that case, reduce the number of pieces, pre-cut some components, or let the student design digital versions that are later printed and assembled with minimal cutting.
5. How do I store finished lapbooks?
Finished lapbooks can be placed upright in magazine holders, stored flat in a large binder or portfolio, or stacked in labeled boxes. Keep them accessible so learners can easily review their work.
Conclusion: Making Lapbook Planning Simple
Planning a lapbook is simply a matter of choosing a meaningful topic, breaking it into manageable subtopics, matching each subtopic with a suitable mini-book, and guiding learners step by step through the process. With a bit of forethought and a few inexpensive supplies, you can transform almost any unit of study into an engaging, hands-on project.
As you become more comfortable with the format, you can reuse your planning process across subjects, tweak layouts, and invite students to help design future lapbooks. Over time, you will build a rich collection of customized learning projects that tell the story of your educational journey.