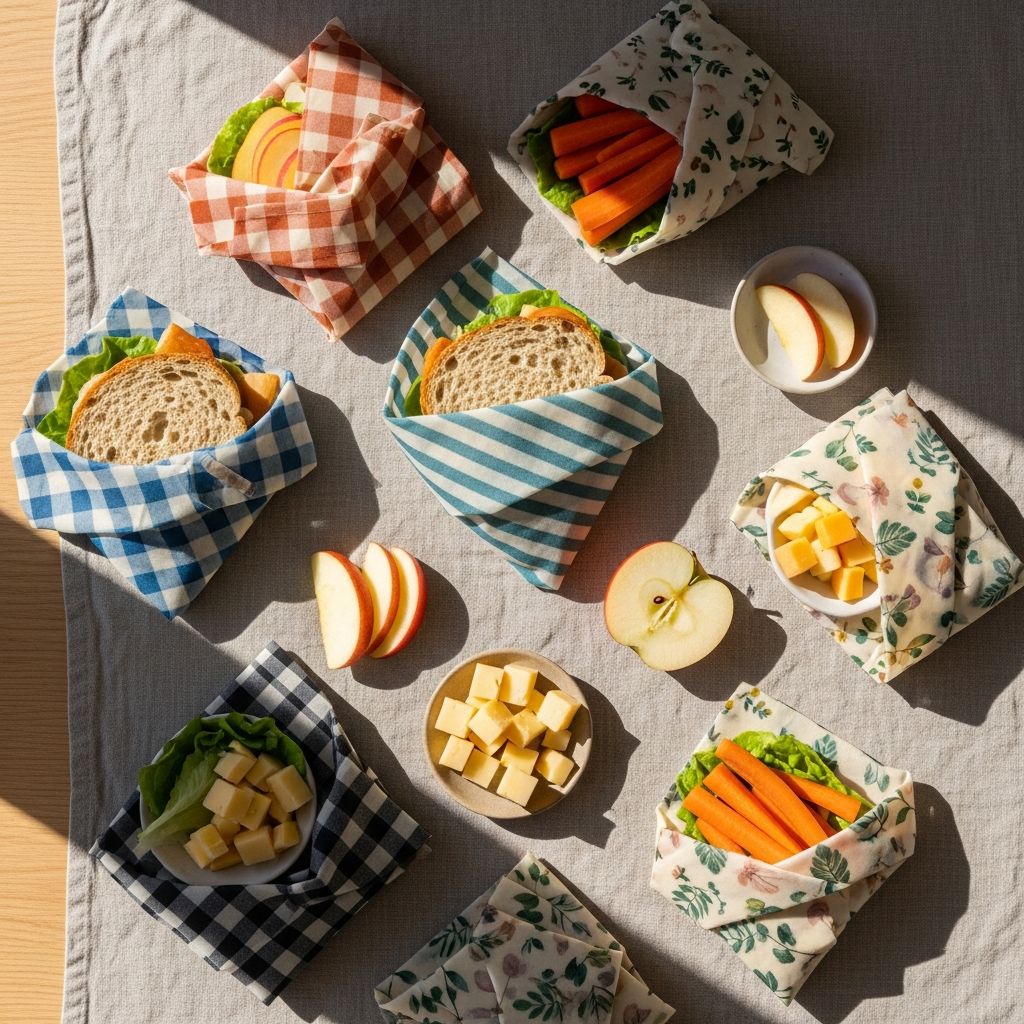
Waxed fabric food wraps are a simple, eco-friendly alternative to plastic wrap and single-use bags, and they are surprisingly easy to make at home. With a few basic supplies and an hour of crafting time, you can create colorful, reusable wraps that keep sandwiches, fruits, and snacks fresh in your child’s lunchbox.
Why Switch to Reusable Food Wraps?
Many households throw away plastic bags and cling film every day, especially when packing snacks and school lunches. Switching to reusable waxed wraps cuts down on daily waste and helps build sustainable habits for the whole family.
Homemade wraps also give you control over the materials that touch your food, and they let kids help design their own patterns and colors, turning an everyday chore into a fun project.
- Reduce single-use plastic in lunchboxes and snack time.
- Customize sizes for sandwiches, cut fruit, cheese, or baked goods.
- Save money over time by reusing the same wraps for months.
- Introduce kids to hands-on sustainability and simple crafting skills.
How Waxed Fabric Wraps Work
Waxed fabric wraps combine breathable cotton with a thin coating of wax, sometimes blended with natural oils and resins. When pressed gently around food or containers, the wraps soften slightly with the warmth of your hands and hold their shape as they cool.
This creates a flexible, semi-moldable cover that protects food from drying out while still allowing a bit of airflow, helping fresh foods stay appealing in a lunchbox.
- The wax layer adds water resistance and helps repel moisture.
- The wraps are pliable but firm enough to fold, crease, and tuck in edges.
- With proper care, a single wrap can last many months before needing a refresh.
Choosing Safe and Suitable Materials
Good materials are essential for food-safe, long-lasting wraps. Focus on natural fibers, food-friendly waxes, and simple tools you already own. Avoid synthetic fabrics and heavily treated materials that may not handle heat or contact with food well.
Best Fabrics for Waxed Wraps
Natural, tightly woven fabrics provide structure without being too stiff. Cotton is generally the easiest to work with for beginners, but other breathable fibers can also perform well.
- Lightweight cotton or quilting cotton: Holds wax evenly and folds neatly around food.
- Muslin or cotton sheeting: Good for larger covers, such as bowl toppers.
- Old shirts or sheets (100% cotton): A budget-friendly way to upcycle fabric you already own.
Wax and Optional Add-Ins
The coating can be kept very simple or slightly upgraded with additional ingredients for extra stickiness and flexibility. Keep in mind that anything used should be food-safe and rated for use at low heat.
- Beeswax pellets or grated beeswax: The classic choice; creates a firm, slightly tacky finish.
- Tree resin (such as pine resin): Optional; increases grip so wraps cling more tightly to bowls.
- Light liquid oil (such as jojoba): Optional; adds softness and reduces stiffness.
Tools You Will Need
Many of the tools required for making waxed wraps are common household items. Choose tools that you can dedicate to craft use if possible, because wax can be difficult to remove completely.
- Fabric scissors or pinking shears for cutting fabric neatly.
- Oven or iron as a low-heat source to melt the wax into the fibers.
- Parchment paper or baking paper to protect surfaces.
- A baking sheet or ironing board, depending on the method.
- An old brush or spatula, if you want to spread melted wax evenly.
Planning Sizes and Shapes for School Lunches
Before heating any wax, it helps to think about the foods you pack most often. Planning sizes in advance ensures that every wrap has a purpose and reduces clutter in your kitchen drawer.
Use your child’s lunchbox, typical snack containers, and favorite foods as guides when deciding how large each wrap should be.
| Wrap Size (Approx.) | Ideal Use | Lunchbox Tip |
|---|---|---|
| Small (15 cm x 15 cm) | Covering half a lemon, a few cookies, or a cheese cube. | Pack two or three small wraps for flexible snack options. |
| Medium (25 cm x 25 cm) | Wrapping a sandwich, sliced fruit, or vegetable sticks. | These are the most versatile size for school lunches. |
| Large (30 cm x 35 cm or more) | Covering bowls, large rolls, or a pile of cut veggies. | Useful when sending leftovers or sharing snacks for group events. |
Step-by-Step: Oven Method for Waxed Fabric Wraps
The oven method is beginner-friendly and works well when making several wraps in one session. Work slowly the first time, then increase your pace as you become more comfortable with how the wax behaves.
1. Prepare and Cut the Fabric
- Wash and fully dry the fabric to remove sizing, dust, or residues.
- Iron out wrinkles so the material lays flat on the baking sheet.
- Measure and cut squares or rectangles using scissors or pinking shears to reduce fraying.
- Test one piece by laying it over a sandwich or container to confirm the size works for your needs.
2. Set Up Your Workspace
- Preheat your oven to a low temperature, just warm enough to melt wax without browning fabric. Many home crafters find that a setting slightly above the lowest oven temperature is sufficient.
- Line a baking sheet with parchment paper to protect it from wax.
- Place one or more fabric pieces flat on the parchment, ensuring they do not overlap.
3. Add Wax to the Fabric
- Sprinkle wax pellets or grated wax evenly across the surface of the fabric.
- Aim for a light but complete layer; it is easier to add more wax later than to remove excess.
- If using a premelted mixture of wax, resin, and oil, you can drizzle a thin layer over the fabric instead of sprinkling.
4. Melt and Spread the Wax
- Place the baking sheet in the oven for a few minutes until the wax is fully melted and shiny.
- Remove the tray carefully and check for dry patches or uneven spots.
- Use an old brush or spatula to push melted wax toward any bare areas, working from the center toward the edges.
- If needed, return the tray briefly to the oven to re-melt and smooth the coating.
5. Cool, Hang, and Inspect
- Using tongs or a corner of the fabric, lift each piece while it is still warm but not dripping.
- Wave gently for a few seconds or hang over a rack, a line with clothespins, or the back of a chair.
- Allow the wrap to cool completely; it should feel dry and slightly tacky but not sticky.
- Hold the cooled wrap up to the light and look for thin or patchy areas, repeating the waxing process on any sections that need more coverage.
Alternative: Iron-On Method (No Oven Needed)
If using the oven is not convenient, a household iron can provide enough heat to melt wax into fabric layers. This method gives you more control over small areas and can be done on an ironing board covered with protection.
- Place a sheet of parchment paper on the ironing board, then lay a piece of fabric on top.
- Sprinkle wax evenly over the fabric surface.
- Cover the fabric with a second sheet of parchment to make a “wax sandwich.”
- With the iron set to a medium setting with no steam, press and move slowly over the entire surface.
- As the wax melts, it will spread between the layers; lift a corner of the parchment to inspect and adjust as needed.
- Let the wrap cool briefly before peeling it away from the parchment and hanging it to finish drying.
Using Waxed Fabric Wraps in School Lunches
Once cured and cooled, your wraps are ready for daily use. Kids often enjoy choosing their favorite patterns each morning and participating in the wrapping process, which helps them take ownership of their lunches and waste reduction efforts.
- To wrap a sandwich, place it in the center of a medium square, fold the sides in, then fold the top and bottom, pressing gently so the wax warms and holds shape.
- For snacks, create a small pouch by folding and pressing edges, then tucking under the bottom of the parcel.
- To cover a container, stretch the wrap over the opening and press around the rim until it clings.
Teach children to open their wraps carefully and fold them back up after lunch so they make it home for washing and reuse.
Care, Cleaning, and Longevity
Proper care extends the life of your wraps and keeps them looking fresh. These wraps do not require intensive cleaning; in fact, gentle handling preserves the wax layer and prevents cracking or peeling.
- Rinse in cool or lukewarm water with a mild dish soap as needed.
- Avoid hot water, dishwashers, and microwaves, which can damage or melt the coating.
- Air-dry completely before storing to prevent odor or mildew.
- Store folded or rolled in a drawer or basket away from direct heat sources.
After months of use, if the wrap becomes limp or develops thin patches, you can refresh it by repeating the waxing and melting steps. When a wrap is truly worn out, cut it into strips and compost it if all materials are natural.
Safety and Food Considerations
Waxed fabric wraps are ideal for dry and moderately moist foods but are not suitable for every situation. Use common sense and simple guidelines to make sure they are used safely in a school setting.
- Avoid using waxed wraps directly on raw meat or fish.
- Do not use wraps in the microwave, oven, or on hot leftovers.
- Explain to children that wraps should not be chewed or used as napkins.
- If anyone in the household has a bee product allergy, consult a professional before using beeswax-based wraps.
For strongly colored or oily foods, consider placing a piece of parchment inside the wrap as an extra barrier to reduce staining and lingering odors.
Fun Design Ideas for Kids and Families
Part of the joy of waxed fabric food wraps is the opportunity to personalize them. Children usually enjoy choosing fabrics that reflect their interests, which also makes their lunchbox easier to spot among a crowd.
- Pick patterns that match your child’s favorite animals, colors, or hobbies.
- Use different prints for different types of food so kids can quickly identify what is inside.
- Add simple stitched details, such as a button and string on a larger wrap, to create a reusable “sandwich envelope.”
- Create a color-coded set for each family member to reduce mix-ups on busy mornings.
Frequently Asked Questions About Waxed Fabric Wraps
How long do homemade wraps usually last?
With regular use and proper care, many wraps last anywhere from six months to a year before they need to be fully replaced. Light use, gentle washing, and avoiding high heat will help them stay functional longer.
Can these wraps go in the freezer?
Waxed fabric wraps can be used briefly in the freezer for items like bread or cut fruit, but they are not ideal for very long-term storage. The material may become stiff when frozen, so let it soften slightly at room temperature before unwrapping.
Are waxed wraps safe for very young children?
For preschoolers or toddlers, wraps are usually best used around containers instead of directly on loose food. This reduces the chance of chewing or tearing, and it keeps the wrap cleaner during energetic snack times.
What if I used too much wax and the wrap feels thick?
If a wrap feels overly stiff or leaves visible flakes, you can place it back in the oven between two sheets of parchment and let excess wax run off onto the paper. Then remove and cool the wrap again; many crafters also press a second piece of fabric onto the excess wax to create a new wrap without wasting materials.
Can I make vegan waxed wraps?
Yes, plant-based waxes such as soy or candelilla can sometimes be used instead of beeswax, but they behave differently in terms of melting point and flexibility. It may take a few experimental batches to find a formula that creates the right balance of grip and softness.
Getting Started with Your First Batch
Making waxed fabric food wraps is a rewarding afternoon project that blends creativity, sustainability, and family time. Once you complete your first few wraps, you may find yourself experimenting with new sizes, styles, and recipes for the coating to suit your household’s habits.
Start with a handful of small and medium wraps, keep notes on what you like best, and gradually build a custom collection that makes every school lunch a little more colorful and a lot less wasteful.