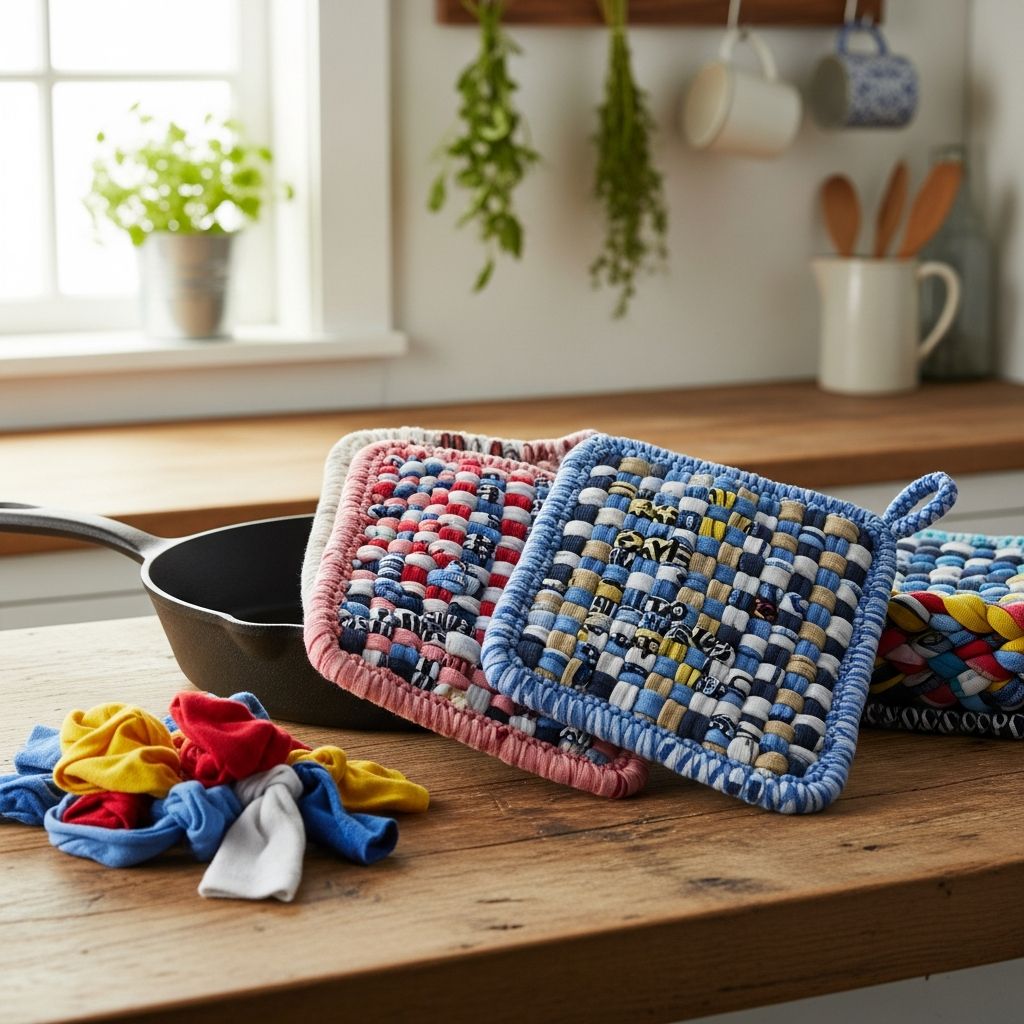
Old T-shirts are soft, colorful, and often full of memories, but eventually they become too worn to wear. Instead of sending them to the trash, you can turn them into thick, useful potholders that protect your hands and brighten your kitchen. This project is beginner-friendly, inexpensive, and a fun way to teach kids about both crafting and reusing materials.
Why Turn T-Shirts Into Potholders?
Repurposing T-shirts into potholders gives new life to fabric that is already soft, washable, and easy to work with. The resulting pads are thick enough to cushion hot dishes and add a personal touch to your cooking space.
- Eco-friendly: Reduce textile waste and keep old shirts out of landfills.
- Budget-friendly: Use materials you already have, plus basic tools.
- Sentimental: Preserve favorite shirts that no longer fit by turning them into daily-use items.
- Beginner-friendly: No advanced sewing or complex tools are required.
Choosing The Right T-Shirts
Not every T-shirt is ideal for potholder making. The best fabric is thick enough to insulate against heat but still flexible enough to weave or braid smoothly.
- Fabric type: Medium to heavyweight cotton or cotton-blend shirts work best.
- Stretch level: A bit of stretch (jersey knit) makes it easier to create smooth yarn or strips.
- Condition: Avoid shirts with thin, see-through areas or holes in the main body.
- Print vs. plain: Solid colors give a clean look, while graphic tees create playful patterns in the finished potholder.
Tools And Materials You Will Need
Most of the supplies for this project are common household items or easy to find at any craft or discount store. Gather everything before you start to keep the process smooth.
- 1–3 clean T-shirts (depending on how many potholders you want)
- Sharp fabric scissors or rotary cutter and cutting mat
- Ruler or measuring tape
- Fabric marker, chalk, or a soft pencil
- Sturdy yarn needle or crochet hook (optional, for finishing edges)
- Square potholder loom or DIY cardboard/wood loom (optional if weaving)
- Clips, clothespins, or small binder clips (for braiding and holding ends)
- Needle and strong thread, or a sewing machine (for reinforced joins)
Three Main Construction Methods
There are several ways to turn T-shirt fabric into a heat-resistant pad. The three most approachable methods are weaving, coiled braids, and layered quilts. Each has a different look and skill level.
| Method | Look | Skill Level | Best For |
|---|---|---|---|
| Woven on a loom | Grid pattern, evenly textured | Beginner | Kids, quick gifts, matching sets |
| Coiled braid | Spiral or oval with braided surface | Beginner–Intermediate | Rustic decor, farmhouse look |
| Layered quilt | Flat, squared, subtle seams | Intermediate (simple sewing) | Minimalist kitchens, uniform sets |
Step 1: Preparing T-Shirt Strips Or Yarn
Before you can braid, weave, or layer, the shirt needs to be turned into strips or continuous yarn. Take your time in this step; consistent widths make the final potholder more even and attractive.
- Lay the shirt flat: Smooth it out on a clean, flat surface, aligning hems and side seams.
- Remove upper sections: Cut straight across under the sleeves to separate the body tube from the top. Set the top aside for smaller strips or future projects.
- Trim the hem: Cut off the bottom hem if it is bulky or thick.
- Mark strips: Using a ruler, mark parallel lines 2–3 cm (about 3/4–1 1/4 inches) apart across the width of the tube.
- Cut along lines: Cut along each line, but leave about 2–3 cm uncut near one edge if you want continuous yarn, or cut fully for individual loops.
Creating Continuous T-Shirt Yarn (Optional)
To avoid tying many small strips together, you can transform the tube into one long spiral strand. This method is slightly more advanced but saves time later.
- Slip your hand or a piece of cardboard inside the tube so you can see and control both layers.
- Open the uncut section. You will see staggered slits along each edge.
- Cut diagonally from one slit on the front layer to the next slit on the back layer, creating a spiral path around the tube.
- Continue cutting diagonally until all slits are connected into one long strip.
- Gently stretch the strip so the edges curl inward, forming rounded T-shirt yarn.
Method 1: Woven T-Shirt Potholder On A Simple Loom
Weaving on a square loom is a simple way to make firm, square potholders with a pleasing checkerboard texture. You can use a purchased metal or plastic loom or make one from stiff cardboard or scrap wood with evenly spaced notches or nails.
Warping The Loom
- Cut several loops or strips slightly longer than the loom’s height.
- Hook or secure one end at the top edge of the loom and stretch it to the bottom edge, attaching there as well.
- Repeat side-by-side until the whole loom is filled with vertical strands.
- Keep the tension snug but not overly tight to allow space for weaving.
Weaving The Weft
- Cut more loops or strips equal to the loom’s width.
- Starting on one side, weave the first strip over one vertical strand and under the next, alternating across.
- Push the strip gently toward the top so it lies flat and even.
- Weave the next strip under the first vertical where the previous strip went over, continuing the over-under pattern.
- Repeat until the loom is packed with rows and the entire square is filled.
Binding Off And Finishing Edges
- Begin at a corner and remove the first loop from the loom.
- Slide off the next loop and pull it through the first, forming a chained edge.
- Continue around the square, always pulling the newest loop through the previous one until you return to the starting corner.
- Use the final loop as a hanging tab by leaving it as a small ring, or pass the tail back into the edge with a yarn needle.
- Trim any extra ends and tuck them securely into the fabric structure.
Method 2: Coiled Braid Spiral Potholder
For a more rustic, handcrafted style, braided strips can be coiled into a spiral and stitched in place. This method works even if you do not own a loom and can be done while watching a movie or chatting with friends.
Braiding T-Shirt Strips
- Group three strips of similar length and tie them together with a firm knot at one end.
- Secure that knotted end to a table edge or clip it to something heavy.
- Braid the three strips, keeping tension even so the braid does not twist.
- When a strip nears its end, overlap a new strip by several centimeters and stitch or knot them together, then continue braiding.
- Create a long braid, aiming for at least a meter (or more) for a medium potholder.
Coiling And Securing The Spiral
- Form a tight circle with the starting knot at the center, wrapping the braid around itself.
- Use a strong needle and thread to stitch through adjacent coils every few centimeters, working from the center outward.
- Shape the spiral into a flat disk, adjusting tension so it does not bowl or curl.
- Stop when the potholder is large enough to cover your palm with extra room at the sides.
- Fold the final braid end to the back, stitch it down securely, and add a loop of strip or braid as a hanger if desired.
Method 3: Layered T-Shirt Quilt Potholder
This variation resembles a small quilt made entirely from knit fabric. It is more structured and can look especially neat if you prefer cleaner lines over braided or woven textures.
- Cut two squares of T-shirt fabric slightly larger than your desired potholder size.
- Cut at least one more square as an inner layer; combine several layers for extra thickness.
- Stack the squares, aligning edges, with the nicest side of the outer layers facing outward.
- Pin around all four edges to prevent shifting.
- Sew around the perimeter, leaving a small opening for turning if you want hidden seams, or leave edges raw and use a wide zigzag stitch to bind all layers together.
- Add simple quilting lines, either diagonally or in a grid, to tie all layers so they do not bunch during washing.
- Sew on a small fabric loop at one corner before closing the final seam to create a hanger.
Size, Thickness, And Safety Considerations
While these projects are fun and decorative, potholders must also be safe to use around high heat. Thoughtful choices in size and layers help protect your hands and surfaces.
- Recommended size: Aim for at least 15–20 cm (6–8 inches) wide for good coverage.
- Layering: Use enough layers or a dense weave so you cannot easily feel heat through the fabric when holding a hot dish briefly.
- Avoid synthetic melts: If the shirt has a high synthetic content, keep it away from direct flame and broiler elements, which can scorch or melt fibers.
- Test before use: Hold a hot (not scalding) pan for a few seconds to check insulation. If warmth transfers quickly, add more layers or reserve that pad for trivets rather than handling pans.
Creative Design Ideas
Once you understand the basics, it is easy to personalize each potholder with color combinations, textures, and small decorative details.
- Alternate strips from different shirts to create stripes or color blocks.
- Use the printed sections of a shirt for the center of a spiral or the front panel of a layered square.
- Combine two construction methods, such as sewing a woven square onto a layered base for extra thickness.
- Add decorative stitching or embroidery along edges using contrasting thread.
- Create seasonal sets: cool blues and whites for winter, bright citrus colors for summer.
Care, Washing, And Longevity
One of the biggest advantages of T-shirt fabric is how easy it is to launder. Proper care keeps your handmade potholders fresh and functional for a long time.
- Machine wash with similar colors in warm or cold water.
- Air dry flat to preserve shape, or tumble dry on low if the fabric tolerated that setting as a shirt.
- Inspect seams, braids, and stitched areas periodically and reinforce any loose spots.
- Retire any potholder that becomes overly thin, scorched, or has holes where heat could reach your skin.
Gift And Storage Ideas
Handmade T-shirt potholders make thoughtful, practical gifts with a personal story behind them. They also store neatly in small kitchens.
- Bundle two or three coordinating potholders and tie them with a fabric strip as a housewarming gift.
- Pair a handmade potholder with a favorite recipe card and a wooden spoon.
- Hang potholders on hooks near the stove to add color to your backsplash and keep them within easy reach.
- Store extras in a basket or large jar on the counter for both decoration and convenience.
Frequently Asked Questions
1. Do I need a special loom to make T-shirt potholders?
No. While a ready-made loom makes the process faster, you can create a functional version from cardboard or a scrap wooden square by marking and cutting evenly spaced notches or adding small nails along the edges. The key is keeping spacing consistent so your weave looks neat.
2. How many T-shirts are needed for one potholder?
A single adult-size T-shirt usually provides enough fabric for at least one woven or layered potholder, sometimes more, depending on thickness and size. If you combine colors or prefer larger pads, two shirts give a comfortable amount of material to work with.
3. Are these potholders safe for very high heat?
Properly layered T-shirt potholders handle everyday tasks such as grabbing pot handles or moving oven trays briefly. For extended contact with very high heat or cast-iron cookware, double up or use them together with a commercial heat-resistant mitt for extra protection.
4. What if my T-shirt is mostly synthetic?
Shirts with a high percentage of synthetic fibers may soften or melt if exposed to extreme heat or open flame. Consider using such fabric for trivets under warm dishes rather than for directly handling very hot pans, or mix it with thicker cotton layers for better safety.
5. Can children help with this project?
Yes, many parts of this craft are child-friendly, including choosing colors, helping measure strips, and doing basic weaving on a loom. Adults should handle sharp tools, supervise heat-related testing, and take care of any machine sewing or tight hand stitching.
6. How can I keep the edges from curling?
Knit fabric naturally tends to curl, but this is easily managed. Weaving densely, adding a stitched border, or using a wide zigzag seam around the outside helps flatten the edges. In braided or spiral versions, frequent stitching between coils also encourages a smooth, flat finish.
7. Can I combine leftover scraps from multiple projects?
Absolutely. Shorter strips work well in braided and layered designs. Join ends with small, secure overlaps and stitching, then braid or stack the results. Mixing scraps from different colors and prints often creates especially interesting, one-of-a-kind potholders.
Start Turning Old Tees Into Everyday Helpers
With some careful cutting and a bit of time, worn or sentimental T-shirts can become practical tools that you reach for every time you cook. Whether you choose weaving, braiding, or layering, the finished potholders are proof that simple materials—and a little creativity—can bring new life to items you already own.