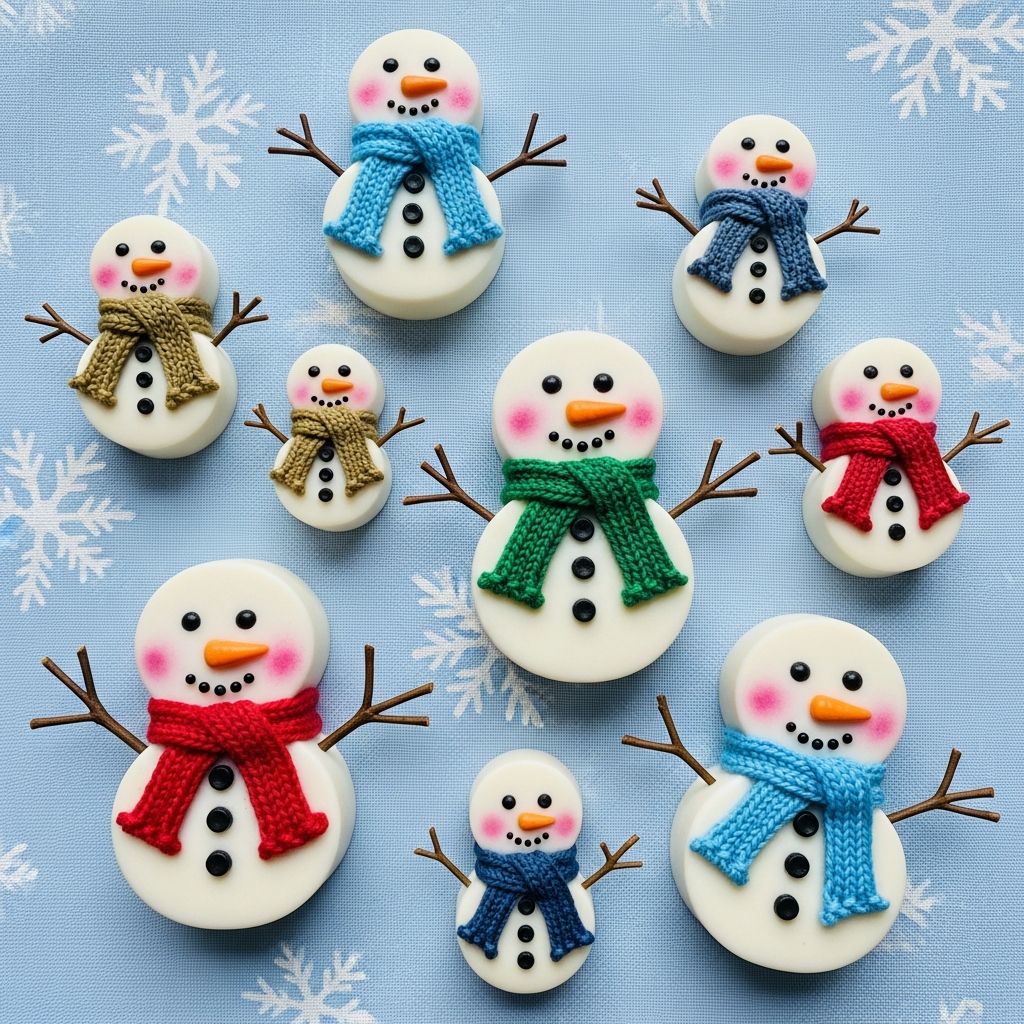
Snowman soaps are a playful way to bring winter cheer into the bathroom, turning ordinary handwashing into a moment of seasonal magic. With a few basic supplies and a bit of imagination, anyone can craft adorable snow-inspired soaps that make memorable gifts or fun party activities.
This guide walks through everything needed to design, shape, decorate, and package snowman soaps—from simple beginner methods to more detailed designs for crafters who enjoy fine details.
Why Make Snowman Soaps?
Creating snowman soaps adds a handmade touch to holiday gifting and offers an easy way to involve kids in a project that feels both creative and practical. Instead of traditional paper crafts, this project yields something useful that encourages healthy hygiene habits.
Because soap is consumable, snowman bars are ideal when you want a festive keepsake that will not clutter shelves for years but will still feel special and thoughtful.
Essential Materials and Tools
Most of the items needed for snowman soaps are easy to find at craft stores, online, or even in a well-stocked kitchen. Choosing skin-friendly ingredients and sturdy tools will make the process smoother and safer.
Below is a typical supply list you can adapt to your preferences and what you already have on hand.
- Plain white soap base (melt-and-pour or pre-made bars)
- Microwave-safe bowl or double boiler
- Silicone molds (round cavities or basic bar shapes)
- Cosmetic-grade colorants (black, orange, red, blue, and any accent colors)
- Skin-safe fragrance or essential oils (optional)
- Wooden stir sticks or heat-safe spoons
- Disposable dropper or pipette for fragrance and color
- Small paintbrushes reserved for soap or cosmetic use
- Toothpicks or bamboo skewers for fine details
- Rubbing alcohol in a spray bottle (to reduce bubbles and help layers adhere)
- Plastic wrap, cellophane bags, or boxes for packaging
- Ribbon, twine, and printable tags for gifting
Optional Add-Ons
To make your snowmen even more unique, consider a few extras that add texture or surprise elements.
- Biodegradable glitter for a subtle “frosted” look
- Oats or fine exfoliating grains for a gentle scrub
- Mini soap embeds such as stars or snowflakes
- Kid-friendly charms or toys wrapped in an additional soap layer
Safety Tips for Family Soap Crafting
While melt-and-pour soap is generally beginner-friendly, warm liquids and slippery surfaces still require care, especially with kids involved. Setting a few ground rules keeps the experience pleasant and safe for everyone.
- Always supervise children when working with hot melted soap or microwaves.
- Use oven mitts or heat-resistant gloves when handling containers that have been heated.
- Keep the workspace dry and clear of clutter to avoid spills and slips.
- Label any fragrance oils and store them out of reach of young children.
- Test a small amount of finished soap on skin if using new fragrances or additives.
Planning Your Snowman Designs
Before melting any soap, planning the overall look of your snowmen will help determine how many layers, colors, and decorative details you need. Sketching a few ideas can be surprisingly helpful.
Think about whether you want each bar to feature a full snowman, just a cheerful face, or a minimalist silhouette surrounded by wintry designs.
Design Ideas to Consider
- Classic three-segment snowman: Head, middle, and lower snowball with scarf and buttons.
- Snowman portrait: A close-up face with carrot nose, coal eyes, and a cozy hat.
- Snow family: Different sizes representing various family members, ideal for gift sets.
- Snowman scenes: A snowman standing in a snowy field with stars or trees in the background.
Step-by-Step: Basic Snowman Face Soap
This method is perfect for beginners and younger children because it uses minimal layers and straightforward shapes. The result is a round or rectangular bar with a simple snowman face on the surface.
1. Prepare the Base
- Cut the white soap base into small, even cubes so it melts more evenly.
- Place the cubes into a microwave-safe container, leaving enough room at the top for stirring.
- Heat in short intervals, stirring in between, until the soap is completely melted and smooth.
- If using fragrance, add a small amount at this stage and stir thoroughly.
2. Pour and Set
- Lightly spritz the inside of your silicone mold with rubbing alcohol to help avoid bubbles.
- Pour the melted soap into each cavity, filling to the desired level.
- Gently tap the mold on the counter to release air bubbles, then spray the surface with rubbing alcohol.
- Allow the soap to cool until firm enough to decorate but still slightly warm to the touch, or let it fully harden and decorate later.
3. Add the Snowman Face
There are two popular approaches: embedding colored soap pieces or painting details directly on the surface. Choose whichever feels easier or more enjoyable.
- For embedded pieces, create tiny circles of black soap for eyes and dots for a mouth, plus a thin orange triangle for the nose.
- For painted details, mix a drop of colorant with a small amount of melted soap and use a brush to apply features once the base layer has cooled.
- Keep expressions varied by changing eye size, eyebrow angles, and smiles—some snowmen can look surprised, sleepy, or extra jolly.
Building Three-Dimensional Snowman Soaps
For crafters who enjoy sculpting, three-dimensional snowmen resemble tiny bath-time figurines that double as soap. These take a bit more time and patience but create a major “wow” factor.
Layered Ball Method
One approach uses spherical molds or hand-formed balls that are stacked and fused together. This method allows for a traditional snowman silhouette.
- Create soap balls: Pour white soap into small round molds or hand-shape pliable soap pieces into balls of three different sizes.
- Attach segments: Slightly melt the contact surfaces, then press the balls together, using a bit of liquid soap or freshly melted soap as “glue.”
- Carve or press features: Use toothpicks to press in eye sockets and button indents, then add contrasting colored soap for details.
- Add accessories: Form scarves, hats, and ear muffs from tinted soap strips or embeds and attach with a bit of melted soap.
Flat-Back Figure Method
If fully round figures feel too delicate, use a flat-back style that stands up on a shelf yet has a stable surface for drying between uses. These can be poured in shallow molds shaped like snowmen or cut from flat slabs of soap.
- Pour a thin slab of white soap in a tray and let it set until firm.
- Use cookie cutters to cut snowman shapes, pressing firmly to create clean edges.
- Decorate as desired with colored soap details, painted features, or embedded accents.
Color and Scent Combinations for a Winter Feel
Color and scent are what truly give your snowmen personality. Light, frosty hues pair well with cool fragrances, while richer colors and warm aromas create a cozy, fireside mood.
| Theme | Suggested Colors | Fragrance Ideas |
|---|---|---|
| Frosty Morning | White, pale blue, silver accents | Mint, eucalyptus, or soft pine |
| Cozy Cabin | Cream, deep red, dark brown | Cinnamon, vanilla, or warm spice blends |
| Sweet Snow Day | White, soft pink, light teal | Cotton candy, marshmallow, or sugar cookie |
| Starry Night | White, navy, gold accents | Amber, cedar, or subtle musk |
Making Snowman Soap Sets for Gifting
Snowman soaps can be grouped into themed sets that make polished, ready-to-give presents. Coordinating colors and scents within a set helps everything feel cohesive and intentional.
- Create a trio with one large snowman and two smaller “child” snowmen for family-themed gifts.
- Bundle a snowman soap with a washcloth, small candle, and hot cocoa packet for a winter self-care kit.
- Offer a mix of expressions—cheerful, sleepy, and surprised—for a playful variety pack.
Eco-Conscious and Sensitive-Skin Adjustments
For recipients with sensitive skin or environmental concerns, small adjustments can make snowman soaps more inclusive. Choosing mild, fragrance-free bases and minimal colorants reduces the chance of irritation.
Eco-friendly packaging such as recyclable boxes, paper bands, or biodegradable cellulose bags preserves the festive look without relying heavily on plastic.
Creative Packaging and Display Ideas
Presentation is a big part of the charm. Packaging turns a cute soap into a special gift that feels ready for a celebration or stocking stuffer. Even simple materials can look polished with a little care.
- Slip individual soaps into clear bags and tie with plaid ribbon and a small bell.
- Arrange several snowmen in a shallow box lined with shredded paper “snow.”
- Wrap a bar in white tissue, draw a quick snowman face on the outside, and add an orange paper triangle as a nose.
- Attach mini instruction or story cards that describe your “snowman soap family.”
Common Problems and Simple Fixes
Even well-planned batches occasionally go off script, but most issues are easy to solve or disguise. View imperfections as chances to personalize your snowmen rather than as failures.
- Bubbles on the surface: Mist with rubbing alcohol immediately after pouring and again if new bubbles appear.
- Uneven layers: Embrace the wavy lines as “drifts of snow” or trim the sides with a small knife for a straighter edge.
- Color bleeding: Use minimal liquid dyes and allow each layer or painted detail to fully set before adding the next.
- Detached accessories: Reattach hats or noses with a dab of freshly melted soap as adhesive.
Hosting a Snowman Soap Craft Party
Snowman soaps make an excellent group activity for winter birthdays, holiday gatherings, or classroom celebrations. The process can be split into age-appropriate tasks so everyone contributes.
- Pre-melt the soap base so younger guests only need to pour and decorate.
- Set up stations: pouring, coloring, decorating faces, and packaging.
- Prepare name tags or small labels so participants can identify their creations at the end.
- Offer non-soap activities, like coloring sheets, for children who finish early.
Storage and Shelf Life
Finished snowman soaps keep best when stored in a cool, dry location away from direct sunlight. Excess heat or humidity can cause sweating, fragrance fade, or slight warping over time.
Individually wrapping each bar helps preserve scent and prevents dust accumulation. When stored properly, most melt-and-pour soaps maintain quality for many months, making them suitable for early holiday prepping.
Frequently Asked Questions
Can children make snowman soaps on their own?
Older children can handle many steps independently, such as decorating and packaging, but adults should manage any tasks involving hot melted soap and sharp tools. For younger kids, prepare the basic bars in advance and invite them to add faces and accessories.
What type of soap base works best?
A white melt-and-pour base is the simplest choice because it instantly resembles snow and requires minimal colorant. However, glycerin or goat’s milk bases can also be used, and you can adjust the design to suit the level of transparency or creaminess you prefer.
How can I make the soaps more moisturizing?
Look for bases labeled as moisturizing or enriched with ingredients such as shea butter, cocoa butter, or aloe. While it is possible to add small amounts of oils, exceeding the recommended limits can affect how firmly the soap sets.
Are essential oils safe for snowman soaps?
Many essential oils can be used safely in soap at low, properly diluted concentrations, but not all are suitable for children or sensitive skin. Always check usage guidelines from trustworthy sources and avoid applying undiluted essential oils directly to skin.
How do I prevent the colors from staining skin or sinks?
Use cosmetic-grade colorants designed for soap and keep hues on the lighter side to reduce the risk of residue. Test one bar in your own sink or shower before gifting to ensure the color rinses away cleanly.
Can snowman soaps be sold at craft fairs?
Yes, many makers sell themed soaps at local events, but it is important to follow any regional regulations for cosmetic products. Clear ingredient labeling and simple packaging that keeps bars protected will help build trust with customers.
Bringing Winter Cheer to Everyday Routines
Handmade snowman soaps transform routine handwashing into a small seasonal celebration. Whether crafted as a solo project on a quiet snowy day or as the centerpiece of a lively holiday gathering, they blend practicality with playful design in a way that appeals to all ages.
With a basic understanding of soap handling, a bit of patience, and a willingness to experiment, anyone can create a cheerful army of snowmen ready to brighten sinks, bathtubs, and gift baskets all winter long.