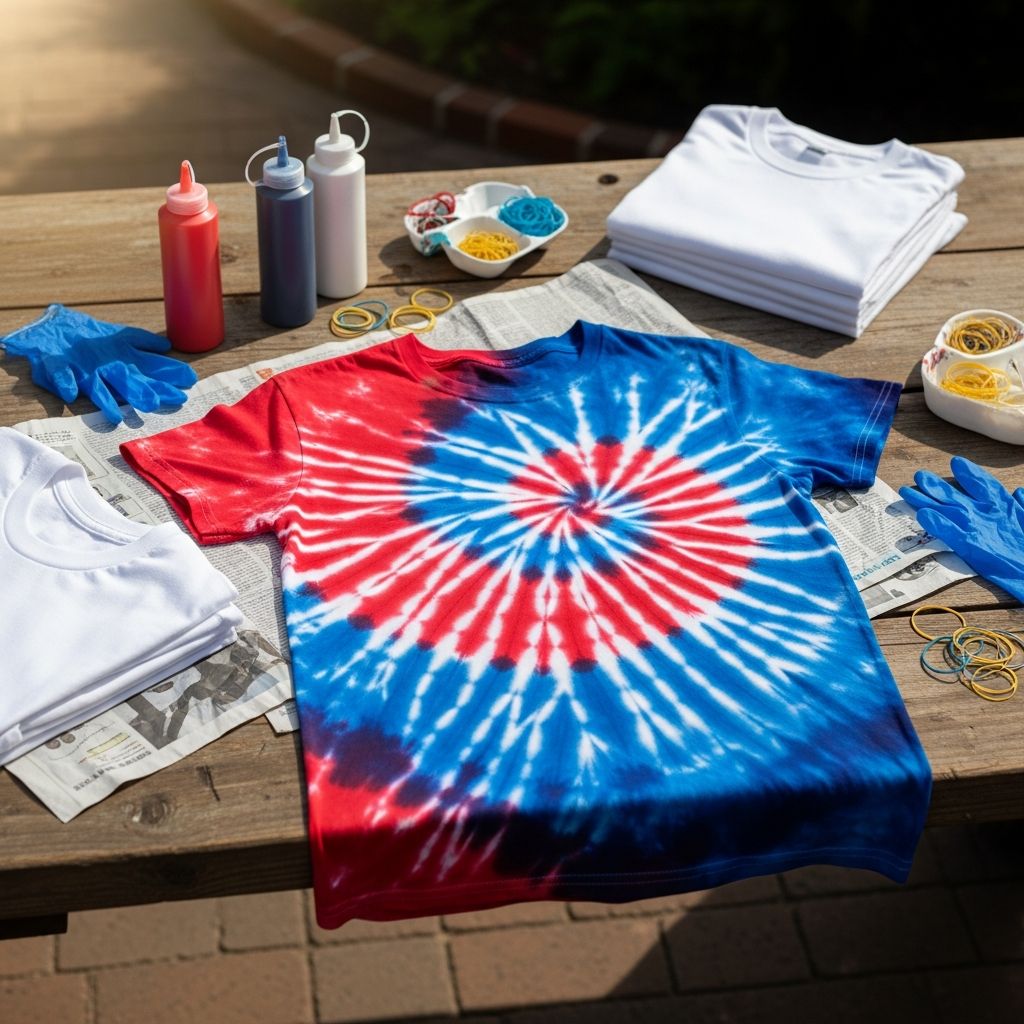
Patriotic tie-dye T-shirts are an easy, eye-catching way to celebrate Independence Day, parades, cookouts, and any red-white-and-blue occasion. This guide walks you through creating your own designs from scratch, using simple techniques that work for both beginners and families with kids.
Why Patriotic Tie-Dye Makes a Perfect Holiday Project
Unlike store-bought shirts, handmade patriotic tie-dye allows you to choose your own color balance, patterns, and fit, so everyone in the family can wear something that actually feels like their style. The process is simple enough for kids with adult supervision, but still creative and open-ended enough to keep older crafters interested.
Because the designs are abstract and forgiving, small mistakes usually turn into happy accidents, which makes this a low-pressure, high-reward project for busy families, party hosts, or last-minute planners. You can also reuse the same basic methods for other color themes throughout the year.
Planning Your Project: Time, Space, and Skill Level
A bit of planning up front will keep the mess under control and ensure bright, long-lasting color. Before you start, think through how many shirts you want to make, where they will dry, and how much time you have for dye setting and rinsing.
- Time needed: Expect 20–40 minutes of active work per shirt, plus 6–24 hours of dye setting time and another 20–30 minutes for rinsing and washing.
- Age and skill level: Adults should handle mixing dyes and pouring over shirts, while kids can help with twisting, folding, and choosing color placement.
- Workspace: A covered outdoor table or a protected indoor surface near a sink works best so cleanup is quick and stress-free.
Essential Supplies for Red, White, and Blue Tie-Dye
The right materials make your project more predictable and prevent disappointing, washed-out colors. Aim for 100% cotton shirts and fiber-reactive dyes labeled for cotton so the colors bond permanently with the fabric.
Core materials
- Plain white 100% cotton T-shirts (pre-washed, no fabric softener)
- Red and blue fabric dye (powdered one-step or liquid fiber-reactive dye)
- Plastic squeeze bottles for each color
- Rubber bands or zip ties for sectioning the fabric
- Disposable gloves and a plastic table covering or trash bags
Helpful extras
- Wire cooling rack or baking rack to keep shirts above pooled dye
- Plastic wrap or plastic grocery bags for wrapping dyed shirts
- Painter’s tape or stickers for creating simple resist shapes
- Aprons or old clothing for everyone working on the project
Choosing a Patriotic Design Style
Red, white, and blue tie-dye does not have to look the same on every shirt. You can lean toward subtle, bold, or playful depending on how you fold, tie, and place color.
- Classic spiral: Radiating swirls of red and blue with white bands showing through for a bold, retro look.
- Diagonal waves: Angled stripes of color that hint at a flag without needing precise lines.
- Color-blocked top corner: A large blue area near the shoulder with red and white sections below, reminiscent of a patriotic emblem.
- Random crumple: Soft, marbled color patterns that are extremely forgiving for new dyers and young helpers.
Pick one method for the whole group to simplify teaching, or let each person experiment with a different pattern while you keep the same red-white-blue palette to unify the finished outfits.
Step-by-Step: Making a Spiral Fireworks Shirt
The spiral design resembles spinning fireworks and works well for almost any shirt size. The tighter you twist and the more bands you add, the more defined the spiral will look.
- Prep the shirt: Start with a pre-washed, slightly damp cotton T-shirt. Lay it flat on your protected surface and smooth out major wrinkles.
- Pinch and twist: Decide where you want the center of the spiral (center chest, off to one side, or near the hem). Pinch that point with your fingers or a clothespin and begin twisting the fabric so it coils into a flat disk.
- Secure with bands: Wrap rubber bands across the disk to divide it into wedge-shaped sections, like cutting a pie. Three to six wedges usually work well for beginners.
- Apply color: Wearing gloves, add red dye to alternating wedges, then add blue to the remaining wedges, leaving some thin areas undyed for white streaks. Flip the bundle and repeat on the back.
- Let it set: Place the dyed bundle on a rack, wrap it loosely in plastic, and let it sit in a warm spot for the recommended setting time on your dye package.
Step-by-Step: Creating Diagonal Waves and Bold Stripes
If you prefer stripes that feel a little more structured than a spiral but don’t want to recreate a literal flag, try simple diagonal sections. This approach looks especially nice on adult sizes because the longer body shows more of the angle.
- Gather on the diagonal: Lay the shirt flat, then pinch one bottom corner and pull it toward the opposite shoulder, gathering the fabric into a long tube on the diagonal.
- Add bands: Secure rubber bands every few inches along the tube. The closer the bands, the narrower the stripes will be.
- Place color for movement: Alternate red-white-blue along the length of the tube. For a softer look, let some sections stay partially white instead of fully saturating them.
- Rotate and repeat: Roll the tube gently to check for missed spots and touch up any pale areas while still leaving intentional white gaps.
This method creates gentle, flowing lines across the front and back of the shirt that suggest motion, similar to a waving banner in a breeze.
Keeping the White Areas Bright and Crisp
One of the biggest challenges with patriotic tie-dye is preserving clean white sections between strong red and blue dyes. Careful setup and patience will help keep colors from muddling together into purple or pink.
- Place shirts on a rack so excess dye drips away instead of pooling beneath the fabric.
- Squeeze dye gently instead of flooding each section until it is dripping heavily.
- Aim the dye tip toward the center of each section and avoid crossing over the rubber bands.
- Wrap each shirt separately in plastic so neighboring colors cannot touch during the setting period.
Setting, Rinsing, and Washing for Long-Lasting Color
Following the correct setting time is just as important as the folding method. Rushing to rinse too soon often leads to faded shirts after the first laundry cycle.
- Let the dye react: Keep shirts wrapped and undisturbed for at least 6 hours, or as long as 24 hours for the boldest results, depending on your dye instructions.
- Cold rinse first: With gloves on, remove the bands under cold running water, gently squeezing out excess dye until the water begins to run lighter.
- Wash separately: Machine wash shirts in hot or warm water with a small amount of detergent, separate from other laundry for the first one or two washes.
- Dry and inspect: Tumble dry or hang dry, then check that the colors look even. Slight variation from front to back is normal and adds to the handmade charm.
Kid-Friendly Adaptations and Classroom Ideas
With a few simple adjustments, patriotic tie-dye can become a favorite camp activity, classroom project, or birthday party craft. The key is to simplify choices and control where the mess happens.
- Pre-mix and label dye bottles so children only choose placement, not ratios.
- Limit each child to one or two colors at a time to reduce muddy results.
- Use large plastic bins or trays under each shirt so drips stay contained.
- Have kids wear oversized old shirts or smocks and provide a shared hand-washing station.
Consider giving younger kids small practice pieces such as bandanas or fabric squares before they move on to their main shirt, which lets them get a feel for how the dye spreads.
Patriotic Tie-Dye Safety Checklist
While fabric dye is designed for home use, it still needs respectful handling. Protecting eyes, skin, and surfaces will keep the project fun instead of stressful.
| Area | What to Do |
|---|---|
| Skin & clothing | Wear gloves, old clothes, or aprons; wash any splashes off skin with soap and water. |
| Surfaces | Cover tables with plastic or disposable cloths; wipe up spills immediately. |
| Ventilation | Mix dyes in a well-ventilated area and avoid breathing in turned-up powder. |
| Children | Supervise closely; let adults handle mixing powdered dyes and first rinsing. |
| Storage | Clearly label any leftover dye bottles and store away from food and drinks. |
Creative Variations: Beyond the Basic Tee
Once you are comfortable dyeing shirts, you can expand the project into a full patriotic ensemble or create coordinated pieces for groups and photo sessions. Most cotton items that fit into a washing machine will work.
- Use the same colors on bandanas, socks, and tote bags for matching accessories.
- Try a mostly blue crumple pattern on one item and mostly red stripes on another to play with contrast.
- Layer tie-dye over simple resist shapes made with tape or stickers to suggest stars or initials without needing fine detail.
Styling Your Patriotic Shirts for Events
Handmade tie-dye works for far more than the backyard. With a bit of styling, your red-white-and-blue shirts can be part of semi-coordinated outfits for pictures, community gatherings, or travel days.
- Pair kids’ shirts with solid shorts in one of the tie-dye colors to keep the look balanced.
- For adults, add neutral jeans, a denim skirt, or white sneakers to tone down the brightness.
- If everyone in the group wears a different pattern but the same color palette, family photos will look coordinated without feeling uniform.
Frequently Asked Questions About Patriotic Tie-Dye
How far in advance should the shirts be made?
Making shirts one or two days before your event gives enough time for setting, rinsing, and drying without feeling rushed. If you are dyeing with kids, add an extra day in case someone needs to redo a piece or you need to repeat a wash.
Can polyester or blends be used instead of 100% cotton?
Polyester and heavy blends rarely absorb fiber-reactive dyes well, which can lead to pale or uneven color. For the strongest reds and blues, stick with shirts labeled 100% cotton or at least with a high natural fiber content.
What if the colors bleed together when rinsing?
If you see significant color runoff, keep rinsing each shirt separately until the water mostly runs clear and avoid stacking wet pieces together. Future washes should be done with like colors, on a cooler setting, to minimize continued bleeding.
How can leftover dye be used?
Leftover dye is perfect for small accessory projects such as scrunchies, dish towels, or practice swatches. Just remember that mixed dye solutions lose strength over time, so use them within a day or two for the best results.
Are there ways to make the shirts look more subtle?
To keep things understated, use more white space by diluting your dye with additional water and applying it lightly rather than saturating every section. Concentrate the brightest color on smaller areas, such as a shoulder or side panel, instead of the entire shirt front.
Making Patriotic Tie-Dye a New Tradition
Once you have gone through the process once, it becomes easier to set up a yearly tie-dye station as a recurring tradition. You might schedule it a week before major celebrations so friends and relatives can bring their own shirts and leave with a custom piece.
Over time, you can experiment with new folding methods, color intensities, and matching accessories, building a small wardrobe of handmade patriotic pieces that tell a story of shared creativity and celebration.