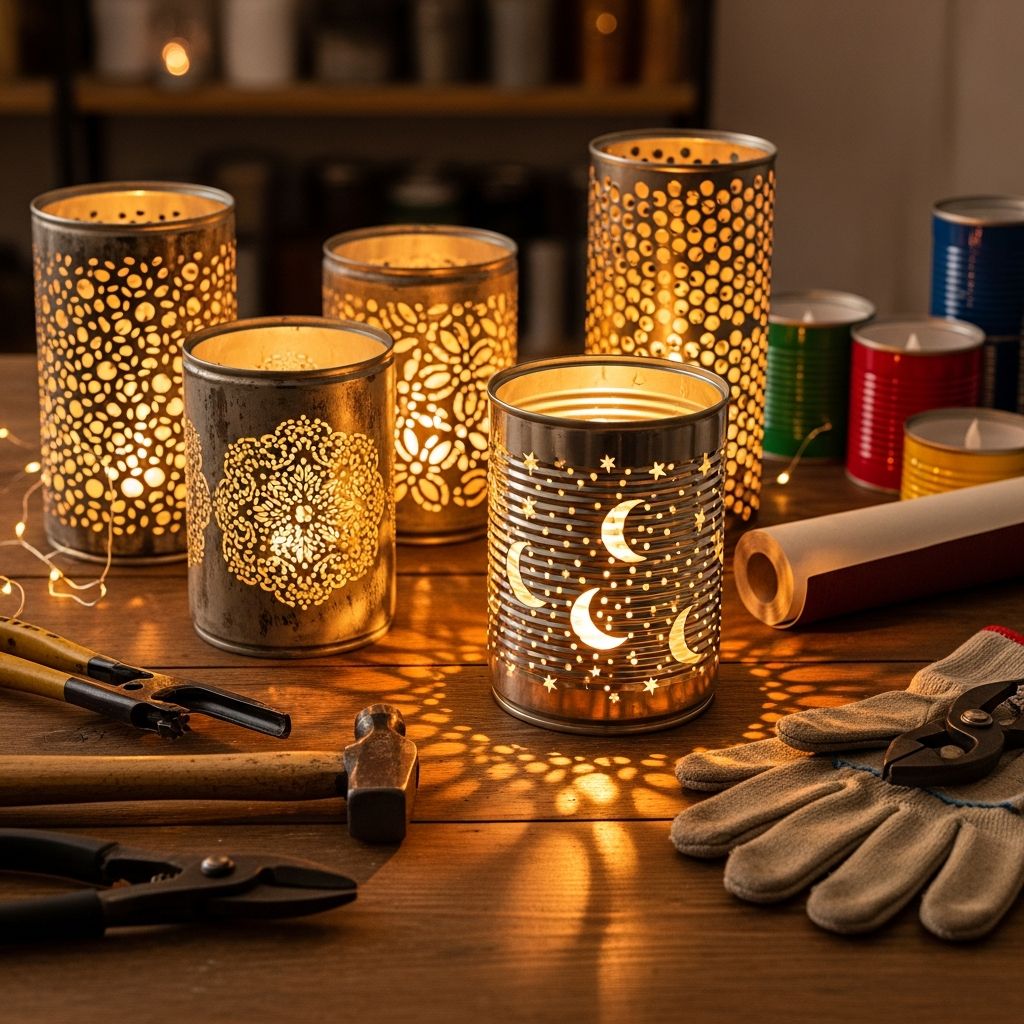
Metal can lanterns are a simple, low-cost way to add warm, twinkling light to patios, holiday tables, and cozy corners indoors. By reusing everyday food cans, you can create custom lanterns that reflect your style, from rustic farmhouse to minimalist modern.
This guide walks through everything you need to know: choosing and preparing cans, punching patterns safely, finishing and decorating, and practical ideas for displaying your new creations.
Why Make Lanterns from Old Cans?
Empty metal cans are often tossed into the recycling bin without a second thought, yet they are almost ready-made lantern bodies. With a few holes punched in the sides and a safe light source placed inside, they scatter light in beautiful dots and patterns across nearby surfaces.
- Eco-friendly upcycling: Give cans a second life rather than sending them straight to the recycling stream.
- Budget-friendly decor: Most supplies are basic household tools, so the project stays inexpensive.
- Customizable style: Paint colors, punched patterns, and handles can all be tailored to seasons, events, or personal taste.
- Beginner-friendly craft: The basic technique is straightforward enough for supervised kids, but flexible enough for more advanced makers to experiment.
Choosing the Best Cans for Lanterns
Almost any metal food can can be turned into a lantern as long as it is clean and free of sharp, bent rims. Different shapes and sizes cast different looks and are useful for different spaces.
| Can Type | Size & Shape | Best Use |
|---|---|---|
| Small soup or vegetable can | Short, compact | Tabletop votives, clustered centerpieces, windowsills |
| Large tomato or coffee can | Tall, roomy | Pathway lights, porch steps, hanging garden lanterns |
| Wide pet-food can | Low and wide | Shallow candle basins, grouped on trays, low ambient lighting |
Choose cans with smooth edges whenever possible, and avoid ones that are crushed or deeply dented, since these spots can be harder to work around when punching patterns.
Tools and Materials You Will Need
Most of the tools for this project are basic items found in many households or easily purchased at a hardware store. You do not need specialized equipment, but you do need tools that let you safely create small holes in metal.
- Clean, label-free metal cans (various sizes if desired)
- Permanent marker or masking tape for guidelines
- Small hammer suitable for precise tapping
- Nail, awl, or small metal punch to create holes
- Water and freezer space (for stabilizing cans)
- Work gloves and eye protection for safety
- Old towel or scrap wood to protect your work surface
- Optional: wire, pliers, and wire cutters for handles
- Optional: spray paint or metal paint for color and protection
- Optional: battery-operated tea lights, LED votives, or fairy lights for illumination
Safety First: Working Carefully with Metal
Metal cans and punched holes can develop sharp edges, so treating this as a real tool-using project rather than just a quick craft keeps everyone safe. Simple precautions reduce the chance of cuts or flying metal fragments.
- Wear sturdy work gloves when handling cans and while punching holes.
- Use eye protection to shield your eyes from small metal shards.
- Keep fingers away from the tip of the nail or punch while hammering.
- If working with children, let adults or older teens handle the hammering and any wire cutting.
Preparing Cans: Cleaning, Freezing, and Marking
Good preparation sets you up for clean, crisp patterns. A few extra minutes at this stage can prevent dents, crooked rows, and smudged designs later on.
Step 1: Wash and Remove Labels
Rinse each can well with soap and water, removing food residue so your lanterns do not develop odors. Soak labels in warm water and peel them off, using a scrub pad or a small amount of cooking oil to remove sticky glue if necessary.
Step 2: Fill with Water and Freeze
Fill each can with water nearly to the top and place it upright in the freezer until the water is frozen solid. The frozen water acts as a temporary brace, helping the can hold its shape while you hammer holes into the sides.
Freezing also makes it easier to control your hammer taps, since the can will resist collapsing under the pressure of each strike.
Step 3: Plan and Mark Your Design
Once the water is solid, remove the can from the freezer and work quickly so it does not thaw. Draw your pattern directly on the outside with a permanent marker, or tape on a paper template that shows where each hole will go.
- Use horizontal or vertical lines for a structured, modern look.
- Experiment with spirals, stars, or random constellations for a playful lantern.
- Try outlining a simple shape, such as a heart, tree, or moon, with dotted holes.
Punching the Pattern: Technique and Tips
With the design in place and ice inside the can, you are ready to start creating the light-catching holes. This part of the project is rhythmic and satisfying when done with patience.
Step 4: Set Up a Stable Work Surface
Place a folded towel, piece of scrap wood, or rubber mat on your work surface, then rest the frozen can on top. This cushioning reduces slipping and protects both your table and your tools from damage.
Hold the can steady with your gloved hand or nestle it between two blocks of wood so it cannot roll away as you work.
Step 5: Hammer the Holes
Position the tip of your nail or metal punch on the first point of your design. Tap gently with the hammer until the tool breaks through the metal and into the ice. Pull the tool back out before moving to the next point.
- Use light, repeated taps rather than one heavy strike to maintain control.
- Try to keep holes evenly spaced so the final pattern looks intentional and balanced.
- For bolder light beams, widen some holes slightly by rotating the punch in place after the metal is pierced.
Continue along your design line or pattern, rotating the can as needed. If you find the ice is starting to melt and the can becomes soft, pause and refreeze it before punching more holes.
Adding Handles and Hanging Options
Lanterns can sit directly on a flat surface, but adding handles transforms them into hanging lights for trees, porches, and hooks. Handles also make it easier to carry or reposition lanterns safely once a light source is inside.
Simple Wire Handle
To attach a basic wire handle, punch two small holes near the rim of the can on opposite sides. Cut a length of sturdy wire slightly longer than the distance you want the handle to span, then bend it into a smooth arc.
- Thread each end of the wire through one of the top holes from the outside to the inside.
- Use pliers to twist and curl the ends inside the can so they stay secure and do not poke fingers.
- Optionally, shape decorative loops or coils in the wire to give the handle a more ornamental look.
Alternative Hanging Methods
If you prefer not to use wire, you can also create hanging lanterns by tying strong twine or thin rope through the top holes. Leather cord gives a rustic look, while metallic chain creates a more industrial feel.
Make sure any non-metal hanging material is kept away from open flame, or use only battery-powered lights in those lanterns to avoid heat damage.
Melting, Smoothing, and Cleaning Up
After you finish punching all the holes and attaching any handles, the ice inside the can has served its purpose. The next stage is to melt it completely and smooth any rough edges left by the punching process.
- Run warm tap water over the inside of the can until the ice loosens and slides out.
- Dry the can inside and out with a towel to prevent rust from forming too quickly.
- Inspect the punched holes and rim; if necessary, gently sand sharp burrs with fine-grit sandpaper or a metal file.
At this point you have a functional lantern shell. You can place a candle inside and use it as-is, or move on to painting and decorating to match your style.
Painting and Decorating Your Lanterns
Paint adds personality, protects the metal from rust, and can even influence how light is reflected from inside the lantern. Choose finishes that fit where and how you plan to use your lanterns.
Painting Options
Most people use spray paint designed for metal because it covers quickly and evenly. Light colors and metallic finishes often reflect more light, while darker shades create moodier, more dramatic lanterns.
- Solid colors: White, black, navy, or seasonal shades like orange or red for holidays.
- Metallic finishes: Gold, copper, or brushed silver for a sophisticated glow.
- Ombre or layered looks: Spray a darker color at the base and fade to lighter at the top.
Always paint in a well-ventilated area or outdoors, and protect the work area with newspaper or a drop cloth. Apply several thin coats rather than one heavy one to avoid drips.
Decorative Details
Beyond paint, small decorative touches can make each lantern feel unique. Consider layering textures and materials that complement the punched design.
- Add twine or ribbon around the rim for a rustic or festive accent.
- Glue on small beads, faux gems, or metal charms between punched holes.
- Stenciling shapes or words onto the outside can personalize lanterns for specific events.
Lighting Choices: Safe and Stylish Illumination
The light source inside your lantern determines both the mood and the safety of the finished project. Open-flame candles provide a classic, flickering glow, while battery-powered options are cooler and more flexible.
- Tea light candles: Traditional and inexpensive; best for outdoor use with appropriate supervision.
- Battery-operated LED votives: Sa […]