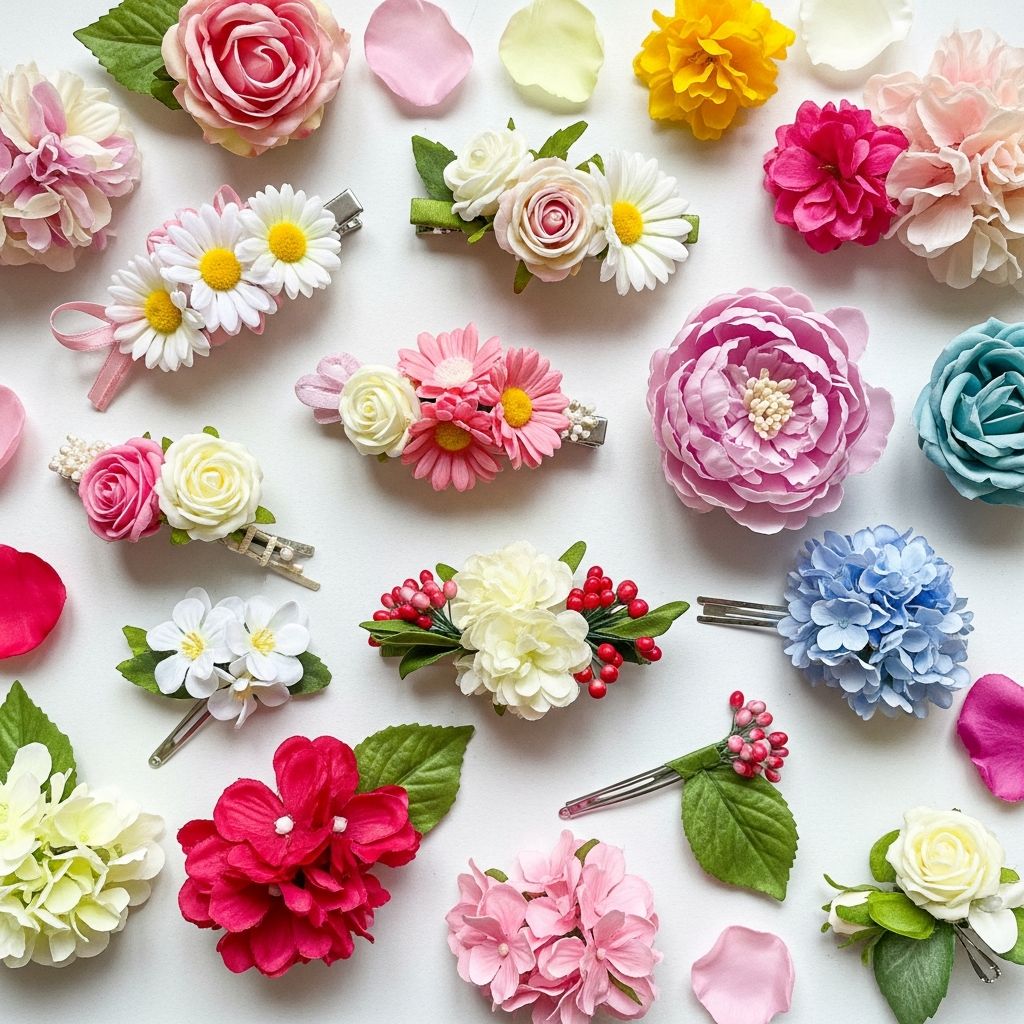
Flower hair clips are an easy way to dress up an everyday outfit, add a romantic touch to a special occasion, or create custom accessories that reflect your personal style. This guide walks through everything from choosing materials to assembling and styling your own clips, so you can craft pieces that look professionally made but are uniquely yours.
Why Make Your Own Flower Clips?
Handmade flower hair clips offer a level of personalization that store-bought accessories rarely match. By choosing your own colors, textures, and clip types, you can create pieces that suit different hair types, events, and seasons.
Beyond personal style, DIY clips are budget-friendly and make thoughtful gifts, party favors, or bridal accessories. Crafting them can also be a relaxing creative hobby that does not require advanced skills or expensive tools.
Planning Your Design Before You Start
Before cutting a single petal or heating up the glue gun, take a moment to think about how and where the clip will be worn. A large, dramatic flower looks beautiful for photos or events, while smaller, flatter flowers are more practical for everyday wear or for children.
- Decide if the clip is for casual wear, a wedding, a festival, or a child’s outfit.
- Choose a color palette that coordinates with the clothing or theme you have in mind.
- Consider the wearer’s hair type: fine hair often needs lighter clips and better grip, while thick hair can handle heavier, bolder designs.
Materials and Tools You’ll Need
You can adapt this project to what you already have on hand, but the items below form a solid starting point. Shopping your existing craft supplies is a great way to keep costs low while experimenting with different looks.
Basic Supplies
- Hair hardware: alligator clips, snap clips, French barrettes, or bobby pins
- Flowers: silk flowers, fabric flowers, felt flowers, or layered ribbon blooms
- Adhesive: hot glue gun with glue sticks, or strong craft glue
- Backing material: small felt circles or ovals for stability
- Decorative centers: beads, pearls, rhinestones, buttons, or tiny fabric bows
Helpful Tools
- Sharp scissors or fabric scissors
- Needle and thread (for extra security on fabric flowers)
- Wire cutters (if using wired artificial flowers)
- Ruler or measuring tape
- Heat source such as a lighter or candle if you plan to slightly melt synthetic fabric edges for texture (optional and requires caution)
Choosing the Right Clip and Flower Style
The base you choose will affect both comfort and durability. Lightweight clips suit younger children, while stronger hardware is better for thick or curly hair. Balancing the size of the flower with the strength of the clip ensures the accessory stays in place.
| Clip Type | Best For | Flower Size | Notes |
|---|---|---|---|
| Alligator clip | Most hair types, quick placement | Small to medium | Good grip; easy to line with ribbon or felt for comfort. |
| Snap clip | Fine or toddler hair | Small and flat | Stays close to the head; avoid overly heavy flowers. |
| French barrette | Thick or long hair, half-up styles | Medium to large | Ideal for statement pieces and multi-flower designs. |
| Bobby pin | Updos and detailed placement | Very small | Use for accent blossoms or scattered floral looks. |
For the flowers themselves, you can either use pre-made blossoms or create your own from fabric, felt, or ribbon. Layering different materials—such as a lace base with a satin flower on top—adds depth and dimension without making the clip too bulky.
Step-by-Step: Classic Single Flower Clip
This project focuses on a single focal flower mounted on a clip. It is simple enough for beginners but can be customized endlessly with color choices and embellishments.
Step 1: Prepare the Clip Base
- Open the clip and slide a small piece of scrap paper or cardstock inside the jaws to keep glue off the gripping area.
- Cut a piece of felt slightly smaller than the flower’s base. This will act as a cushion and help the clip adhere more securely.
- Apply a thin line of hot glue along the top of the clip and press the felt onto it, holding for a few seconds until set.
Step 2: Prepare the Flower
- If using a store-bought silk flower, gently remove any plastic stems or backing pieces so the underside lies as flat as possible.
- For layered flowers, check if the petals feel secure. If they wobble, add a few small stitches or dots of glue between layers to keep them from spinning.
- If desired, replace the original center with a bead, rhinestone, or button to match your color scheme.
Step 3: Attach Flower to Clip
- Place a generous but controlled pool of glue on the felt-covered top of the clip.
- Quickly press the flower base onto the glue, centering it on the clip. Hold firmly until the glue cools and the flower no longer shifts.
- Check from all angles to ensure the flower sits upright and the clip still opens and closes easily.
Step 4: Add Finishing Details
- Inspect the clip for stray glue strings and trim them away once the glue has cooled.
- If any petal edges look frayed, carefully trim them or lightly seal synthetic fabrics using a quick pass near (not directly in) a flame.
- Try the clip in your hair or on a mannequin head to confirm the orientation works as intended; adjust future clips accordingly.
Layered and Multi-Flower Clip Ideas
Once you master a single flower clip, experiment with more elaborate arrangements. Combining several small flowers can create a lush, garden-like look that works beautifully for parties, photo shoots, or special events.
- Gradient blooms: Use three flowers of the same type in light, medium, and dark shades of one color for a subtle ombré effect.
- Mini bouquet barrette: Line a French barrette with felt and arrange a cluster of tiny blossoms, greenery, and a single standout focal flower in the center.
- Asymmetrical designs: Place a larger flower off-center and balance it with a few smaller buds and leaves on one side for a modern, organic feel.
- Textured mix: Pair a soft fabric bloom with a few stiff paper flowers or lace leaves to add contrast in texture.
Ideas for Different Ages and Occasions
Adapting your design to the wearer and event makes each clip feel intentional and special. Subtle choices in color and scale can transform the same basic technique into completely different looks.
- Everyday wear: Choose small, flat flowers in neutral or soft colors that won’t catch on hats, scarves, or headphones.
- Children’s parties: Use bright colors, glittery centers, and lightweight materials. Consider making matching sets as favors or activities.
- Weddings and formal events: Opt for ivory, blush, or metallic tones with pearl or crystal centers. Coordinating clips for bridesmaids or flower girls add a cohesive touch.
- Festivals and vacations: Go bold with oversized tropical flowers, layered leaves, and vibrant color combinations.
Safety and Comfort Tips
While flower clips are generally simple accessories, a few precautions keep them safe and comfortable, especially for young children. Secure building and thoughtful material choices help avoid irritation and extend the life of each clip.
- Keep small beads and detachable parts away from very young children who might put them in their mouths.
- Cover any exposed metal edges with felt or ribbon to prevent scratching sensitive scalps.
- Test the clip’s weight by wearing it for a few minutes; if it tugs on the hair, scale down your design.
- Allow all glue to cure fully before use, so the accessory does not shift or come apart in the hair.
Storage and Care for Long-Lasting Clips
Proper storage keeps petals from getting crushed and helps prevent dust accumulation. With a little care, your handmade clips can stay beautiful season after season.
- Store clips in a shallow box or on a ribbon display, with enough space so flowers are not pressed tight against each other.
- Keep them away from direct sunlight to avoid fading, especially for brightly dyed or painted flowers.
- Dust occasionally with a soft brush or a hair dryer on a cool, gentle setting.
- Avoid getting the clips wet; if they do get damp, let them air dry completely before storing.
Frequently Asked Questions
Can I make these clips without a hot glue gun?
Yes. A strong fabric or craft glue can work, but expect a longer drying time and hold the flower in place with clips or a small weight while it cures. For very active wearers or heavy flowers, a hot glue bond or a few reinforcing stitches will usually be more durable.
What if I do not have artificial flowers?
You can create flowers from felt, cotton fabric, satin ribbons, or even recycled clothing. Cut petal shapes, layer them, and secure them with stitching or glue to build your own custom blossoms before attaching them to clips.
How do I stop petals from fraying?
For synthetic fabrics like polyester or satin, lightly sealing the cut edges near a small flame or using a fabric sealant can drastically reduce fraying. For natural fabrics like cotton, pinking shears or fray-preventing liquid along the edges are helpful alternatives.
Are these clips suitable for very fine baby hair?
For babies and toddlers, choose extremely lightweight flowers on small snap clips or soft headbands. Avoid beads or small detachable elements and supervise wear to ensure safety and comfort.
Can I wash flower hair clips?
Most decorative clips are not designed for full washing. Spot clean gently with a barely damp cloth if needed, and avoid soaking the glue or metal parts to prevent rust or weakened bonds.
Creative Variations to Try Next
Once you are comfortable making basic designs, experiment with different themes and seasons. Keeping a small box of leftover petals, beads, and clips allows you to mix and match elements into new creations.
- Seasonal sets with autumn leaves, winter berries, spring blossoms, or summer tropicals.
- Monogram centers using small letter charms or embroidered felt circles.
- Match-your-outfit clips made from fabric scraps that coordinate with handmade dresses or tops.
- Minimalist designs using a single petal layer and a simple metallic bead for a clean, modern look.
With a few basic techniques, you can transform simple craft materials into hair accessories that feel special every time you wear them. The key is to keep experimenting with shapes, layers, and colors until you discover the combinations that feel most like your personal style.