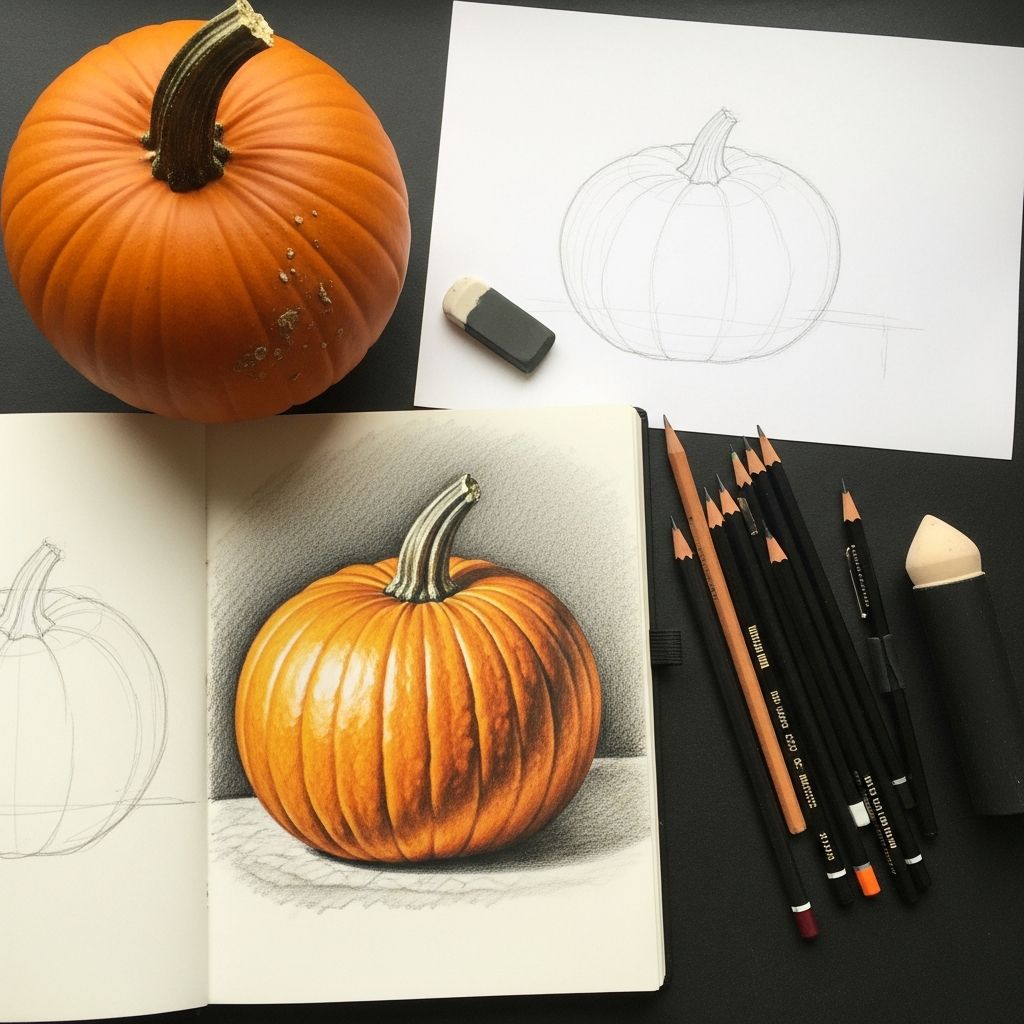
Drawing a pumpkin is one of the easiest and most satisfying seasonal art projects you can do. With just a few simple shapes and some basic shading, you can create a pumpkin that looks three-dimensional and ready for fall or Halloween. This guide walks you through every stage, from the first sketch to fun finishing details.
Why the Pumpkin Is a Great First Drawing Project
The pumpkin is an excellent subject for beginners and kids because:
- Its form is based on simple shapes like ovals and curves.
- There is no single “perfect” pumpkin shape, so mistakes are easy to hide.
- It can be adapted for many themes: autumn decor, Halloween, Thanksgiving, or simple practice.
- You can practice core drawing skills: proportion, overlapping forms, and shading to show light and shadow.
Basic Supplies You Will Need
You can draw a pumpkin with almost any drawing tool, but these supplies will make the process smoother:
- Drawing surface: Plain printer paper, sketchbook paper, or light cardstock.
- Pencil: Any standard HB pencil works; softer graphite (like 2B–4B) helps with shading.
- Eraser: A soft eraser to clean up guidelines and adjust shapes.
- Coloring tools (optional): Colored pencils, crayons, markers, or watercolor.
- Reference (optional): A real pumpkin or a photo to observe shape, ridges, and stem texture.
Understanding the Pumpkin’s Shape Before You Draw
Before you start sketching, it helps to think about what a pumpkin looks like in simple geometric terms:
- The overall body can be seen as a squashed sphere or a wide oval.
- The surface is divided into vertical segments called ribs or ridges, which curve around the pumpkin.
- The stem is a short, slightly curved cylinder that sits on top, often tilting to one side.
- Light typically hits one side more than the other, creating highlights and shadows, which you can show using lighter and darker areas.
Thinking in these simple forms (oval body, curved ribs, cylinder stem) makes the step-by-step process much easier.
Step 1: Sketch the Main Outline
Start lightly so you can erase later:
- Draw a wide, horizontal oval. This will be the basic footprint of your pumpkin.
- If you want a taller pumpkin, make the oval more rounded; for a squat pumpkin, make the oval flatter.
- Keep your lines soft and broken rather than dark and heavy so they are easy to adjust.
At this point, you are not worried about details. You are only deciding how big the pumpkin will be and how much space it will take up on the page.
Step 2: Add the Center Rib
The center rib is the middle section of the pumpkin and helps you find symmetry:
- Find the middle of your oval.
- Lightly draw a vertical curved line from the top of the oval to the bottom.
- Curve this line slightly to suggest the roundness of the pumpkin instead of drawing a straight vertical line.
This center rib will act as a guide when you add the rest of the segments.
Step 3: Build the Side Ribs
Now you will turn that plain oval into a pumpkin by adding ribs on both sides of the center.
- On the left side of the center rib, draw another vertical curve starting near the top of the pumpkin and ending near the bottom.
- Let this line bow outward more than the center rib to show the pumpkin swelling out to the sides.
- Repeat on the right side, mirroring the curve as closely as you can.
- Continue adding additional ribs to the left and right until your oval looks like a series of overlapping curved panels.
The outermost ribs should almost touch or slightly pass beyond your original oval, helping define the final silhouette.
Step 4: Refine the Silhouette
Now that you have a set of curved ribs, you can clean up the outer shape:
- Look at the outermost lines on each side. These will now function as the border of your pumpkin.
- Erase sections of the original oval that no longer match the natural bumpy outline of your ribs.
- Connect any gaps between ribs with small curves so the outer edge looks continuous and round, not jagged.
When you are done, you should see a clearly rounded pumpkin shape, made up of several vertical segments.
Step 5: Draw the Stem
The stem gives character to your pumpkin and helps show perspective.
- At the top of the pumpkin, slightly below the highest point of the outer contour, draw a small, horizontal curve. This will be the base of the stem.
- From each end of that curve, draw two short, slightly inward-curving vertical lines going up.
- Connect those lines with another curve to close the top of the stem. This makes a short cylinder.
- If you want a bent stem, angle the vertical lines and curve the top to follow the direction of the bend.
You can add small lines on the stem to suggest texture, as real pumpkin stems are often ridged and rough.
Step 6: Add Depth with Overlapping Ribs
Now you will make the pumpkin feel three-dimensional by showing some ribs in front and some behind.
- Pick the middle rib and make it slightly thicker or darker near the top to show it is closest to the viewer.
- Where ribs meet near the stem, allow one to slightly overlap another, erasing small portions of lines that should sit behind.
- Add a hint of extra ribs behind the main ones by drawing short, partial curved lines peeking out above or beside the front ribs.
Overlapping is a classic drawing technique to show depth and spatial order, helping the viewer see which forms are in front and which are behind.
Step 7: Establish Light and Shadow
Decide where your light is coming from before you start shading.
- Pick a direction, for example: light coming from the upper left.
- The ribs on the left side will receive more light and should stay lighter.
- The ribs on the right side and lower areas will be in more shadow and should be shaded darker.
This simple decision about light direction guides all of your shading and makes the pumpkin look more realistic.
Step 8: Shade the Pumpkin Ribs
Now you can add value (lightness and darkness) to bring the pumpkin to life:
- Use the side of your pencil to softly shade the ribs that are turned away from the light.
- Keep the central part of each rib slightly lighter than the edges to suggest a round, bulging surface.
- Darken the grooves where two ribs meet, especially on the shadow side, because these areas receive less light.
- Blend gently with your finger, a tissue, or a blending stump if you want smoother shading.
This method of dark grooves and lighter centers follows the natural way light falls on rounded surfaces and helps convey volume.
Step 9: Shade the Stem
The stem often looks slightly rough and textured.
- Draw short vertical or diagonal lines along the stem to show its fibrous surface.
- Keep one edge of the stem lighter to create a highlight.
- Darken the base of the stem where it meets the pumpkin because that area is usually in shadow.
Varying the direction and strength of your pencil strokes gives the stem a more natural, organic feel.
Step 10: Optional – Add a Cast Shadow and Background
To anchor the pumpkin on the page, you can add a cast shadow and simple background details:
- Under the pumpkin, draw a soft, flat oval shape slightly offset opposite your light source.
- Shade this oval more heavily near the base of the pumpkin and lighter as it moves away.
- Add a few simple indications of ground: fallen leaves, a tabletop edge, or a patch of grass.
A cast shadow makes the pumpkin feel like it is resting on a surface rather than floating in space.
Adding Color: Turning Your Sketch into Fall Art
Once your pencil drawing looks the way you want, you can add color:
- Pumpkin body: Use orange as a base, then add darker orange or red-orange in the grooves and near the bottom for depth.
- Highlights: Leave a thin, lighter band on the ribs facing the light or gently erase some color to create a highlight.
- Stem: Use browns and greens; add darker tones where it meets the pumpkin.
- Cast shadow: Use cool grays or a muted purple for a more natural shadow color.
This simple approach to color reflects basic color and light principles used in beginner drawing and painting instruction.
Creative Variations on the Classic Pumpkin
Once you are comfortable with a basic pumpkin, you can experiment with different styles and themes.
| Variation | How to Draw It | Best For |
|---|---|---|
| Jack-o’-lantern | Add cut-out eyes, nose, and mouth; shade inside the openings to suggest depth. | Halloween decorations and cards |
| Stacked pumpkins | Draw one pumpkin, then a smaller one on top, overlapping shapes to show stacking. | Fall porch or harvest scenes |
| Mini gourds | Use similar ribbed structure but change proportions and colors (yellow, green, white). | Still life practice and color studies |
| Stylized cartoon pumpkin | Exaggerate the stem, simplify the ribs, and add expressive eyes or a face. | Children’s drawings and classroom projects |
Tips for Drawing Pumpkins with Kids
Drawing activities are useful for building fine motor skills, hand–eye coordination, and creativity in children. A pumpkin is a forgiving subject that works well in classrooms and at home.
- Start with big, bold shapes so kids are not overwhelmed by tiny details.
- Use thicker pencils, crayons, or markers for younger children to make gripping easier.
- Encourage individuality—some pumpkins can be tall, others very round, and all are acceptable.
- Turn the project into a story by letting kids name their pumpkins or imagine where they grow.
- Display finished drawings to reinforce confidence and pride in their work.
Common Mistakes and How to Fix Them
Here are a few frequent beginner mistakes and easy ways to correct them:
- Problem: The pumpkin looks flat.
Fix: Add more contrast between light and shadow; darken grooves between ribs and shade one side more than the other. - Problem: The stem looks pasted on instead of attached.
Fix: Add a slight curve at the base where the stem enters the pumpkin and increase shadow around that junction. - Problem: The shape feels stiff and too perfect.
Fix: Break up the outer contour with gentle bumps and irregularities; real pumpkins are rarely symmetrical. - Problem: Visible guidelines distract from the final drawing.
Fix: Erase construction lines after refining the silhouette, then go over final lines more confidently.
Frequently Asked Questions (FAQs)
How can I draw a pumpkin that looks more realistic?
Focus on three things: accurate overlapping ribs, a clear light source for shading, and a slightly irregular outer contour. Observe a real pumpkin or a reference photo to see where shadows deepen and where the surface catches the most light.
What is the easiest way for kids to remember the steps?
Break it into a simple sequence they can repeat out loud: “oval, stripes, stem, shade.” Start with the oval, add curved stripes for ribs, draw the stem, and finish with simple light and dark areas. Repetition helps kids internalize the process.
Which colors should I use if I do not have orange?
You can blend yellow and red to approximate orange, layering yellow first and then lightly adding red on top. Adjust the balance to get a brighter or deeper tone. Many basic color sets are designed so primary colors can be mixed to create secondary colors like orange.
How long does it take to draw a simple pumpkin?
A basic line drawing can take 10–15 minutes, while a fully shaded or colored pumpkin may take 20–40 minutes depending on the level of detail and experience of the artist.
Can I draw a pumpkin digitally instead of on paper?
Yes. The same steps apply on a tablet or computer. Use a sketch brush for light guidelines, then a darker brush for final lines and separate layers for color and shading. Digital drawing offers the advantage of easily undoing mistakes and experimenting with different color schemes.
References
- Drawing Basics: Forms and Gesture — Savannah College of Art and Design. 2021-09-01. https://www.scad.edu/sites/default/files/2017/drawing-basics-forms-gesture.pdf
- Light for Visual Artists: Understanding & Using Light in Art & Design — Richard Yot, Laurence King Publishing. 2011-01-01. https://laurenceking.com/products/light-for-visual-artists
- Pumpkin Growing and Varieties — University of Illinois Extension. 2022-10-05. https://web.extension.illinois.edu/pumpkins/growing.cfm
- Color Theory for Beginners — The Metropolitan Museum of Art, Education Department. 2020-06-15. https://www.metmuseum.org/art/online-features/metkids/explore/color
- Development of Fine Motor Skills — Centers for Disease Control and Prevention. 2022-03-31. https://www.cdc.gov/ncbddd/childdevelopment/positiveparenting/preschoolers.html