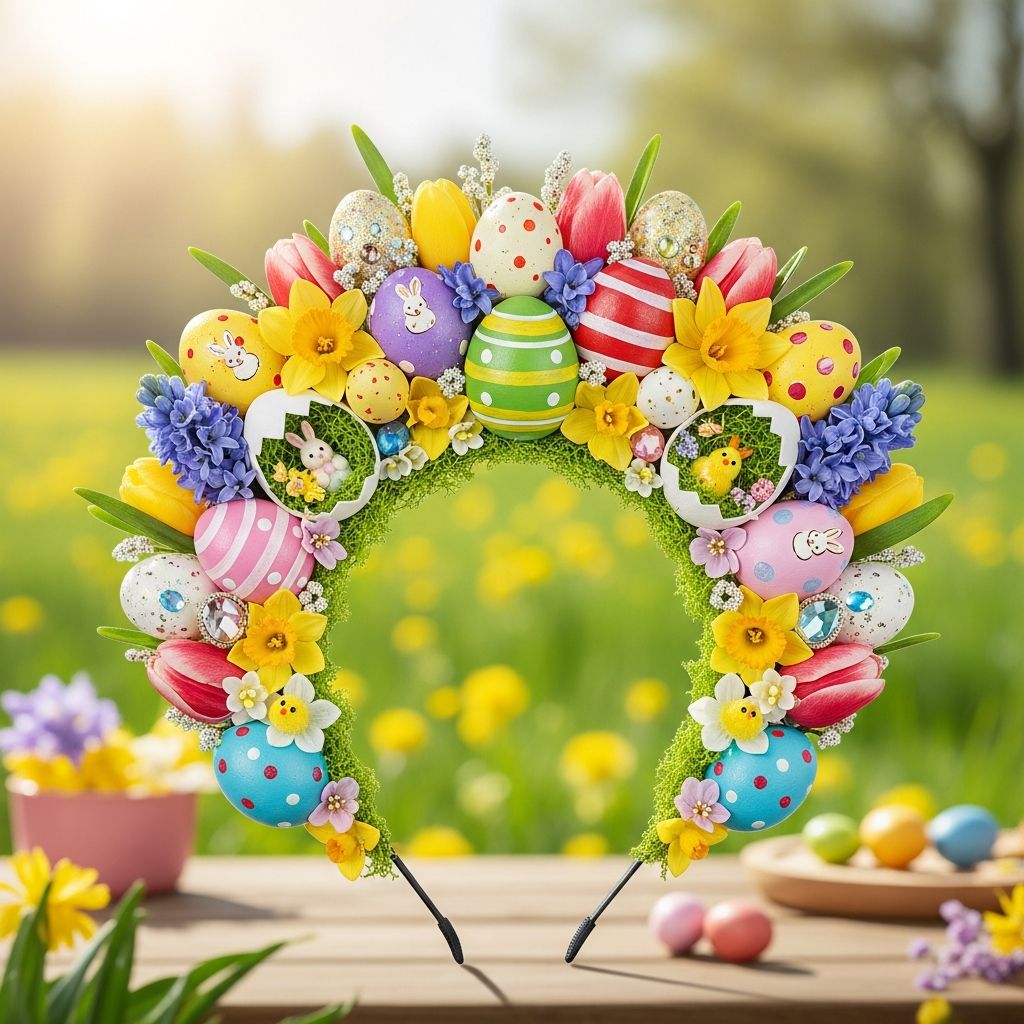
Easter crafts can be much more than dyeing eggs in pastel cups. Transform your celebration by turning eggs into playful crowns that children and adults can wear during egg hunts, brunches, or festive photo sessions. This guide walks through every step of making safe, lightweight, and delightfully quirky Easter egg crowns that feel like they came straight out of a storybook.
Unlike traditional egg decorating, this project treats eggs as tiny sculptures that sit atop a crown or headband, giving each wearer a unique look. With simple supplies and a bit of patience, your family can design crowns that match personalities, outfits, and Easter tablescapes.
Why Make Easter Egg Crowns?
Easter egg crowns turn a familiar tradition into a wearable memory. Instead of keeping decorated eggs on a plate or in a basket, you bring them to life as part of your celebration outfits.
- They create instant photo opportunities and keepsake moments.
- They give kids a hands-on project that ends with something they can proudly wear.
- They can be customized for themes like woodland fairy, minimalist modern, or bright rainbow.
Planning Your Craft Session
Before gathering supplies, think through who will be making and wearing the crowns. This helps you decide how simple or elaborate the designs should be and how much time to allow.
- Age range: Plan more pre-assembly for toddlers and more creative control for older kids.
- Time available: Simple crowns can be made in an hour; intricate designs might span a weekend.
- Setting: Cover tables, protect clothing, and choose a well-lit area for painting and gluing.
Materials and Tools Checklist
You can adapt this project to whatever you have at home, but the list below covers the basics and a few fun extras. Choose either real eggshells or lightweight faux eggs depending on how fragile you want the crowns to be.
Core Materials
- Eggs (blown real eggs or plastic/foam craft eggs)
- Plain plastic headbands, flexible metal headbands, or floral wire wreath bases
- Strong craft glue or hot glue (for adults only)
- Acrylic paint or craft paint in spring colors
- Paintbrushes in various sizes
- Cardstock or thin cardboard (for structural supports)
Decorative Extras
- Silk or paper flowers
- Ribbon, lace, or twine
- Glitter, sequins, or small gems
- Green felt or tissue paper for leaves
- Markers or paint pens for details and faces
Tools
- Scissors
- Hole punch (optional, for attaching decorative pieces)
- Craft knife (for adults to trim or adjust eggs and cardboard)
- Protective table covering and smocks or old T-shirts
Egg Options: Real vs. Faux
Choosing between real and faux eggs affects how you handle, paint, and store your crowns. Consider the trade-offs before you begin so you do not have to adjust mid-project.
| Egg Type | Pros | Cons | Best For |
|---|---|---|---|
| Blown real eggs | Lightweight, authentic texture, traditional look | Very fragile, require prep time to empty and dry | Older kids, decorative crowns to display after wearing |
| Plastic craft eggs | Durable, reusable, easy to glue | Slightly heavier, may need sanding or priming for paint | Younger kids, outdoor wear, yearly reuse |
| Foam eggs | Feather-light, easy to pierce with wire or toothpicks | Can dent easily, some paints may melt foam without a barrier coat | Large, dramatic crowns with many eggs |
Preparing the Eggs Safely
If using real eggs, emptying and cleaning them is the most delicate step. Adults should handle this part, especially when working with younger children. After emptying, rinse the shells gently and allow them to dry completely before painting to prevent moisture-related cracks.
For faux eggs, preparation is simple. Lightly wiping them with a damp cloth removes any dust or residue. If the surface is slick, a quick coat of white acrylic paint or primer helps color layers adhere evenly.
Designing Your Crown Layout
Before any gluing, create a layout plan. Arranging eggs and decorations first prevents last-minute crowding and crooked placement. Treat your headband or crown base as a tiny stage on which the eggs are your main characters.
- Decide on symmetry: a single central egg, evenly spaced eggs, or an asymmetrical cluster.
- Plan height: mix full eggs with half-eggs or small decor to avoid a top-heavy look.
- Balance color: alternate bright and soft shades so the design feels cohesive from all angles.
Step-by-Step: Basic Easter Egg Crown
This basic process provides a flexible foundation. You can adjust each stage for more detail, sparkle, or themed elements once you get comfortable with the structure.
- Prepare your base.
Wrap the headband or wire base in ribbon or fabric if you want a finished look and more grip. Secure the ends with glue and let them dry fully.
- Paint your eggs.
Apply one or two base coats of paint in chosen colors. Add patterns such as stripes, dots, tiny flowers, or abstract smudges once the base is dry. Let all layers dry thoroughly before handling.
- Create supports.
Cut small strips or rings of cardstock to act as platforms for the eggs. These supports help distribute weight and protect fragile shells from direct pressure on the crown base.
- Attach the eggs.
Glue the cardstock supports to the crown base first, then gently glue eggs onto the supports. Hold each egg in place until the adhesive begins to set to prevent sliding.
- Fill the gaps.
Use small flowers, leaves, ribbon loops, or tufts of tissue paper to cover any exposed glue or cardboard and to soften transitions between eggs.
- Allow to cure.
Let the completed crown sit undisturbed for the recommended glue-drying time before trying it on. Rushing this step risks shifting or detaching pieces.
Creative Theme Ideas
Once you understand the basics, themed crowns turn the project into storytelling. Assign each family member a motif so that every crown feels personal and distinct.
- Garden Fairy: Soft pastel eggs, miniature silk flowers, and trailing ribbons in shades of green and lavender.
- Rainbow Parade: A full spectrum of bold eggs from red to violet, paired with metallic accents and confetti-style dots.
- Forest Critters: Neutral-toned eggs with simple drawn faces, felt ears, and leaf clusters to suggest woodland animals.
- Minimalist Modern: White or monochrome eggs with geometric patterns, paired with a simple plain band.
Making Crowns Kid-Friendly
Children love the idea of wearing eggs on their heads, but delicate materials can be frustrating. Adapt the craft so that kids can participate confidently at their own level while adults manage the riskier steps.
- Use plastic or foam eggs for younger crafters to reduce breakage and tears.
- Pre-paint and pre-glue structural parts so children focus on decorating with stickers, markers, and safe glue.
- Offer simple design choices such as “two colors and one pattern” rather than overwhelming them with options.
Safety Tips for a Smooth Craft Day
Because this project involves fragile objects, adhesives, and sometimes sharp tools, a few precautions help everyone stay safe and happy. Set clear roles, with adults in charge of structural work and children in charge of decoration where possible.
- Keep hot glue and craft knives strictly for adults or older teens with supervision.
- Remind children to carry crowns by the base, not by the eggs.
- Ensure that no loose glitter or small pieces are within reach of toddlers who still mouth objects.
Styling and Using Your Crowns
Once finished, your Easter egg crowns can be more than a quick costume. Build them into your day so they become part of your family’s seasonal rituals.
- Wear them during Easter brunch or a special breakfast to mark the occasion.
- Use them as playful props in a mini photo shoot with a simple backdrop.
- Arrange crowns around a centerpiece when not in use, letting them decorate your table or mantel.
Storing and Reusing Crowns
Careful storage lets you enjoy your creations for more than one season, especially if you use faux eggs and sturdy materials. Treat the crowns as you might treat delicate holiday ornaments.
- Place each crown in a shallow box lined with tissue paper or soft cloth.
- Store them in a cool, dry space away from direct sunlight to preserve paint colors.
- Repair loose elements with a small dab of glue before next year’s celebration.
Simple Variations Without a Headband
If you do not have headbands on hand, you can still capture the charm of egg crowns in other formats. These alternatives help you use the same decorative ideas on different bases.
- Egg Garland: Attach painted eggs and small flowers to a length of ribbon or string to hang across a mantle or doorway.
- Mini Egg Wreath: Arrange eggs around a small cardboard ring to create a halo-style decoration for walls or chair backs.
- Tabletop Halo: Place a circular egg arrangement around a candle or vase as a centerpiece inspired by crown design.
Quick Troubleshooting Guide
Even the most carefully planned craft sometimes runs into snags. A simple troubleshooting plan can save your project from frustration and help children see that mistakes can be fixed creatively.
| Problem | Likely Cause | Simple Fix |
|---|---|---|
| Egg cracks while gluing | Too much pressure or uneven support | Add a larger cardboard platform and replace the broken egg with a new one. |
| Eggs tilt or slide | Glue not fully set before moving | Hold in place longer or prop with small objects until dried. |
| Crown feels heavy | Too many eggs clustered in one area | Use fewer eggs, switch to foam, or spread them evenly along the band. |
| Paint chips off | Surface not cleaned or primed | Add a clear sealer or repaint with a primer coat first. |
Frequently Asked Questions
How long does an Easter egg crown take to make?
Expect about one to two hours from start to finish for a basic crown, including drying time between paint layers. More detailed designs with multiple coats, patterns, and decorations may require an additional session or overnight drying.
Can these crowns be worn outdoors?
Yes, crowns can be worn outside for hunts and photos, but treat them gently and avoid rough play. If you plan a lot of movement, choose plastic or foam eggs and secure all elements firmly with strong adhesive.
Are real egg crowns safe to keep year after year?
Blown and thoroughly dried eggshells can last for several seasons if stored carefully. Keep them in padded boxes and handle them as you would delicate ornaments to minimize the risk of cracking.
What is the best age for children to help?
Children in early elementary grades are usually ready to paint eggs and place decorations with guidance. Younger children can participate by choosing colors and adding stickers while adults assemble the structural elements.
Can I make a vegan-friendly version?
Absolutely. Use plastic or foam eggs instead of real shells to keep the project entirely egg-free while preserving the playful look of traditional Easter egg crowns.
Turning Crowns into a Family Tradition
Once your family discovers how expressive and fun Easter egg crowns can be, they may become an annual tradition. Each year, try new themes, color schemes, or materials and label the inside of every crown with the year and the maker’s name.
Over time, you will build not just a collection of whimsical headpieces, but a gallery of memories that trace how your family and your creative styles grow from one Easter to the next.