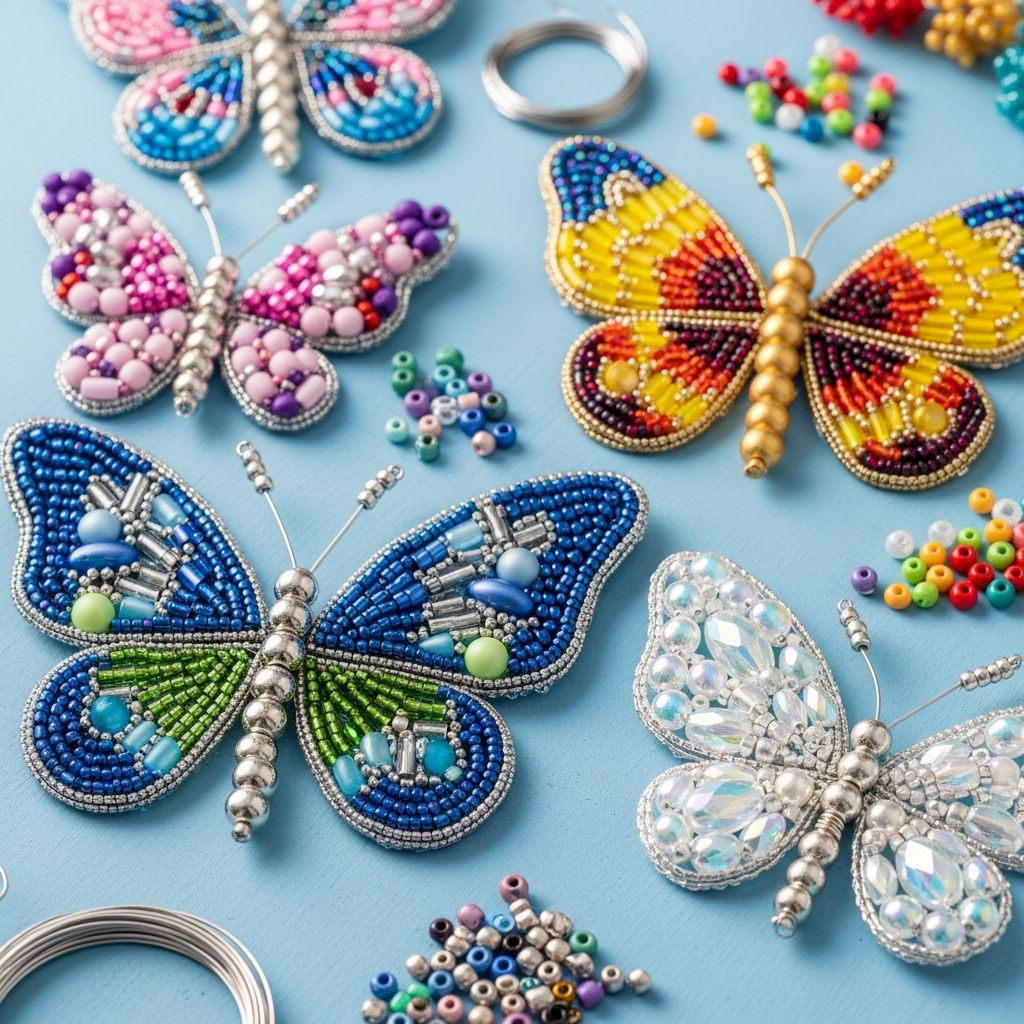
Beaded butterflies are a charming craft that blend simple techniques with eye-catching color and texture. This project turns everyday beads and basic wire into bright little butterflies that can decorate a child’s room, clip onto gift bags, or even become part of a festive table setting.
With a bit of planning and a handful of supplies, this activity scales beautifully from a quiet afternoon craft to a group project for parties, classrooms, or family gatherings. The process encourages creativity, fine motor skills, and color exploration, making it as educational as it is fun.
Why Beaded Butterflies Make a Great Project
Butterflies are a natural favorite for craft projects because they are colorful, symmetrical, and easy to stylize. Beads add sparkle and weight, helping the finished butterflies feel like a “real” creation rather than a throwaway craft.
- They use inexpensive, widely available materials like plastic beads and craft wire.
- The design is flexible: change bead colors, wing shapes, or attachments to fit any season or celebration.
- The steps are repetitive and soothing, which can be relaxing for kids and adults alike.
Materials and Tools You Will Need
Before starting, gather everything in one place so crafters can stay seated and focused. Adjust the exact items to fit what you already own—this project is very forgiving.
- Wire: Craft or jewelry wire that is flexible enough to bend by hand but sturdy enough to hold its shape.
- Beads: Plastic or acrylic beads in a few different sizes and colors for the body and wings.
- Cutting tool: Wire cutters or an old pair of craft scissors reserved for non-fabric use.
- Pliers: Needle-nose pliers for making loops, tightening twists, and tucking in sharp ends.
- Optional bases: Wooden clothespins, hair clips, key rings, or magnets for displaying your butterflies.
- Optional extras: Glitter, ribbon, permanent markers, or tiny faux gemstones for added decoration.
Suggested Bead and Wire Choices
| Component | Recommended Option | Why It Works Well |
|---|---|---|
| Body beads | Medium and large round beads | Give the butterfly a defined head, thorax, and tail with minimal effort. |
| Wing beads | Small faceted or pony beads | Create sparkling, colorful wings that catch the light. |
| Wire for body | Slightly thicker craft wire | Provides a sturdy spine and stable antennae. |
| Wire for wings | Flexible wire or pipe cleaners | Makes it easy to form smooth curves and figure-eight shapes. |
| Attachment base | Clothespins or clips | Allow you to display butterflies on curtains, plants, or napkins. |
Safety Tips for Crafting with Kids
Because this project involves small beads and wire, a few simple precautions help ensure a safe, frustration-free experience. Adjust your expectations and tools depending on the age and skill level of the crafters.
- For children who still mouth objects, avoid small beads entirely and use large, chunky beads under close supervision.
- Let adults handle wire cutting and the final securing twists, especially when using metal wire.
- Keep a small container on the table for trimmed wire ends and broken beads so they do not fall to the floor.
Step-by-Step Guide: Building the Butterfly Body
Start with the body so you have a clear center point to build your wings around. This keeps the overall shape balanced and makes the finishing steps more intuitive.
- Cut the body wire. Trim a length of wire long enough to hold all of your body beads plus extra for antennae. Leaving generous extra length gives you room to adjust.
- Create a loop for the tail. Bend one end of the wire into a small loop and pinch it closed with pliers. This prevents beads from slipping off as you work.
- Thread the body beads. Add beads in a vertical line, starting from the tail and moving toward what will become the head. Many crafters like a pattern such as small bead, medium bead, large bead to suggest the butterfly’s natural body shape.
- Form the head and antennae. After the last bead, bend the remaining wire in half above the head bead so two equal pieces point upward. Twist the wires once at the base to secure the bead, then leave the two ends free for antennae.
- Shape the antennae. Add a small bead to each antenna tip if desired, then curl the wire ends into tiny spirals or loops. This detail instantly makes the butterfly look finished and whimsical.
Creating Beaded Wings with Simple Shapes
The wings are where each butterfly develops its personality. The process is similar no matter the final shape: string beads on a wire, then bend that wire into the outline you prefer.
- Prepare the wing wire. Cut a longer piece of wire for the wings. The more beads you plan to use, the longer the wire should be.
- String the wing beads. Fill most of the wire with small beads, leaving a little bare wire at each end so you can twist and secure later.
- Shape the top wings. Bend the beaded wire into a loop on one side of the body area to form the upper wing, then bring the wire back toward the center. Repeat on the other side to mirror the shape.
- Add the lower wings. Using the remaining beaded section, curve the wire into slightly smaller loops below the top wings. Aim for a gentle figure-eight layout when viewed from the side.
- Check symmetry. Place the wings flat on the table and compare both sides. Slight differences add charm, but adjust if one side looks dramatically larger or more crowded.
Connecting Wings and Body Neatly
Joining the wings to the body is the moment when scattered pieces become a butterfly. Take your time with this step, because a secure connection ensures that the craft holds up to handling and play.
- Position the wings. Lay the body on the table with the antennae pointing up, then place the wing unit behind or beneath the body so the wing center aligns with the middle of the body bead stack.
- Wrap the wing wire. Use the extra wire in the center of the wing piece to wrap around the body wire tightly. Two or three snug wraps usually provide enough stability.
- Tuck and smooth ends. Using pliers, tuck any sharp wire ends toward the back of the butterfly or into bead holes where they cannot snag fingers or fabric.
- Adjust wing angles. Gently bend the wings forward or back to give the butterfly a sense of motion, like it is about to take flight.
Ideas for Displaying Your Beaded Butterflies
Once the basic butterfly is constructed, deciding how to display it becomes part of the creative fun. A simple change in base can transform the craft from a toy to a decoration or gift accessory.
- Clothespin clip: Glue or wire the butterfly onto a painted clothespin so it can clip onto curtains, plants, or book edges.
- Napkin holder: Attach to a small ring or loop of wire for use as a reusable napkin ring at spring or summer gatherings.
- Fridge magnet: Glue a small magnet to the back for a cheerful refrigerator decoration that can also hold lightweight notes.
- Gift topper: Clip or tie the butterfly to a wrapped present in place of a bow for a memorable handmade touch.
Color Themes and Design Variations
The same basic technique can support dozens of different looks. Encourage kids to experiment and name their butterfly “species” based on the colors and patterns they choose.
- Rainbow butterflies: Use a full spectrum of colors arranged in order across the wings for a bright, playful effect.
- Monochrome elegance: Choose one color in several shades (light, medium, dark) to give a more sophisticated, coordinated appearance.
- Metallic and jewel tones: Mix metallic beads with rich gemlike colors for butterflies that resemble jewelry pieces.
- Seasonal sets: Make pastel butterflies for spring, bright citrus versions for summer, warm browns and golds for autumn, and icy blues with clear beads for winter.
Adapting the Project for Different Ages
Beaded butterflies are highly adaptable, which makes them ideal for multi-age groups. Slight adjustments in materials and expectations let toddlers, teens, and adults all participate in the same activity.
| Age Group | Recommended Materials | Project Focus |
|---|---|---|
| Young children | Large plastic beads, soft pipe cleaners | Color sorting, counting, and basic hand-eye coordination. |
| Older kids | Standard craft wire, mixed bead sizes | Following instructions, symmetry, and simple pattern design. |
| Teens and adults | Jewelry wire, glass beads, decorative bases | Refined color schemes, gift-worthy finishes, and custom shapes. |
Turning Butterflies into Learning Moments
Beyond being pretty, this craft offers natural opportunities for gentle learning. Adults can weave in short conversations or mini lessons without making the activity feel like formal schoolwork.
- Ask kids to arrange beads in repeating sequences to introduce or reinforce pattern recognition.
- Use the butterfly’s body to talk about segments (head, thorax, abdomen) and compare them with real insects.
- Discuss symmetry by folding an imaginary line down the center of the butterfly and checking if the wings roughly mirror each other.
Simple Troubleshooting and Adjustments
Even well-planned crafts sometimes need small fixes. Fortunately, this project allows easy adjustments without starting over from scratch.
- Beads sliding around: Add small tightening twists between a few beads or finish with a wrapped loop to hold them in place.
- Wings look uneven: Count beads on each side before shaping, or gently bend the wire to even out the overall outline.
- Wire feels too stiff: Switch to a thinner gauge or use pipe cleaners for younger crafters who need softer material.
- Butterfly won’t sit flat: Adjust the angle of the wings or add a simple base, such as a clip, magnet, or ring, to stabilize it.
Storage and Long-Term Care
Handmade butterflies can become treasured keepsakes, especially if they are linked to a special occasion or a child’s first big craft project. A bit of care helps them last longer.
- Store butterflies in a shallow box or tin so the wings do not get crushed at the bottom of a toy bin.
- Keep them away from very young siblings or pets that might find the beads tempting to chew.
- If dust builds up, lightly wipe the beads with a soft cloth instead of soaking the entire butterfly in water.
Frequently Asked Questions
Can this project be done without metal wire?
Yes. For young children or situations where metal wire is not ideal, pipe cleaners are an excellent substitute. They bend easily, are soft to the touch, and still hold beads securely enough to form butterfly shapes.
How long does one butterfly usually take?
The time varies with age and experience, but many beginners can complete a simple butterfly in about 20–40 minutes. More elaborate designs with smaller beads and multiple color patterns will naturally take longer.
What if I don’t have many bead sizes?
Using only one bead size is perfectly fine. In that case, rely on color changes and wing shape to create variation, such as darker beads near the body and lighter shades toward the edges of the wings.
Is this project suitable for group events?
Beaded butterflies work very well for birthday parties, scout meetings, or classroom projects. Preparing small kits ahead of time—each containing pre-cut wire, a bead mix, and an attachment base—helps the activity run smoothly.
Can these butterflies be turned into jewelry?
With a sturdier wire and smaller beads, the same concept can be adapted into pendants, brooches, or statement hair clips. Just be sure that any jewelry findings you add are securely closed and appropriate for the intended wearer’s age.