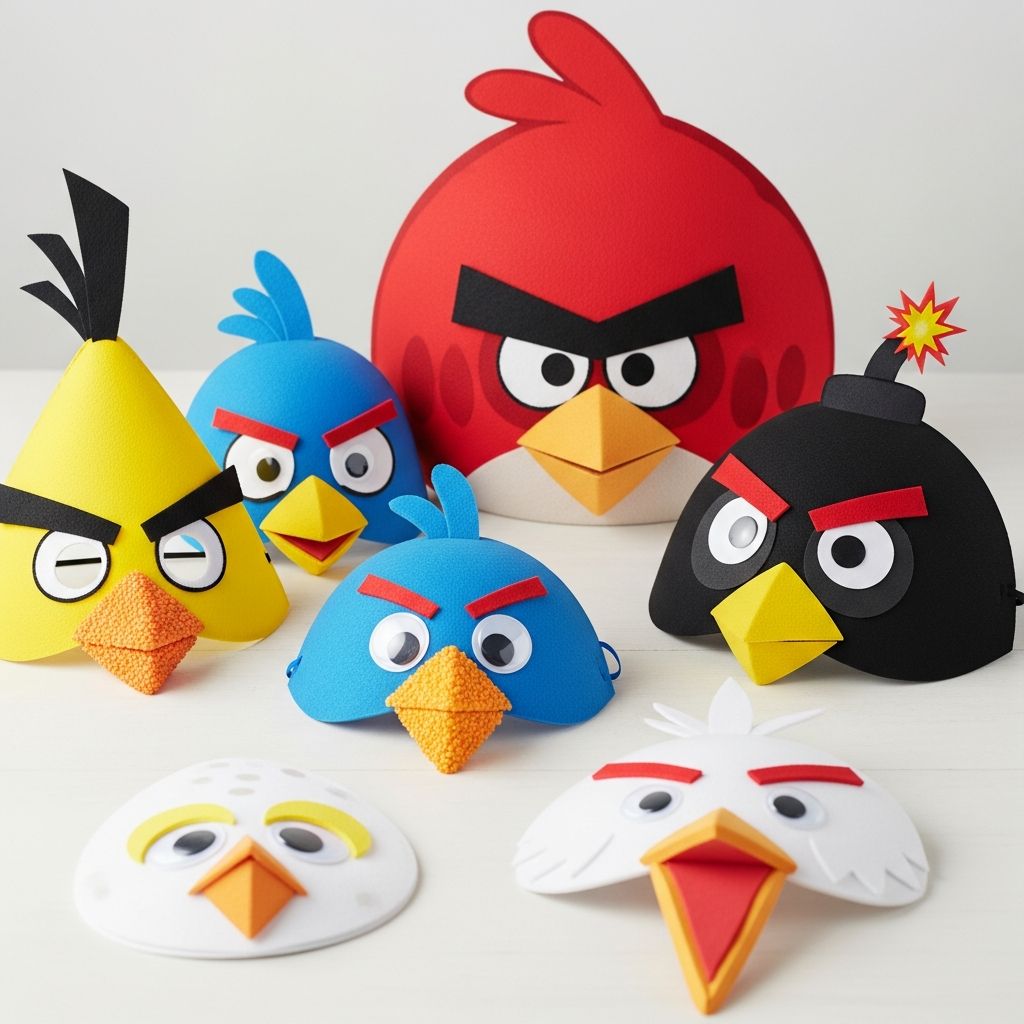
Need a last-minute Halloween costume or a quick party idea that kids will actually be excited to wear? Angry Birds–inspired masks are a simple, low-cost way to turn anyone into a feathery, fierce character in just an afternoon. This guide walks through how to make sturdy, comfortable masks using everyday supplies, plus ways to customize them for different ages, faces, and favorite birds.
Why Angry Birds–Style Masks Make Great Costumes
These masks are ideal for busy families, classroom events, or themed birthday parties because they take minimal time and money while still looking bold and recognizable. The oversized eyes, colorful beaks, and expressive eyebrows instantly read as Angry Birds–inspired, even though the project uses simple shapes and basic tools.
- Perfect for last-minute costumes when stores are sold out or your child changes their mind at the eleventh hour.
- Customizable for any bird color or personality, including angry, sleepy, silly, or glam variations.
- Comfortable to wear thanks to a sunglasses base or elastic band, leaving hands free for trick-or-treating or games.
Materials and Tools You Will Need
You can adapt this project to what you already have at home, but the following checklist gives you the easiest starting point. Choose bright colors and thicker paper so the masks survive an entire evening of play.
- Cardstock or thin cardboard: White or colored, sturdy enough to hold its shape.
- Inexpensive plastic sunglasses (without prescription lenses) or elastic cord to hold the mask on.
- Adhesive: Masking tape, clear tape, or craft glue; repositionable tape is helpful for adjustments.
- Cutting tools: Scissors for general cutting; a craft knife and cutting mat for detailed eye openings (adults only).
- Coloring supplies: Markers, crayons, paint, or colored paper for layering shapes.
- Optional extras: Craft foam, glitter (for non-eye areas), feathers, stickers, or washi tape.
Planning Your Mask Design
Before cutting anything, decide which bird personalities you want to create. Think in simple layers: a large background shape for the head, a beak, big eyes, and eyebrows or feathers to show emotion. Kids love being part of this planning step because they get to choose colors and expressions.
- Pick a main color for each bird (red, yellow, blue, black, white, or any custom shade).
- Sketch a quick oval or rounded square that will become the main face area.
- Mark where the eyes should be relative to the sunglasses or where the wearer’s eyes will align.
Step-by-Step: Building the Base Mask
The base is the foundation that holds everything together. You can attach it to sunglasses for a hands-free, face-hugging fit, or punch holes and add elastic. Both approaches work well; choose whichever feels more comfortable and age-appropriate.
1. Create the Face Shape
Start with a sheet of cardstock that is slightly wider than the wearer’s face. This makes the mask dramatic without obstructing movement too much. You can always trim the sides later for comfort.
- Have the wearer hold the cardstock in front of their face while you lightly mark where the eyes, nose, and top of the head should sit.
- Draw a large, rounded shape on the cardstock using those marks as a guide; think circle, egg, or squashed oval.
- Cut out the shape with scissors, rounding corners so the edges are smooth and less likely to bend or poke.
2. Add Eye Openings
Eye openings are the most important part of comfort and safety, so take a little extra time here to ensure good visibility. If you are using sunglasses, the mask will sit in front of the lenses, and the openings should be aligned to those.
- Hold the base up to the wearer’s face or to the sunglasses and lightly mark the center of each eye.
- Draw slightly oversized ovals or circles around those marks, leaving at least 1.5–2 cm of paper between the eye openings and the edges of the mask.
- Use the tip of a craft knife to pierce the center of each eye area (adults only), then switch to scissors to carefully cut out the openings.
Crafting the Angry Birds–Style Features
Once the base is ready, the fun begins: building up the dramatic beaks, eyebrows, and feather tufts. Using separate pieces for these features makes the mask look more dimensional and allows kids to rearrange or swap parts if they change their mind about the character.
3. Make the Beak
The beak is the main focal point of any bird mask. For an Angry Birds–inspired look, aim for a chunky, geometric triangle or diamond shape that protrudes slightly from the face.
- Cut a wide triangle from yellow or orange cardstock, making it about as wide as the space between the eyes.
- Score a fold line horizontally across the middle so the beak bends slightly downward.
- Fold a narrow tab along the top edge of the beak (about 0.5–1 cm) that will sit behind the mask and act as a gluing surface.
- Lightly curl the front tip of the beak with your fingers to give it a more 3D, cartoon look.
4. Design the Eyes and Eyebrows
Angry Birds–inspired characters are all about expression. Oversized eyes and bold eyebrows do most of the storytelling. You can make them exaggerated for comedy or slightly softer for younger kids who prefer a less intense look.
- Cut two white circles or rounded squares, each larger than the actual eye holes.
- Cut smaller black circles or ovals for pupils and glue them off-center to show direction or emotion.
- Add thick, rectangular eyebrows angled downward for “angry,” slanted upward for “worried,” or curved for “surprised.”
- For a glam or silly bird, swap eyebrows for eyelash strips or add a tiny bow between them.
5. Add Feather Details and Accessories
To finish the bird look, add a few simple shapes at the top or sides of the mask to suggest feathers or hair. This is also a great place to individualize each mask with different colors and accessories.
- Cut 2–3 thin, tapered strips of paper or foam and cluster them at the top center to mimic feathers.
- Add a small crest on one side to represent specific bird types or special powers.
- Include optional elements like tiny crowns, hats, glasses, or stars for themed parties.
Assembly: Putting the Mask Together
Once all pieces are cut, lay them out like a puzzle on top of the base. Test their placement before using any permanent adhesive. Masking tape or low-tack tape is helpful during this stage so you can reposition designs until everything looks right.
- Place the eyes over the openings, ensuring the pupils sit slightly above the center for a classic cartoon look.
- Slide the folded top tab of the beak under the eyes and push it up as far as it comfortably fits between them.
- Attach eyebrows slightly overlapping the top of the eyes for strong expressions.
- Secure feather details to the top or sides of the mask, leaving enough room that they do not bump into hair or hats.
When the arrangement looks good, glue or tape all pieces in place. Press each area firmly for a few seconds so the adhesive grabs well. If using glue, let everything dry completely before moving on to the attachment step.
Attaching the Mask: Sunglasses vs. Elastic
There are two common, kid-tested ways to wear these masks comfortably: taped onto plastic sunglasses, or held on with elastic around the head. Both have pros and cons, so you can choose what works best for your event and the wearer’s age.
| Method | Pros | Cons |
|---|---|---|
| Sunglasses base |
|
|
| Elastic strap |
|
|
How to Attach to Sunglasses
- Remove any stickers from the sunglasses and clean the frames so tape or glue adheres well.
- Hold the mask in front of the glasses, lining the eye openings up with the lenses.
- Use small tabs of masking tape on the top and sides of the frames, securing them to the back of the mask.
- Test fit on the wearer and adjust the angle so the mask does not tilt up or down.
How to Attach with Elastic
- Punch a small hole on each side of the mask at eye-level, leaving at least 1 cm from the edge to prevent tearing.
- Thread elastic through one hole and tie a secure knot on the inside of the mask.
- Wrap the elastic around the wearer’s head to measure the correct length, then mark and cut.
- Thread the loose end through the second hole and tie a knot; trim excess and cover knots with tape if they feel scratchy.
Customizing Masks for a Flock of Birds
One of the best things about this project is that a basic template can be reused to create a whole flock. Use the same general shape and just swap colors and details so each mask feels unique while still clearly part of the same theme.
- Red bird: Red base, yellow beak, thick black eyebrows, small feather tuft on top.
- Yellow bird: Yellow triangular base or wide triangle accent at the bottom, slightly longer beak, upward-pointing feathers.
- Blue bird: Blue base, smaller rounded beak, tiny crest, playful eyebrow shapes.
- Black bird: Dark base, orange beak, bold eyebrows, and a small flame-like feather tuft.
- White bird: White base, orange or yellow beak, optional blush circles on cheeks, and bow or flower accessories.
Tips for Kids, Classrooms, and Parties
These masks work well in many settings, from small family craft days to large parties. A bit of advance prep makes the process smoother when working with a group of kids or limited time.
- Pre-cut base shapes and beaks for younger children so they only have to decorate and assemble.
- Offer a small tray of pre-cut eyebrows, feathers, and eyes in different shapes so kids can mix and match.
- Write each child’s name lightly on the back of the mask so they do not get swapped accidentally.
- Set up a drying zone where glued masks can rest without being touched until the adhesive sets.
Safety and Comfort Considerations
Cute masks are only successful if they are safe and comfortable. Spend a few minutes testing visibility and fit before heading out for trick-or-treating or a party. Be especially careful with sharp tools and small parts around young children.
- Always have an adult handle craft knives or other sharp blades used for eye openings or fine cuts.
- Ensure the eye openings are large and aligned correctly so vision is not restricted, especially in low-light situations.
- Round off any pointed cardstock corners, and reinforce weak spots with small pieces of tape.
- Keep glitter, sequins, and small embellishments away from the immediate eye area.
Simple Variations Without Angry Birds Branding
While this project is inspired by the general look of Angry Birds–style characters, it works just as well for completely original birds. You can change the shapes and colors to avoid direct branding while still enjoying bright, expressive masks.
- Shift the eye shape to more rounded or almond forms for owls, parrots, or fantasy birds.
- Replace thick eyebrows with patterned paper strips or curved lines for a softer or more whimsical appearance.
- Experiment with pastel colors, metallic papers, or ombre painted backgrounds for non-game-related birds.
Frequently Asked Questions
How long does it take to make one mask?
For a single adult or teen working alone, expect about 30–45 minutes from start to finish, including cutting, decorating, and attaching the strap or sunglasses. When making multiple masks in an assembly-line style, the time per mask drops significantly.
Can younger kids help with this project?
Yes, younger children can absolutely help with coloring, gluing large pieces, and choosing decorations. Adults or older siblings should handle cutting the base shape, eye openings, and any small, detailed pieces to keep the process safe.
What if I do not have cardstock?
If cardstock is not available, use thin cardboard from cereal boxes or similar packaging. Cut and flip the pieces so any printed designs face the back, then paint or cover the front with plain paper before adding the features.
How can I keep the mask from bending?
Using thicker paper and reinforcing stress points with tape helps a lot. If you expect rough play, glue an extra strip of cardboard across the back of the mask at eyebrow level to act as a hidden brace.
Are these masks reusable?
With careful storage, these masks can definitely be reused for multiple events. Keep them flat in a shallow box, away from moisture and direct sunlight, and avoid stacking heavy items on top so the beaks and feathers do not crush.
Bring Your Flock to Life
With a handful of supplies and an hour or two of crafting time, it is easy to create a whole flock of bright, expressive bird masks for Halloween, themed parties, or everyday dress-up. Encourage each wearer to invent a backstory, catchphrase, or special power for their character, and you will end up with far more than simple costumes—you will have a ready-made cast of colorful personalities ready for fun.