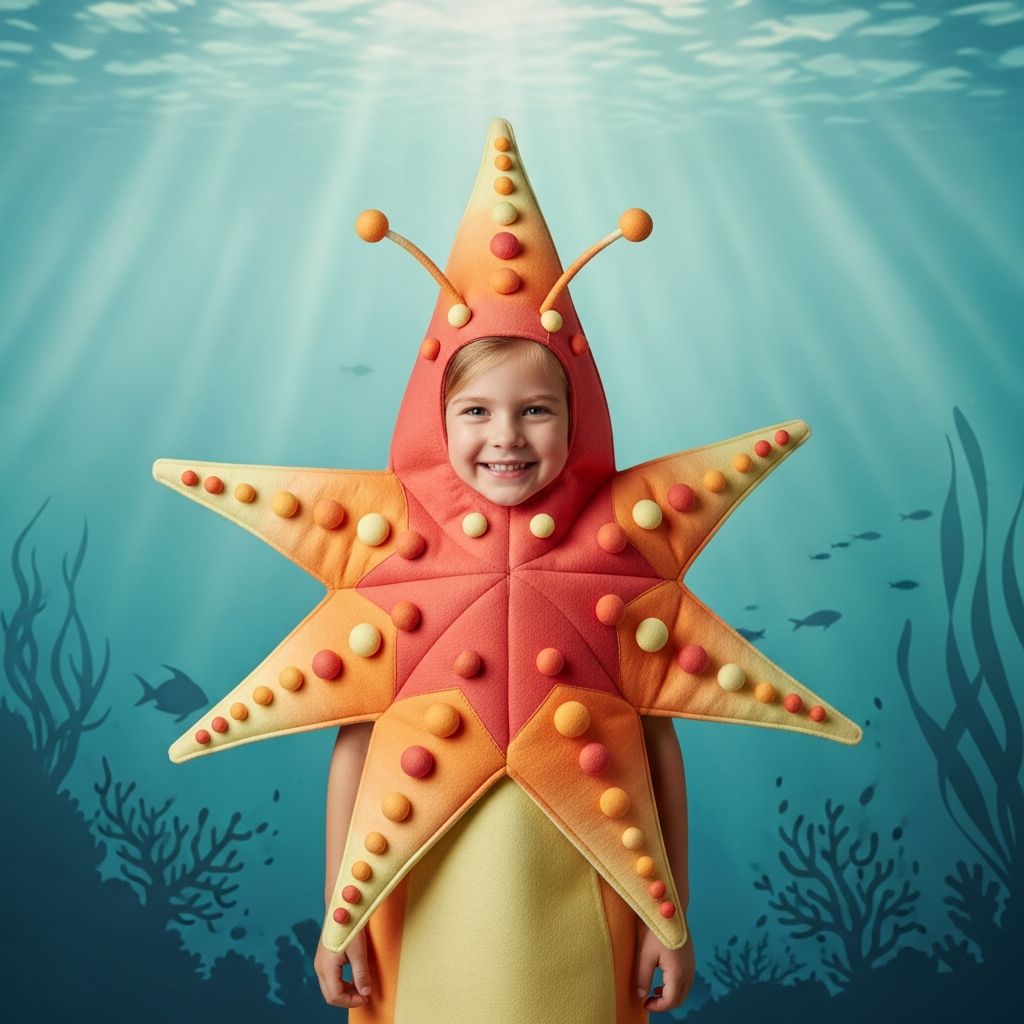
If your child loves ocean creatures, a homemade starfish costume is a fun, budget-friendly project that transforms basic craft supplies into a bright, sea-inspired outfit.
Why Choose a Starfish Costume?
A starfish costume stands out among typical dress-up choices because it is colorful, instantly recognizable, and surprisingly simple to build at home. It works for Halloween, school plays, under-the-sea parties, and even educational events about marine life.
- Easy to recognize: The five-armed shape is iconic and eye-catching.
- Comfortable: With the right base clothing and straps, kids can run, dance, and play freely.
- Flexible style: You can keep it simple or decorate it with glitter, fabric, and even glow-in-the-dark accents.
Planning the Costume Design
Before you gather materials, decide what kind of starfish you want to create: realistic, cartoon-like, or completely fantastical. This choice guides your colors, decorations, and overall style.
Key Design Decisions
- Shape: A classic five-pointed star is easiest, but you can round the arms for a more organic, ocean-like look.
- Color palette: Think coral orange, sunny yellow, deep ocean blue, or pastel pink. Metallic or iridescent details can hint at shimmering sea light.
- Texture: Dots, bumps, or raised areas help imitate the surface of a real starfish without needing complex techniques.
Materials and Tools Checklist
Most of the supplies can be found at home improvement stores, dollar shops, or your local craft store. Feel free to substitute materials based on what you already own.
- Large, flat backing material (sturdy cardboard, foam board, or lightweight craft foam)
- Soft base clothing (leggings and a long-sleeve top in a coordinating color)
- Paint suitable for cardboard or foam (acrylic paint or child-safe spray paint)
- Brushes or foam rollers
- Scissors or a craft knife (for adults only)
- Non-toxic glue (craft glue or a low-temperature glue gun used by an adult)
- Ribbon, elastic, or wide fabric strips for straps
- Decorative elements such as foam circles, felt scraps, sequins, or pom-poms
- Marker or pencil for drawing the outline
Optional Extras
- Glitter glue for sparkling details
- Glow-in-the-dark paint for nighttime events
- Face paint or temporary tattoos with ocean themes
Size and Fit: Measuring Your Child
A comfortable costume begins with accurate measurements. Take a few minutes to measure your child so the starfish shape is proportional and easy to wear.
| Child Height | Approximate Starfish Height | Approximate Starfish Width |
|---|---|---|
| 90–110 cm (toddler) | 70 cm | 70 cm |
| 110–130 cm (young child) | 80–90 cm | 80–90 cm |
| 130–150 cm (older child) | 100–110 cm | 100–110 cm |
Use these figures as a starting point and adjust based on how much your child likes or dislikes large costumes. Leave enough room around the head and shoulders so they can move comfortably without the points hitting their face.
Step-by-Step: Building the Starfish Shape
The starfish body is the foundation of the costume. You can make a front panel only, or front and back panels connected with shoulder straps.
1. Draw and Cut the Star
- Lay your cardboard or foam board on a flat surface.
- Ask your child to lie down gently so you can estimate the body placement, then mark the general head and shoulder area.
- Sketch a large star shape with five arms radiating from the center, making sure the arms extend beyond your child’s shoulders and hips but not so far that walking becomes difficult.
- Cut out the shape carefully using scissors or a craft knife (adults only). Rounded tips look friendly and more “under the sea” than sharp points.
2. Create Openings and Straps
- Decide whether the child’s head will pass through a central opening or if the panel will hang in front and back like a sandwich board.
- If using a central head opening, trace a circle or oval at the center and cut it out. Test the size with your child to ensure it is comfortable.
- If using straps instead, punch or cut small holes near the top edges of the star and thread ribbon or elastic through to form shoulder loops.
- Tie knots or secure the straps with strong glue or tape on the back side.
Painting and Coloring Your Starfish
Paint brings the starfish to life. Work in a well-ventilated area and protect your surfaces with old newspaper or a disposable tablecloth.
Base Coat
- Apply a solid base color with a wide brush or foam roller.
- Allow the first layer to dry completely before adding more details; this helps prevent smudging and keeps colors bright.
Details and Shading
- Add slightly darker shades along the edges of each arm to give the starfish dimension.
- Use a lighter color or metallic paint in the center area to create a sense of highlight.
- Dot small circles along the arms to hint at texture, using a contrasting color or glitter glue.
Creating Fun “Suction Cup” Textures
Real starfish have textured surfaces and tiny tube feet. You can suggest this without needing biological accuracy by adding raised decorations along the arms.
- Cut small circles from craft foam or felt and glue them along each arm in rows.
- Use pom-poms or flat-backed gems for a sparkly, whimsical look.
- For a softer version, use small fabric yo-yos or rolled pieces of felt.
Press each piece firmly while the glue dries to keep them from falling off during active play. If your child is very active, test one arm first and see how well the decorations stay attached.
Comfort and Safety Tips
Kids should be able to move quickly and safely in the costume, especially at night or in crowded spaces like school events or community trick-or-treats.
- Keep the starfish arms slightly shorter than your child’s full arm span so they can pass through doorways easily.
- Avoid very heavy decorations that might make the costume tip forward or backward.
- If your child will be outside after dark, add reflective tape on the edges or back of the costume.
- Make sure the head opening or straps do not rub the neck; add small felt pads or soft fabric where needed.
Finishing Touches: Under-the-Sea Styling
Once the main starfish body is complete, simple accessories can enhance the undersea theme and tie the whole outfit together.
- Base clothing: Choose solid leggings and a long-sleeve top in blue, teal, or sandy beige to represent the water or ocean floor.
- Headwear: Add a headband with small foam seashells or a simple ribbon that matches the costume color.
- Footwear: Comfortable sneakers or soft shoes in neutral colors work best, especially for school events.
- Face paint: A few dots of white or gold near the eyes, or a small star drawn on one cheek, completes the oceanic look without being overwhelming.
Storage and Reuse Ideas
After the event, the starfish costume does not have to disappear into a closet forever. With thoughtful storage, it can be reused or repurposed for other activities.
- Hang the costume on a wide clothes hanger to keep the arms from bending or drooping.
- Use it as a prop for at-home puppet shows, ocean-themed story time, or classroom demonstrations about marine animals.
- Let siblings or friends reuse it for future events, adding new decorations each time for a fresh twist.
Frequently Asked Questions
How long does it take to make the costume?
The hands-on crafting portion can usually be completed in one afternoon, but drying time for paint and glue may extend the project to a full day. Planning ahead ensures each layer dries properly and makes the final costume more durable.
Can this costume be made without cardboard?
Yes. Lightweight foam sheets, felt panels, or even stiffened fabric can replace cardboard to create a softer, more flexible costume. Just ensure the material is sturdy enough to hold the star shape when worn.
Is this costume suitable for very young toddlers?
For toddlers, a smaller, lighter version is best. Consider a simple star-shaped front panel only, attached to a soft shirt with Velcro or snaps so it can be removed quickly if the child becomes uncomfortable.
How do I make the costume weather-friendly?
For cold weather, size the starfish panel so it fits over a coat and choose waterproof or sealed paint. For warm climates, use breathable base clothing and keep decorations light so the costume does not trap heat.
Can the child help build the costume?
Children can safely assist with painting, choosing colors, placing decorations, and drawing the initial design. Adults should handle cutting, hot gluing, and any steps involving sharp tools or strong adhesives.
Create a starfish costume that fits your child’s personality, from bold and bright to soft and whimsical, and enjoy the process as much as the final under-the-sea look.