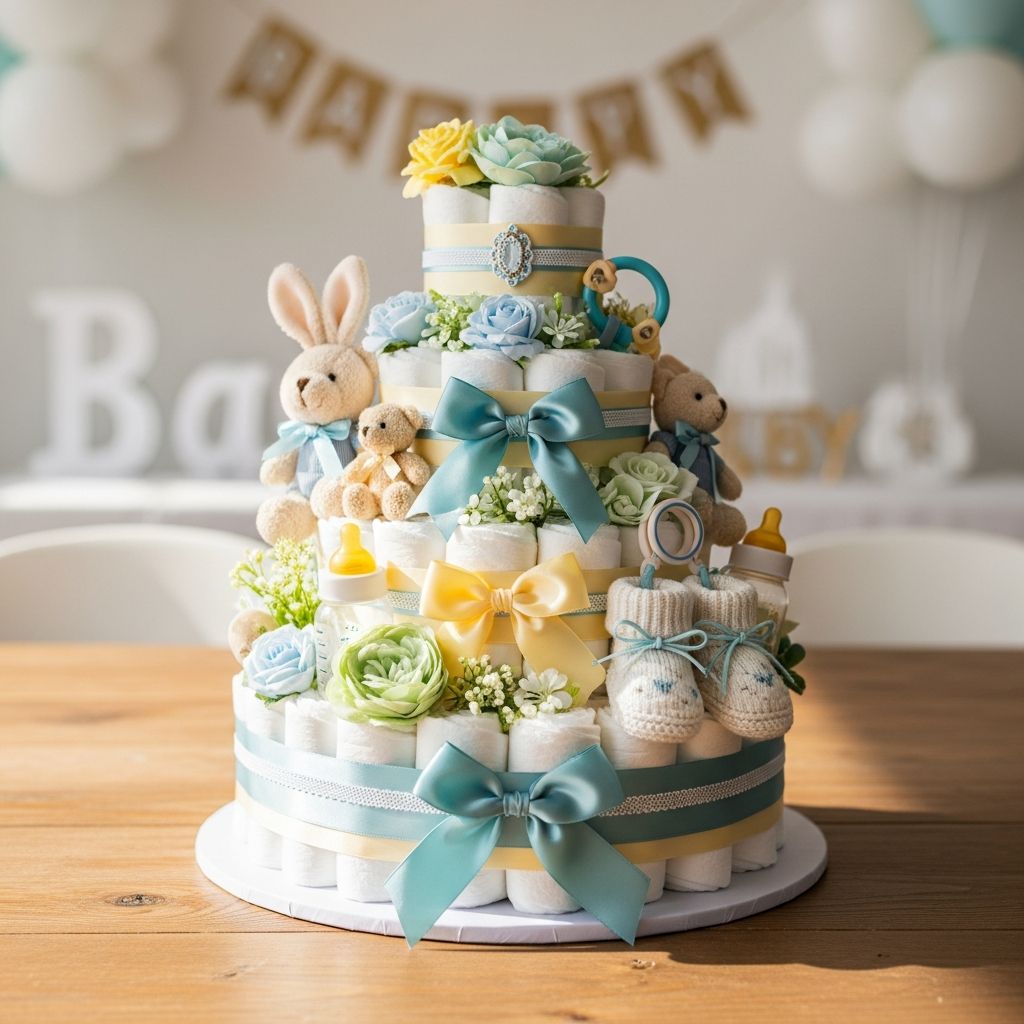
A diaper cake is a clever way to turn a practical gift into a beautiful centerpiece that guests will admire and new parents will actually use. While it looks like an elaborate work of art, you can build one with simple supplies and a bit of planning.
This guide walks through everything from choosing diapers and color schemes to assembling tiers, adding useful baby items, and styling your cake so it becomes the star of the gift table.
Why Diaper Cakes Make Brilliant Gifts
Before diving into the how-to, it helps to understand why diaper cakes have become such a staple at baby showers and welcome-baby parties. The best ones are both practical and highly personalized.
- Practicality: Parents always need diapers, and a cake can hold dozens in one compact gift.
- Presentation: Instead of handing over a box of diapers, you create a fun, photo-worthy centerpiece.
- Customization: You can match the shower theme, nursery colors, or the family’s hobbies and interests.
- Versatility: Diaper cakes work for in-person showers, virtual celebrations (as a background prop), or as a doorstep surprise for new parents.
Planning Your Design and Theme
The most memorable diaper cakes start with a clear design plan. Think beyond “pink for girls” and “blue for boys” and focus on the personality of the parents, the baby’s nursery, or the party decor.
Questions to Help Shape Your Design
- Is there a baby shower theme (woodland, safari, celestial, floral, nautical, etc.)?
- What colors appear in the invitations, tableware, or nursery decor?
- Do the parents have favorite animals, sports teams, books, or hobbies?
- Will the cake sit in the center of a table or against a wall (one-sided vs. full 360° design)?
- Should the cake be gender-neutral or match a known gender?
Popular Diaper Cake Style Ideas
Use these styles as inspiration when you sketch your design or shop for coordinating accessories.
| Style | Key Colors & Textures | Suggested Accessories |
|---|---|---|
| Nature & Woodland | Greens, browns, soft creams; twine, faux greenery | Forest animal plush toys, wooden teether, leaf garlands |
| Minimal & Modern | White, gray, black accents; smooth ribbon, clean lines | Monogram tag, simple satin ribbon, one small plush or rattle |
| Storybook-Inspired | Pastels, primary colors depending on book | Board books tucked between tiers, themed pacifiers or bibs |
| Boho & Neutral | Beige, rust, sage; macrame, lace, natural fibers | Muslin swaddles, wooden beads, dried florals (kept away from diaper edges) |
| Bright & Playful | Bold rainbow colors, patterned ribbon | Colorful toys, stacking cups, patterned socks and mittens |
Gathering Supplies: What You’ll Need
You can adjust the exact quantities depending on how large or elaborate you want your diaper cake to be. The list below will build a classic three-tier design that works for most showers.
Core Materials
- 50–70 disposable diapers (size 1 or 2 is usually ideal)
- 1 sturdy base (cake board, foam board, or thick cardboard cut into a circle or square)
- 1 tall center support (paper towel tube, empty gift wrap tube, or baby bottle)
- Strong wide rubber bands or elastic bands
- Decorative ribbon (1–2 inches wide for covering rubber bands)
- Clear tape or non-damaging double-sided tape
- Optional: clear cellophane and a large bow for wrapping the finished cake
Useful Baby Extras to Tuck In
Part of the fun is hiding practical baby items throughout the cake. Choose a mix of essentials and small luxuries.
- Rolled washcloths and burp cloths
- Pacifiers, teething toys, and rattles
- Baby shampoo, lotion, diaper cream (travel sizes work best)
- Soft socks, mittens, and hats
- Swaddle blankets or receiving blankets (can also wrap a tier)
- Board books or a small photo frame
Choosing How to Roll or Layer the Diapers
There are two common construction methods: individually rolled diapers or a layered ring made from unrolled diapers. Both can look professional; the choice comes down to style and time.
Rolled Diaper Method
This method uses tightly rolled individual diapers arranged upright. It produces a textured, cylindrical look that many people associate with traditional diaper cakes.
- Roll each diaper from the waistband toward the crotch and secure with a small rubber band.
- Gather rolls into clusters and secure with a larger band to create circular tiers.
- Cover the large bands with decorative ribbon for a polished finish.
Layered Ring Method
The layered method keeps diapers flat and overlapping in a spiral, so parents can use them more quickly without having to unroll each one.
- Curve the diapers around your center support, slightly overlapping each one.
- Wrap a wide band around the outside to hold the ring in place.
- Add inner rings on top to build a tier that looks smooth and uniform.
Step-by-Step: Building the Base Tier
The bottom tier supports the entire cake, so give it extra attention. A sturdy and symmetrical base makes the upper tiers easier to assemble and decorate.
- Prepare the base: Cut or choose a base at least 2–3 inches wider than the planned diameter of your bottom tier. Cover it with wrapping paper, fabric, or contact paper if desired.
- Attach the center support: Secure the paper towel tube (or chosen core) upright in the center of the base using hot glue on the base only or very strong tape. Avoid gluing directly to items you want the parents to reuse.
- Form the first ring of diapers: Place rolled or curved diapers around the center support and slide a large rubber band around them. Adjust spacing so the ring forms a clean circle.
- Widen the tier: Keep adding diapers, tucking them under the large band until you reach the desired width. For a dramatic look, use more diapers and make the bottom tier generously wide.
- Check stability: Gently press down on the top of the tier. If it wobbles, tighten the band or add a second band for security.
Building the Middle and Top Tiers
Once the base is solid, the remaining tiers come together quickly. Aim for a gradual tapering shape similar to a traditional layer cake.
- Start the middle tier: Build a slightly smaller ring directly above the base, sliding diapers around the center support and securing them with another large band.
- Adjust the height: Use fewer diapers for the middle tier so it looks visibly narrower than the base. This creates a classic stacked silhouette.
- Add the top tier: Repeat the process with even fewer diapers, creating a small top tier that can hold a decorative focal point such as a plush toy or flower arrangement.
- Straighten all tiers: Stand back and view the cake from all sides. Adjust individual diapers so the tiers look even and straight.
- Secure for transport: If the cake needs to travel, wrap a long piece of clear tape or thin ribbon gently around all tiers to stabilize them while you decorate.
Adding Ribbons and Covering the Mechanics
Decorative ribbon is what turns a cluster of diapers into a stylish centerpiece. It hides the rubber bands and introduces your color palette.
- Measure a length of ribbon around each tier, allowing a small overlap.
- Secure the ends with clear tape or a small dot of hot glue applied to the ribbon only (avoid glue on diapers).
- Layer narrower ribbons or lace over a wider solid ribbon for added texture.
- If your theme is subtle, ribbons can carry most of the color and pattern so the cake still looks cohesive.
Decorating with Baby Essentials and Keepsakes
This is where your diaper cake becomes truly unique. Use baby items as decor so every detail is both adorable and useful.
Ideas for Tucking in Accessories
- Slide rolled washcloths between diapers like tiny accent flowers.
- Attach pacifiers or teething toys to ribbon with small clips or string.
- Fold bibs into small fans and tuck them behind the main ribbon like ruffles.
- Wrap one tier in a muslin swaddle instead of ribbon for a softer, fabric-covered look.
- Place a plush animal, baby shoes, or a small framed quote on the very top as a focal point.
Balance, Color, and Safety Tips
As you decorate, pay attention to both aesthetics and safety so the cake is stylish and parent-friendly.
- Avoid gluing anything directly to diapers; use ribbon, bands, or removable tape on non-fabric items.
- Distribute heavier objects (like bottles) toward the bottom tier for better stability.
- Keep anything with small detachable parts away from the reach of very young siblings at the party.
- Stick to baby-safe materials and avoid strongly scented items if the parents are sensitive to fragrance.
Finishing Touches and Presentation Ideas
Presentation can transform a nice diaper cake into an unforgettable one. Consider how it will be displayed and how the parents will ultimately receive it.
- Place the cake on a decorative cake stand, wooden tray, or charger plate to elevate it visually.
- Add a personalized tag with the baby’s name (if known) or a sweet message for the parents.
- Wrap the entire cake in clear cellophane and tie it with a large bow if you need to transport it or want a polished, gift-ready look.
- Coordinate the colors of your bow and base with the ribbons on the tiers for a cohesive effect.
Quick Troubleshooting Guide
Even careful crafters run into small issues. These common problems have simple fixes.
| Issue | Possible Cause | Easy Fix |
|---|---|---|
| Cake leans to one side | Uneven diaper placement or weak center support | Rebuild the bottom ring more tightly and secure the support firmly to the base. |
| Diapers slide out of bands | Bands too loose or too few diapers in each tier | Add a second band or tuck in extra diapers to fill gaps. |
| Ribbons look wrinkled or uneven | Ribbon cut too short or applied without measuring | Re-cut slightly longer pieces and smooth them in place before taping. |
| Top tier feels unstable | Tier is too small or not anchored on the center support | Add a few more diapers or thread the support fully through the top layer. |
Frequently Asked Questions (FAQs)
How many diapers should I use for a diaper cake?
The exact number depends on the size and number of tiers, but a three-tier cake typically uses between 50 and 70 diapers. The bottom tier usually takes the largest share, with fewer diapers on each tier as you go up.
What diaper size is best for a diaper cake?
Size 1 or 2 works well for most babies because they are likely to fit longer than newborn sizes. Using a slightly larger size also makes rolling and stacking easier and creates a more substantial-looking cake.
Can I use cloth diapers instead of disposable ones?
Yes, cloth diapers can make a beautiful, eco-friendly diaper cake. They are thicker and bulkier, so you may need fewer pieces and a slightly different rolling or folding technique, but the overall steps remain similar.
How far in advance can I make a diaper cake?
You can usually assemble a diaper cake several days or even a couple of weeks before the shower, as unopened diapers store well. Keep the finished cake in a clean, dry place, away from direct sunlight and strong odors.
Should the parents take the cake apart or keep it as a keepsake?
Most parents choose to disassemble the cake and use the diapers and baby items, but it is entirely up to them. Include a small card letting them know that everything on the cake is meant to be used and enjoyed.
What if I am not very crafty?
A diaper cake does not have to be perfect to be meaningful. Focus on neat tiers, coordinated colors, and a few thoughtful baby items. Even a simple design made with care will be cherished and appreciated.
Final Inspiration
With a bit of creativity and this step-by-step framework, you can transform everyday diapers into a stylish, heartfelt centerpiece that celebrates both the baby and the parents. Start with a clear theme, build a sturdy structure, and then have fun layering in ribbons, textures, and baby essentials that reflect the family’s unique style.