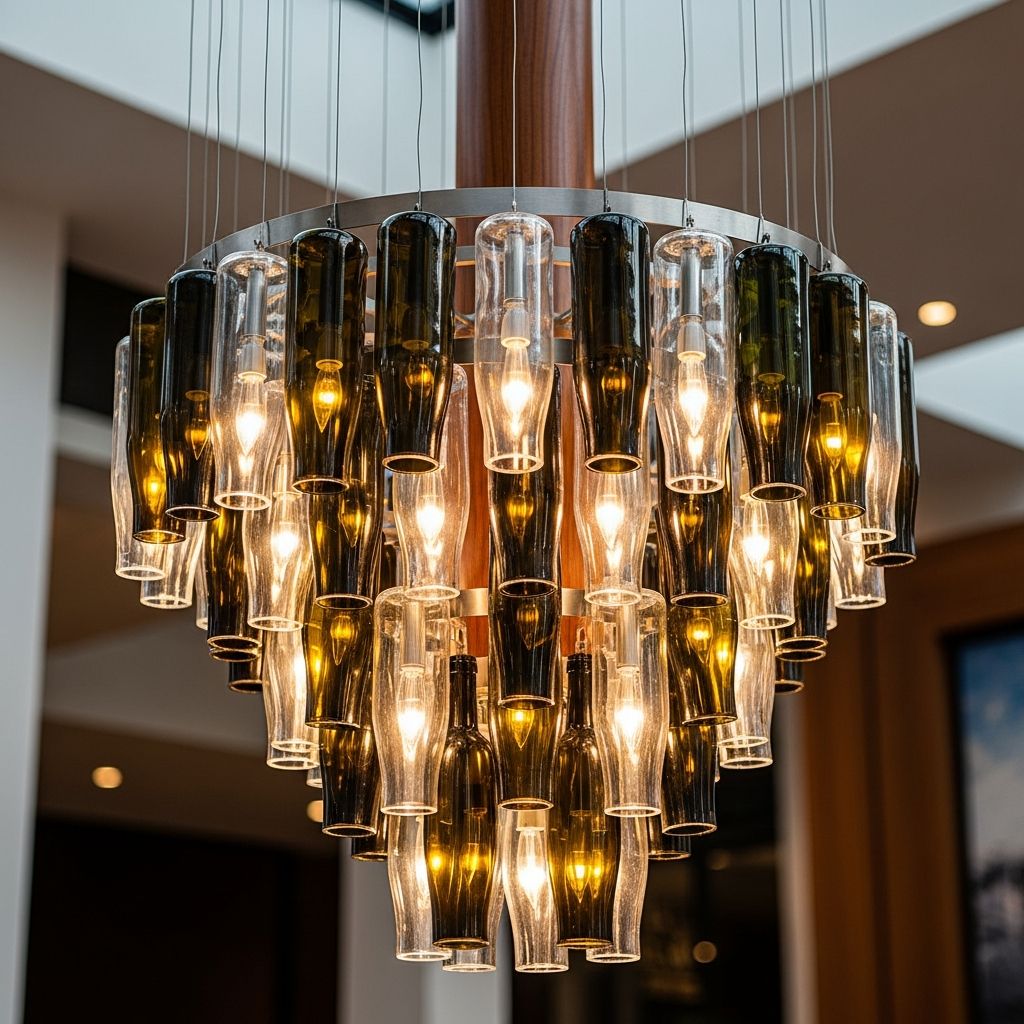
Empty wine bottles do not have to end their life in the recycling bin. With a bit of planning, basic tools, and an eye for style, they can become the centerpiece of your dining room, kitchen, patio, or home bar. A wine bottle chandelier is more than a light fixture; it is a conversation starter, a piece of functional art, and a personal story told in glass and light.
This guide walks through everything from planning the design to hanging the finished piece, so you can create a chandelier that looks intentional, safe, and absolutely unique.
Why Wine Bottle Chandeliers Are Worth the Effort
A wine bottle chandelier combines sustainability with style. Instead of buying a mass-produced fixture, you repurpose something you already have and transform it into a custom design that reflects your tastes, color palette, and even memories shared over each bottle.
- They turn ordinary bottles into sculptural decor that feels high-end but handmade.
- They highlight your personal style, whether rustic farmhouse, modern industrial, or colorful boho.
- They encourage mindful reuse and make a visible statement about sustainability.
Planning Your Chandelier: Vision Before Tools
Before picking up a drill or ordering hardware, make design decisions on paper. A clear plan helps you avoid mid-project changes and unsafe improvisation.
Define the Purpose and Location
First, decide exactly where the chandelier will hang and what kind of light you need there. Ambience for a dining table calls for softer, diffused light, while a kitchen island may require brighter, functional illumination.
- Indoor dining room: Aim for warm, dimmable light and bottles grouped closer together for a cozy, intimate feel.
- Kitchen island: Space the bottles out more, use brighter bulbs, and keep bottle heights fairly even.
- Outdoor patio (covered): Favor solar or low-voltage systems and ensure all materials handle moisture and temperature changes.
Choose a Style and Bottle Aesthetic
The bottles themselves define the visual character of the chandelier. Mix and match shapes, colors, or labels deliberately rather than randomly.
| Style Goal | Bottle Choice | Metal & Hardware Finish |
|---|---|---|
| Rustic farmhouse | Green and brown bottles, labels partially intact | Oil-rubbed bronze or black, distressed wood frame |
| Modern minimalist | Clear bottles, labels fully removed, clean lines | Brushed nickel or matte black, simple rectangular frame |
| Boho colorful | Assorted tinted glass, maybe some etched or painted | Antique brass or copper, circular or asymmetrical frame |
| Industrial loft | Uniform bottles, maybe oversized, thick glass | Raw steel, chain suspension, visible Edison bulbs |
Estimate Size and Bottle Count
Match the chandelier size to the room and furniture below it. An undersized fixture looks lost; oversized feels overwhelming or unsafe.
- For a dining table, aim for a fixture length about half to two-thirds of the table length.
- Leave enough vertical clearance: generally 75–90 cm (30–36 inches) above the tabletop for comfortable sight lines.
- Start with 5–9 bottles for a moderate chandelier; larger rooms or long islands can easily support 12 or more bottles.
Materials and Tools: What You Really Need
The exact materials depend on your design, but most wine bottle chandeliers share the same core components. Always use fixtures and parts rated for lighting use and weight loads appropriate to your design.
Core Materials
- Clean, empty wine bottles (all one style or assorted, as planned)
- Light source: pendant light kits, LED string lights, fairy lights, or LED bulbs with compatible sockets
- Support frame: wood board, metal plate, repurposed rack, or ready-made chandelier canopy
- Hanging hardware: chain, ceiling hooks or mounting bracket, screws, and anchors
- Optional: cable grips, bottle collars, grommets, or rubber bushings to protect wiring
Useful Tools
- Protective gear: safety glasses, gloves, and dust mask
- Drill and appropriate bits (for wood, metal, or tile, depending on your mounting surface)
- Wire strippers and cutters (if doing any electrical work)
- Glass-cutting system (only if you intend to cut off bottle bottoms or modify the glass)
- Sandpaper or sanding block to smooth any cut glass edges
If you are not experienced or confident with wiring, plan a design that relies on plug-in pendant kits or battery/solar lights so you can avoid direct electrical work.
Safety First: Working with Glass and Electricity
A beautiful chandelier is not worth a safety risk. Build in safety at every stage, from handling bottles to mounting the finished fixture on the ceiling.
Working Safely with Glass
- Wear eye protection whenever cutting, drilling, or sanding glass.
- Remove labels with warm soapy water and a scraper instead of harsh chemicals when possible.
- If cutting bottles, follow the system instructions carefully and sand edges until they are completely smooth to the touch.
Electrical and Mounting Safety
- Use only bulbs and wiring components appropriate for enclosed or semi-enclosed spaces, so heat can dissipate safely.
- Never exceed the wattage rating of your sockets or wiring; LEDs are ideal because they stay cooler and use less power.
- Ensure the ceiling box and anchors can support the total weight of the bottles, frame, and hardware.
- When in doubt about wiring or load capacity, consult a licensed electrician or contractor.
Design Paths: Bottles as Shades vs. Bottles as Sculpture
There are two broad approaches to wine bottle chandeliers. In one, bottles function as shades enclosing the light source. In the other, they act as decorative elements around or near the lights, with the bulbs exposed or separate.
Bottle-as-Shade Designs
In this approach, each bottle becomes a mini pendant shade, with a light socket or LED strand running into it. The result feels like a cluster of glowing glass tubes.
- Works well with clear or lightly tinted bottles that allow light to pass through.
- Often uses cut-bottom bottles so heat can escape from both ends.
- Looks especially striking in a row over a bar or island, or in clusters at varying heights.
Bottle-as-Sculpture Designs
Here, the bottles act more like a beaded curtain or glass installation, with light fixtures integrated into or above the arrangement. The light reflects off and through the bottles rather than shining from inside each one.
- Great for people who prefer to avoid glass cutting and direct wiring into bottles.
- Allows creative patterns: spiral shapes, concentric circles, or staggered layers.
- Can be paired with a conventional chandelier frame, with bottles suspended around it.
Step-by-Step: Building a Simple Linear Wine Bottle Chandelier
The following walkthrough describes a popular beginner-friendly design: a row of bottles hanging over a table or counter from a rectangular wooden or metal frame.
Step 1: Prepare and Clean the Bottles
- Rinse each bottle thoroughly with warm soapy water and let it dry fully.
- Soak bottles in a tub of warm water with a bit of dish soap or baking soda to loosen labels.
- Peel labels off gently and use a non-scratch scrub pad or oil-based adhesive remover for any remaining glue.
- Inspect for chips or cracks; discard any damaged bottles for safety.
Step 2: Lay Out Your Frame
Place your frame board or plate on a flat surface and map out where each bottle will hang. Balanced spacing matters as much as the number of bottles you use.
- Mark the centerline of the frame and then measure equal distances left and right for each bottle location.
- Keep at least a few centimeters between bottle necks so they do not bump into each other when moved.
- Mark where chains, cables, or mounting hardware will attach to the ceiling, ensuring an even weight distribution.
Step 3: Install the Hanging Points
- Drill holes through the frame where each bottle or pendant will pass.
- Install cable grips, small grommets, or decorative collars if using pendant kits, to hold wiring in place and protect it from sharp edges.
- Attach eye screws or brackets at the corners (and center, if needed) for the suspension chains or cables.
Step 4: Add the Lighting
This step varies based on your chosen light source. A common option is to use multiple pendant kits, each feeding into a single bottle.
- Feed the cord for each pendant through the frame from the top, so the socket hangs beneath.
- Adjust cord lengths to stagger bottle heights or keep them level, depending on your design.
- If bottles will fully enclose the bulbs, choose compact, low-heat LED bulbs that fit comfortably through the neck.
Step 5: Attach or Insert the Bottles
- Slide each bottle over its corresponding bulb and socket or over the LED light strand.
- Use collars, custom cut stoppers, or cable grips to keep bottles securely supported and prevent slippage.
- Check clearance between bottles, making sure they do not touch when lightly moved.
Step 6: Mount and Test
Once the frame, lights, and bottles are assembled, it is time to bring the chandelier to its final home.
- Turn off power at the breaker if hardwiring into a ceiling junction box.
- Attach mounting hardware securely into a joist or appropriate anchors, then hang the frame via chain or cable.
- Complete any necessary wiring connections or plug in the fixture, then test the lights before final adjustments.
Creative Variations to Make It Your Own
Once you understand the basic structure, you can experiment with different shapes, bottle arrangements, and lighting styles to match your space.
Ideas for Extra Personality
- Color gradients: Arrange bottles so colors subtly shift across the fixture, like clear to green to blue.
- Mixed glass: Combine wine bottles with smaller liqueur bottles or vintage soda bottles for visual variety.
- Etched patterns: Use glass-etching cream and stencils to add subtle motifs, monograms, or borders.
- Painted accents: Lightly frost some bottles or add translucent glass paint to create soft, diffused glows.
- Themed collections: Use bottles from memorable events—anniversaries, celebrations, trips—and arrange them in chronological order.
Basic Maintenance and Long-Term Care
With proper care, a wine bottle chandelier can last for years and remain a highlight of your decor. Dust, fingerprints, and kitchen residue are the most common issues, and all are easy to manage.
- Dust bottles regularly with a soft cloth or feather duster to prevent buildup.
- Turn off the fixture and let bulbs cool before cleaning to avoid thermal shock to the glass.
- Use a mixture of mild dish soap and water on a damp cloth to remove greasy spots, followed by a dry microfiber cloth for shine.
- Inspect hardware and mounting points at least once a year to ensure everything remains tight and secure.
Frequently Asked Questions
Do I have to cut the bottles?
No. Many designs let you leave bottles intact. You can hang them around exposed bulbs, fill them with battery-powered fairy lights, or suspend them slightly below a standard light fixture so they catch and refract the light rather than enclosing it entirely.
What kind of bulbs work best?
LED bulbs are strongly recommended. They run cool, use less energy, and are available in many shapes and color temperatures. For a cozy, intimate feeling, choose warm white LEDs and lower lumen output; for task areas, pick brighter, slightly cooler whites.
Can I use this outdoors?
Yes, if you plan for outdoor use from the beginning. Use weather-resistant hardware, outdoor-rated wiring and fixtures, and consider solar or low-voltage systems. Hang the chandelier in a covered area to protect both glass and hardware from direct rain and harsh sun.
How heavy will the chandelier be?
The weight depends on the number and size of bottles, plus the frame and hardware. A single empty wine bottle typically weighs between 400 and 800 grams, so a cluster of ten bottles can easily exceed several kilograms. Always account for total weight and mount into solid structural support.
Is it beginner-friendly?
Yes, if you keep the design simple and avoid complex wiring. A beginner-friendly version might use a pre-made multi-pendant canopy or plug-in pendant lights combined with intact bottles and a straightforward frame. More advanced projects can involve bottle cutting, custom wiring, or intricate patterns.
Bringing It All Together
A wine bottle chandelier is an ideal project for anyone who loves DIY decor with personality. Instead of hiding empty bottles in the recycling bin, you give them a second life as a glowing centerpiece that reflects your taste, creativity, and memories. With thoughtful planning, safe construction, and just a bit of experimentation, your finished chandelier will feel like a custom art piece created specifically for your home.