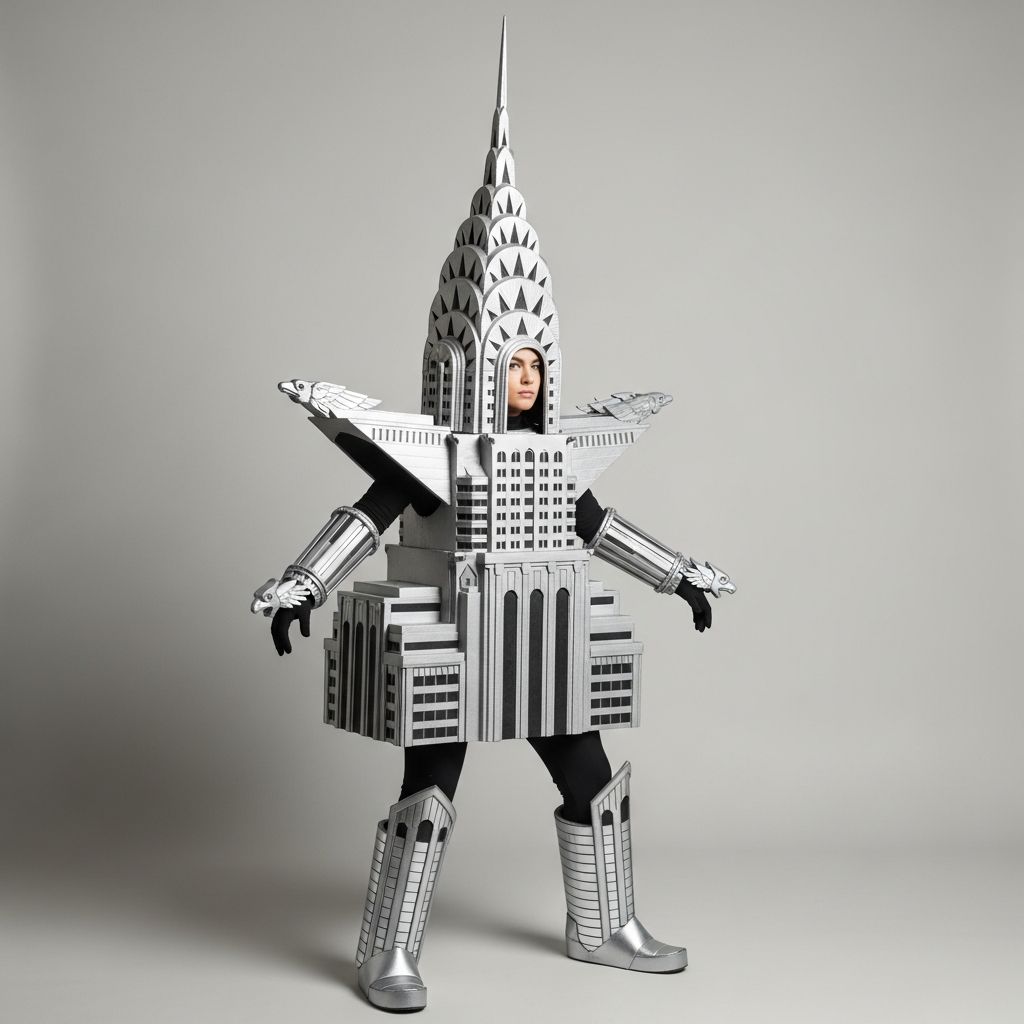
Transform an ordinary afternoon of crafting into a dramatic, shimmering skyscraper costume inspired by the Chrysler Building’s Art Deco crown. This guide walks through every step, from planning the design to adding the final metallic details, using affordable materials and basic tools.
Why a Skyscraper Costume Works So Well
A building costume stands out because it combines bold geometric shapes with a playful twist on architecture and fashion. The Chrysler Building’s stepped crown, repeating windows and metallic sheen make it instantly recognizable and surprisingly easy to mimic with cardboard and reflective finishes.
Unlike many complex character outfits, this design is mostly straight lines and stacked layers, which means beginners can succeed while more advanced crafters can push the details further.
Planning Your Design
Before cutting any cardboard, sketch a simple front view of your costume so you know how tall and wide it should be on the wearer. Decide whether it will cover the torso only, extend past the hips, or include a headpiece that continues the tower above the head.
It also helps to choose a color palette: classic silver and gray for a traditional skyscraper look, or a stylized palette using blues and blacks with metallic accents for a more graphic, costume-party vibe.
Key Design Choices
- Overall height: Just torso, torso plus hips, or full floor-length tower.
- Headpiece style: Simple crown, tall spire, or detachable hat.
- Window treatment: Printed rectangles, painted lines, or cut-out panels backed with fabric.
- Mobility: Narrow “tower” for visual drama or slightly flared base for ease of walking.
Materials and Tools
Most of the costume can be built from sturdy cardboard and covered with metallic finishes to echo the iconic shine of the Chrysler Building. Choose lightweight materials so that the costume is comfortable for several hours of wear.
Suggested Materials List
- Cardboard sheets (corrugated, various sizes)
- Craft knife and scissors
- Cutting mat or scrap cardboard for safe cutting
- Hot glue gun and glue sticks (plus craft glue for detail work)
- Metallic spray paint (silver or chrome) and gray acrylic paint
- Painter’s tape or masking tape
- Ruler or straightedge and measuring tape
- Pencil and permanent marker
- Elastic straps or ribbon for shoulder straps
- Thin foam sheets or felt for comfort padding
- Aluminum foil, metallic craft paper, or silver tape for accents
- Optional: battery tea lights or small LED string lights for windows
Basic Safety Tips
- Always cut away from your body and keep fingers clear of the blade path.
- Spray paint in a well-ventilated outdoor area and protect surfaces with drop cloths.
- Let all painted pieces fully dry before wearing to avoid fumes and smudges.
- Test visibility and range of motion before wearing the costume outside your home.
Measuring the Wearer
Accurate measurements prevent the costume from being either too tight to walk in or so loose that it shifts and twists. Measure the wearer while they stand comfortably in the shoes they plan to wear with the costume.
Essential Measurements
| Measurement | How to Measure | What It Controls |
|---|---|---|
| Torso height | From shoulder to hip | Height of main body section |
| Chest width | Across front of chest (armpit to armpit) | Front panel width |
| Hip width | Across widest part of hips | Lower panel width or flare |
| Shoulder span | Tip of one shoulder to the other | Placement of straps and armholes |
| Desired costume length | From shoulder to where you want costume to end | Overall tower height |
Building the Main Tower
The main body of the costume is a rectangular column that slips over the wearer like a tunic. It should be slightly wider than the torso for comfort, leaving enough space to move arms and walk freely.
Step 1: Cut the Panels
- Mark four rectangles on cardboard: a front, a back and two side panels sized to your chosen dimensions.
- Use a ruler and craft knife to cut clean, straight edges.
- On the front panel, lightly pencil the outlines of window rows and any decorative bands you want to add later.
Step 2: Shape and Assemble the Column
- Score (lightly cut) along the vertical edges where panels will bend so the cardboard folds smoothly.
- Glue or tape the side edges together to form an open-bottom box that fits over the wearer.
- Cut arm openings on the sides, starting conservatively and enlarging gradually until the wearer can move comfortably.
- If desired, cut a gentle curve at the neckline in the front and back panels for comfort around the neck and shoulders.
Creating the Art Deco Crown
The Chrysler Building is famous for its layered, fan-like crown. You can mimic this by stacking smaller, arched pieces of cardboard on top of the main tower, each tier slightly shorter and narrower than the one below it.
Step 3: Design the Crown Tiers
- Decide how many tiers you want (three to five layers usually look good and stay manageable).
- For each tier, sketch a wide arch on cardboard, then add small triangular “rays” or stepped segments along the top to echo Art Deco geometry.
- Cut out each tier and test-stack them on top of the main column to check proportion.
Step 4: Attach the Crown
- Create a flat roof piece for the main tower and glue it in place to act as a base for the crown.
- Starting with the largest tier, glue the arches to the front and back, supported by small strips of cardboard behind them for strength.
- Layer each smaller tier above the last, slightly overlapping, to create a stepped, rising silhouette.
- Reinforce joints with tape on the interior where it will not be visible.
Adding a Spire or Headpiece
A simple spire can transform the costume from “generic tall building” into a distinctive skyscraper inspired by the Chrysler Building. The spire can be attached directly to the crown or built into a separate headpiece for easier transport and wearing.
Spire Options
- Fixed spire: A narrow triangular or cone-like piece glued to the top tier.
- Detachable spire: A cardboard cone covered in foil that slots into a small tube at the crown’s center.
- Hat-style crown: A lightweight headband or cap with a mini version of the stepped crown and spire.
Painting and Metallic Effects
Paint is where the costume comes alive. Use light gray or off-white for the basic structure and metallic silver for accents that suggest steel cladding and reflective surfaces.
Step 5: Base Coats
- Apply a base coat of gray or white acrylic to the entire structure and let it dry completely.
- Use spray paint for large areas if you have outdoor space and proper ventilation; brush-on paint works well for detail and indoor projects.
- Paint the interior a darker shade if you want the open bottom to visually disappear when worn.
Step 6: Metallic Details
- Cover selected areas (such as the crown tiers and spire) with metallic spray paint or adhesive-backed metallic paper.
- Use aluminum foil or silver tape to create narrow bands, chevrons and arcs that mirror Art Deco patterns.
- Add shading with diluted black paint along edges and between window rows to give the impression of depth and shadow.
Windows, Patterns and Texture
Even simple, repeated shapes can convincingly suggest rows of windows. Neat repetition matters more than perfect realism, so focus on keeping lines straight and spacing consistent.
Window Techniques
- Drawn windows: Use a ruler and permanent marker to draw uniform rectangles in rows and columns.
- Painted blocks: Paint dark rectangles for windows and lighter horizontal bands between floors.
- Cut-out windows: Cut small openings and glue black fabric or paper behind them for a lit-from-within effect.
Extra Architectural Details
- Add thin strips of cardboard as raised ledges or cornices between floors.
- Use foam sheets or layered paper triangles to suggest ornamental metalwork around the crown.
- If you want a subtle nod to automotive history, include small stylized “wings” or arrow shapes near the upper levels as decorative motifs.
Straps, Comfort and Fit
Even the best-looking costume fails if it is painful to wear. Plan for adjustable straps and soft contact points wherever cardboard meets shoulders or arms.
Step 7: Adding Shoulder Straps
- Punch or carefully cut small holes in the front and back panels near the top, positioned roughly over the wearer’s shoulders.
- Thread elastic or sturdy ribbon through the holes and tie or knot them into adjustable loops.
- Test the length so the tower hangs straight and does not bump against the wearer’s knees when walking.
Comfort Upgrades
- Glue thin foam or felt pads to the inside where the cardboard touches shoulders and collarbone.
- Round off any sharp corners near armholes and neckline.
- Ensure there is enough open space around the face and neck to avoid feeling boxed in.
Lighting and Special Effects
Simple lighting turns your skyscraper from daytime skyline to nighttime landmark. Battery-powered lights are best so the costume remains portable and safe.
Lighting Ideas
- Place battery tea lights behind a few window cut-outs for a warm glow.
- Run a short LED string around the edges of the crown, securing with clear tape.
- Use reflective tape at the bottom edge to increase visibility in dim environments.
Testing and Adjusting the Costume
Before the big event, wear the costume around your home for several minutes to discover any issues with balance, rubbing or limited movement. Ask someone to observe from different angles while you walk, turn and sit down.
Make any needed adjustments, such as trimming the base for easier steps, widening armholes, or tightening shoulder straps to keep the tower stable and centered.
Storage and Transport
A tall cardboard costume can be awkward to store, but a bit of planning will help it survive beyond a single party. Consider designing the crown or spire as detachable sections that slot into place, which makes it easier to transport in a car.
Keep the costume in a dry place away from moisture, and if possible, cover it with an old sheet or large plastic bag to protect the paint and metallic surfaces from dust and scuffs.
Creative Variations
Once the basic structure is understood, this skyscraper design can be altered to reference other buildings or to match a particular theme. You only need to change the silhouette of the crown, the arrangement of windows, and the color scheme.
Ideas for Variations
- Shift to a gold and black palette with more vertical stripes for a different Art Deco feel.
- Turn the tower into a night skyline by adding a dark blue gradient and stars at the top.
- Create a group costume where each person represents a different famous skyscraper or city landmark.
Frequently Asked Questions
How long does this costume take to make?
For a basic version with simple paint and no lights, expect 4–6 hours spread over a day to allow for drying time. Adding more elaborate crown tiers, metallic detailing and lighting can extend the project to a weekend, especially if you work at a relaxed pace.
Is this suitable for children?
Yes, with supervision. Adults should handle all cutting with craft knives and any spray painting, while children can safely help with painting, taping and attaching decorative pieces. Make sure the costume is short enough that the wearer can walk and climb stairs without tripping.
What if I do not have spray paint?
Metallic craft paper, aluminum foil and silver tape can create a convincing shine without spray paint. Use regular acrylic paints for the base colors, then layer reflective materials for the crown, spire and decorative bands.
How can I make the costume more durable?
Reinforce key areas, such as the inside corners and the base of the crown, with additional strips of cardboard glued perpendicular to the panels. A clear sealer or varnish intended for craft projects can also help protect the paint from moisture and scuffing.
Can I sit down while wearing it?
That depends on the length and shape you choose. If sitting is important, design the costume to end above the knees and keep the cardboard flexible at the lower edge, or leave the back panel shorter so you can perch on a chair more comfortably.
Final Thoughts
A Chrysler Building–inspired costume blends architecture, history and creativity into a wearable piece of art that can be adapted to every age and skill level. With cardboard, metallic finishes and careful planning, you can build a personal version of an iconic skyscraper that commands attention at any costume event.