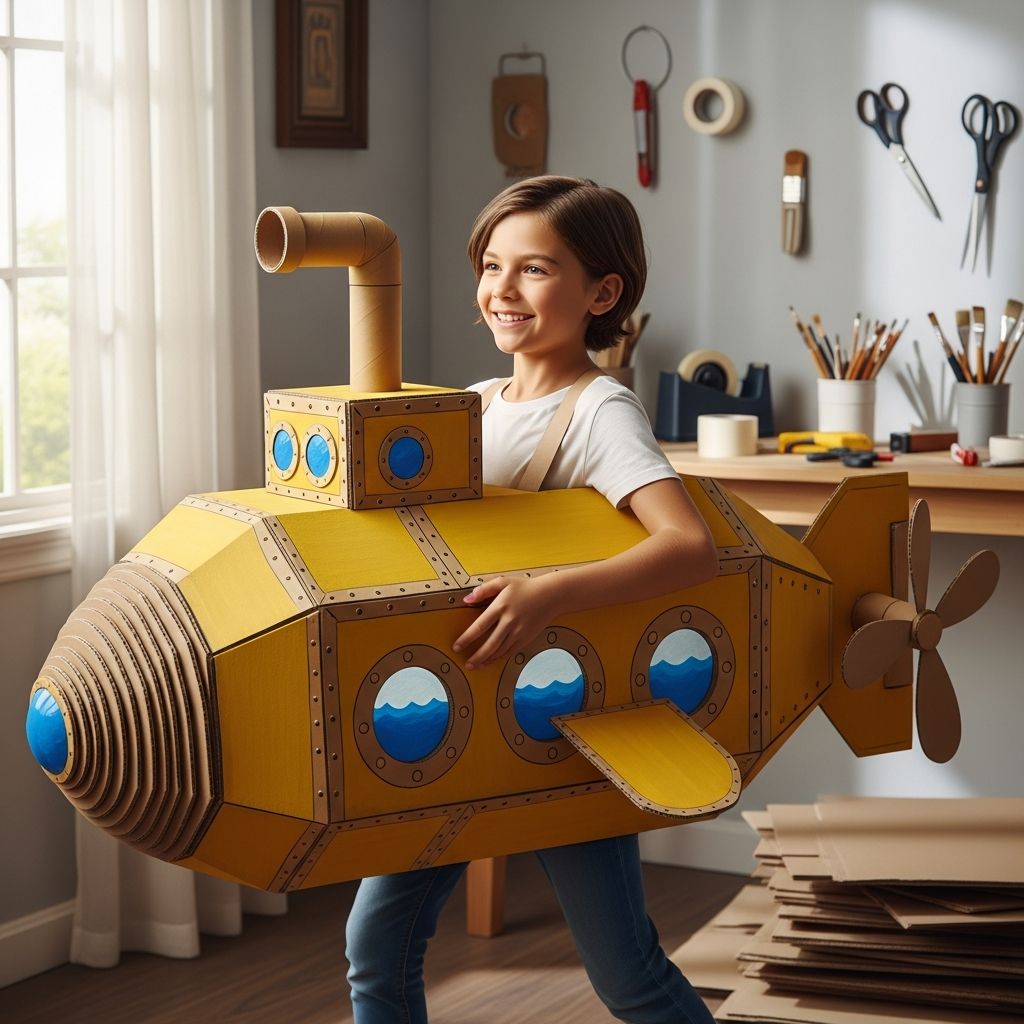
Creating a cardboard submarine costume is an easy and budget-friendly way to bring an undersea adventure to life for Halloween, school events, or imaginative play at home. This guide walks through each stage — from planning the design to adding playful periscopes and portholes — so you can build a unique costume that fits your child comfortably and safely.
Why a Submarine Costume?
A submarine costume stands out among typical costumes and works wonderfully for ocean, explorer, or science themes. It can be made almost entirely from recycled materials, making it eco-conscious as well as fun.
- Perfect for kids who love oceans, ships, and exploration.
- Lightweight and easier to carry than many bulky store-bought costumes.
- Simple to customize with colors, logos, and decorations.
Planning Your Design
Before cutting into cardboard, take a few minutes to plan the shape and size of your submarine costume. A basic silhouette and a few thoughtful measurements help everything come together smoothly.
- Measure your child: Shoulder width, torso length, and approximate hip width.
- Decide the orientation: Will the submarine be worn like a front-and-back sandwich board, or more like a box the child stands inside?
- Choose your style: Classic rounded submarine, cartoon-style with oversized windows, or sleek and modern.
Basic Size Guidelines
| Child Height (approx.) | Suggested Submarine Length | Suggested Submarine Height |
|---|---|---|
| 90–110 cm | 55–65 cm | 30–40 cm |
| 110–130 cm | 65–80 cm | 35–45 cm |
| 130–150 cm | 80–95 cm | 40–50 cm |
Adjust measurements to ensure the costume is not wider than doorways and that your child can walk and turn comfortably.
Materials and Tools
Most of what you need for this submarine costume can be found around the house or purchased inexpensively. Substitute items as needed depending on what you have available.
Core Materials
- 1–2 large pieces of sturdy cardboard (from appliance or shipping boxes).
- Acrylic or poster paint in your chosen submarine colors (yellow, blue, gray, or any theme color).
- Paintbrushes or foam brushes in various sizes.
- Masking tape or packing tape for assembling panels.
- Glue stick or craft glue for attaching smaller decorative pieces.
- String, ribbon, or wide fabric straps for shoulder supports.
Optional Decorative Items
- Colored paper or adhesive vinyl for stripes and logos.
- Plastic bottle caps or jar lids as knobs and control dials.
- Paper cups or small cardboard tubes for periscopes and exhaust pipes.
- Aluminum foil for metallic accents around windows.
- Glow-in-the-dark stickers or reflective tape for added visibility at night.
Tools for Construction
- Scissors for cutting lighter cardboard.
- Craft knife or box cutter (used only by an adult).
- Ruler or measuring tape.
- Pencil or washable marker for sketching shapes.
- Hole punch or sharp tool for making strap holes.
Step 1: Sketching the Submarine Shape
Begin by drawing a simple submarine outline on your largest piece of cardboard. Think of a long oval body with a squared or rounded tail, and a small tower shape (also called a conning tower) on top.
- Draw half of the shape first, then flip the cardboard or use a paper template to mirror it for symmetry.
- Keep edges smooth and rounded where possible to avoid sharp corners.
- Mark where windows and arm or head openings will go, but do not cut them yet.
Step 2: Cutting the Main Body
Once you like your sketch, carefully cut out the submarine outline. If you plan to have a front and back panel, trace this first panel onto a second piece of cardboard and cut a duplicate.
- Place the cardboard on a cutting surface that can handle blade marks.
- Have an adult use the craft knife for long, straight cuts and tighter curves.
- Trim any rough spots with scissors to make edges neater and safer.
If you want side “walls” to give the submarine depth, cut extra strips of cardboard as wide as you want the costume to be, then bend them gently to follow the curve of the sub and tape them along the edges.
Step 3: Creating Windows and Openings
Porthole windows add a lot of character and help people immediately recognize the costume as a submarine. They also provide natural placement for arm or head openings.
- Trace circles using bowls, lids, or cups in different sizes.
- Position one opening where your child’s arm can comfortably slip through, if desired.
- Cut out at least one larger opening for the head or upper body if making a box-style sub.
You can leave some windows uncut and paint them on later to keep the structure stronger. For cut-out windows, cover rough edges with tape for comfort and durability.
Step 4: Adding the Periscope and Tower
No submarine feels complete without a periscope poking up from the top. This element is easy to make and instantly recognizable.
- Cut a small rectangle of cardboard and roll it into a tube, or use an empty paper towel roll.
- Attach a shorter, horizontal tube or folded strip to the top to form the bent end of the periscope.
- Secure the tube to the top of the submarine’s tower with tape and glue, reinforcing it from the inside if possible.
Consider keeping the periscope slightly flexible or shorter for safety, especially in crowded spaces where it might bump into doorways or other people.
Step 5: Installing Straps and Supports
Comfortable straps make the costume easy to wear for longer periods. Position them so the submarine hangs straight and does not tilt forward or backward.
- Punch two holes near the front and two near the back of the top edge of the costume.
- Thread ribbon, rope, or fabric straps through each pair, knotting on the inside.
- Test the length: the submarine should sit around hip or waist level, not too low to trip over.
If the cardboard is thin, glue a small scrap of cardboard where the holes go before punching them to reduce tearing.
Step 6: Painting the Submarine
Painting brings your submarine costume to life. Choose bright, high-contrast colors to make details stand out, especially for nighttime trick-or-treating.
- Lay the costume on a protected surface in a well-ventilated area.
- Apply a base coat of your main color and let it dry fully.
- Add details: stripes, panels, rivets, and shading around windows.
For windows, paint them in a contrasting color and add highlights or reflections using white paint. Draw simple lines or dots around the edges to mimic bolts and metal seams.
Decorative Ideas and Themes
Part of the fun is giving your submarine a personality and story. Consider these creative themes when decorating.
- Explorer sub: Add a simple logo, fake depth gauge, and map patterns along the sides.
- Science lab sub: Paint pretend buttons, screens, and radar displays.
- Fantasy sub: Incorporate sea creatures, coral designs, or stars and galaxies for a magical twist.
You can also add a playful name along the side, like “Sea Scout” or “Deep Diver,” using stencils or freehand lettering.
What to Wear Under the Costume
The clothing underneath helps complete the undersea look and keeps your child comfortable in varying weather. Choose pieces that allow free movement and match your color scheme.
- Swim trunks or leggings and a fitted top in blues, greens, or yellows.
- Rubber boots, sneakers, or simple water shoes for walking safely.
- Optional extras: goggles, snorkel, or a simple captain’s hat.
For cooler weather, add layers in matching colors (tights under shorts, long-sleeved shirts under T-shirts, and thin gloves if needed).
Safety and Comfort Tips
A well-planned costume should look great without limiting movement or visibility. Make a quick checklist before heading out to any event.
- Ensure the costume does not block your child’s view when looking to the sides or down.
- Keep the bottom edge at least a few centimeters above the knees to avoid tripping.
- Check that straps are not rubbing the neck or shoulders; add soft fabric or felt under them if necessary.
For nighttime activities, add reflective tape or small LED lights to the sides and back of the submarine to help drivers and other pedestrians see your child clearly.
Troubleshooting Common Issues
Even with careful planning, small problems can arise. Here are practical fixes for the most common issues.
| Problem | Quick Fix |
|---|---|
| Submarine tilts forward or backward | Adjust strap length or move the strap holes closer to the center. |
| Cardboard tearing at strap holes | Glue reinforcement patches of cardboard around the holes and re-punch. |
| Edges scratching arms or clothes | Cover edges with masking tape or fabric, then repaint if desired. |
| Costume feels too heavy | Remove non-essential decorations and shorten side panels to reduce material. |
Eco-Friendly and Storage Tips
Because this costume is made mostly from cardboard, it is easy to recycle or repurpose once the event is over. You can also extend its life as a dress-up toy.
- Use recycled boxes and leftover craft paint whenever possible.
- After the holiday, turn the submarine into a playroom prop or wall decoration.
- When it is worn out, separate tape and non-paper decorations before recycling the cardboard.
If you want to keep the costume for future use, store it in a dry place away from direct sunlight to prevent warping and fading.
Frequently Asked Questions
How long does it take to make a cardboard submarine costume?
For a simple design with minimal decorations, active craft time is often under two hours, spread over a day to allow paint to dry. More detailed versions with multiple colors, lights, or intricate decorations can take longer, especially if you add interior details.
Can this costume be adapted for adults?
Yes, the same basic approach works for older kids and adults. Increase the size of the submarine body, use wider and stronger straps, and consider using lightweight foam board instead of heavy cardboard to keep the costume comfortable.
What if my child uses a wheelchair or stroller?
You can attach the submarine shape directly to the sides of a wheelchair or stroller using Velcro straps or zip ties (placed where they will not interfere with moving parts). In this version, the vehicle becomes the body of the submarine, and your child simply sits inside as the captain.
Is cardboard safe to wear in rainy weather?
Cardboard softens and warps when wet, so it is best to avoid heavy rain. If you expect light drizzle, apply a clear sealing spray or a thin coat of craft varnish over the paint and have an umbrella on hand to protect the costume.
Can I add sound or light effects?
Small battery-powered lights, such as LED tea lights or string lights, can be taped inside portholes for a glowing effect. Simple sound can be added with a toy that plays submarine or sonar noises, placed securely inside a pocket or taped to the interior wall of the costume.
Bringing Your Undersea Adventure to Life
A cardboard submarine costume transforms everyday materials into a playful under-the-sea adventure and encourages creativity in both kids and adults. With thoughtful planning, comfortable straps, and imaginative decorations, you can create a one-of-a-kind outfit that makes your young explorer feel ready to dive into any Halloween route or school parade.