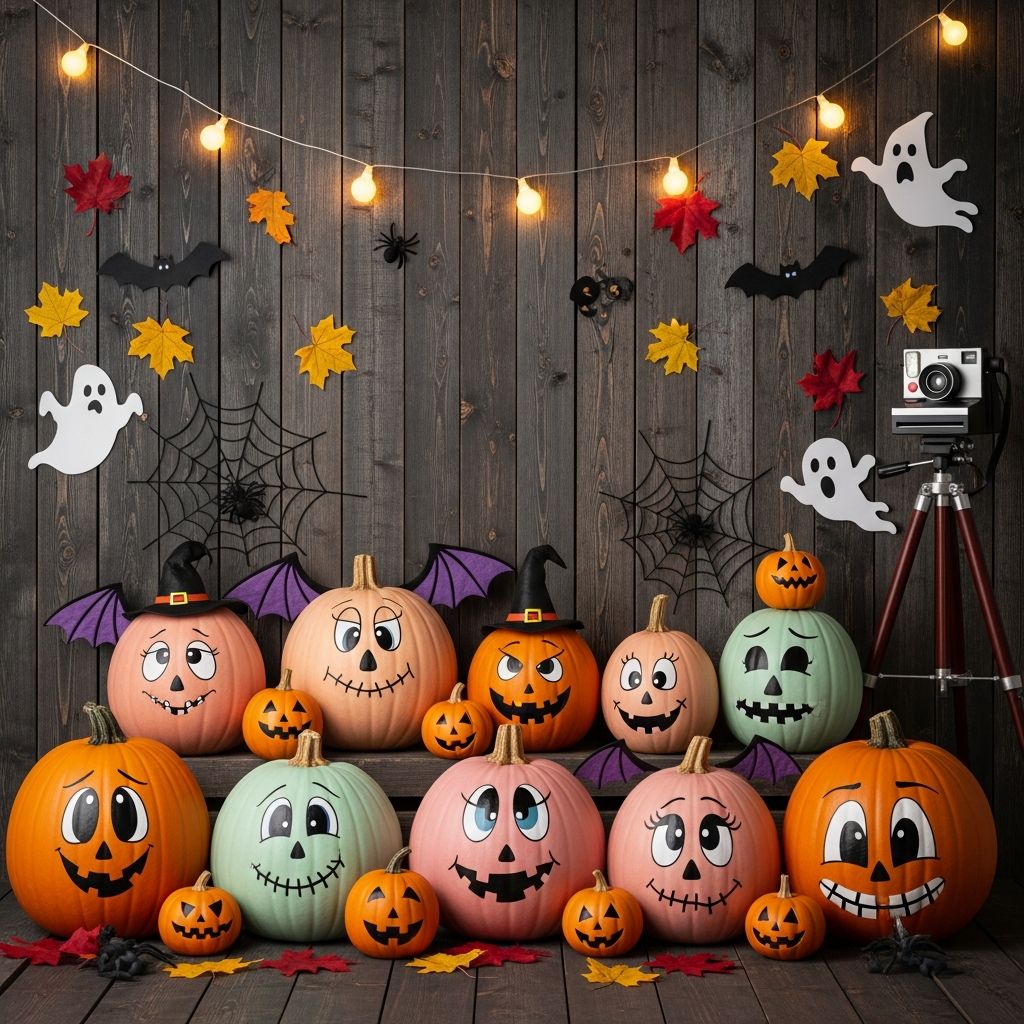
Transform an ordinary wall into a cozy, pumpkin-filled Halloween stage where kids, friends, and neighbors will love stopping to take photos. This guide walks through a complete, original approach to planning and crafting a pumpkin photo wall backdrop that suits any home, budget, or party style.
Why Create a Pumpkin Photo Wall?
A dedicated photo wall instantly turns simple Halloween decorations into an experience. Instead of random decor scattered around the room, a focused pumpkin backdrop creates a natural place for guests to gather, pose, and capture the night.
- It anchors your party and gives guests a clear “photo spot” without needing fancy equipment.
- It can double as a background for games, costume contests, and candy stations.
- It is flexible enough to fit in a hallway, living room, porch, or even a small apartment corner.
Planning Your Pumpkin Photo Wall
Before pulling out tape and scissors, take a few minutes to plan the look and logistics of your photo wall. A little planning saves time and helps you avoid last-minute decorating stress.
Choose a Location
Pick a flat area with enough room for people to stand several steps in front of the backdrop. Consider whether you want the wall indoors for controlled lighting or outside to greet trick-or-treaters.
- Indoor options: behind the sofa, along a hallway, or on a blank dining room wall.
- Outdoor options: garage door, porch wall, fence panel, or side of the house.
- Make sure there are no tripping hazards like cords or loose rugs where guests will stand.
Pick a Style and Color Palette
A pumpkin wall can be spooky, cute, rustic, or bold depending on your color and decor choices. Decide on a style early to keep every detail consistent.
- Classic: bright orange pumpkins, black accents, and simple jack-o’-lantern faces.
- Pastel: soft peach, cream, and light purple pumpkins for a whimsical twist.
- Rustic: muted oranges, burlap, twine, kraft paper, and wooden textures.
- Glow: neon orange, green, and purple details with LED lights or glow sticks.
Materials and Tools Checklist
You can build a pumpkin-themed backdrop with materials from craft stores, dollar shops, or items you already have at home. Mix and match based on your style, space, and budget.
| Category | Options | Notes |
|---|---|---|
| Base surface | Butcher paper, kraft paper roll, fabric sheet, plastic tablecloth, poster boards | Choose a neutral or themed color that covers the whole wall area. |
| Pumpkin shapes | Colored paper cutouts, foam sheets, cardboard, cardstock, artificial pumpkins | Vary sizes for depth; mix solid pumpkins with jack-o’-lantern faces. |
| Adhesives | Painter’s tape, removable mounting strips, glue dots, string or twine | Use removable options on painted walls to avoid damage. |
| Details | Black, white, and yellow paper, markers, felt, ribbons, stickers | For faces, stems, leaves, stars, spiderwebs, or lettering. |
| Lighting | Fairy lights, LED candles, clamp lights, paper lanterns | Soft, even lighting makes photos clearer and more flattering. |
| Photo props | Paper masks, witch hats, small signs, capes, pumpkin buckets | Store props in a basket nearby so guests can grab and pose. |
Step-by-Step: Building the Backdrop Base
The base of your photo wall is like the canvas for your pumpkin scene. Create a smooth, solid background before adding any pumpkins or details.
1. Measure and Mark the Space
Use measuring tape to define a rectangle or square that fits your wall and camera frame. Mark the corners lightly with painter’s tape so you know where your backdrop should begin and end.
- Allow extra width on each side so group photos do not show plain wall edges.
- Height should generally extend from just above head level down to about knee level.
2. Attach the Background Layer
Cover the marked area with your chosen base material. Large rolls of paper or fabric make this process easier, but you can also patch together several panels if needed.
- Overlap seams slightly and secure from the back or top edges to keep them from gaping.
- Smooth out wrinkles as you go so shadows don’t appear in photos.
- If outdoors, secure bottom edges so wind does not lift the backdrop.
Designing the Pumpkin Layout
Next, decide how your pumpkins will appear on the wall: scattered, stacked like a patch, or arranged in patterns. This design step makes decorating faster and more intentional.
Plan Your Pumpkin Shapes
Sketch a quick layout on scrap paper before cutting anything. Think about whether you want one giant central pumpkin, many medium pumpkins, or a blend of sizes.
- Use circles and ovals to indicate where pumpkins will go and how they overlap.
- Add a few pumpkins at different heights to make the background feel full and layered.
Create Pumpkin Cutouts
Cut pumpkins from paper, cardboard, or foam sheets in a variety of sizes. Imperfect shapes add charm and look more handmade, which is great for kids’ parties.
- Trace mixing bowls or plates to get smooth curves if freehand drawing feels tricky.
- For stems, cut rectangles or small trapezoids from brown or green paper.
- Glue stems to the backs of pumpkins so they peek over the top edge.
Adding Personality: Jack-o’-Lantern Faces and Details
This is the step where your wall transforms from a simple fall scene into a Halloween feature. Add faces, leaves, and small details that match the mood you want.
Face Designs for All Ages
Mix playful, silly, and slightly spooky faces to give each pumpkin its own personality. Keep sharp angles minimal if decorating for very young children.
- Use black paper or felt for eyes, noses, and mouths; attach with glue dots or tape.
- Draw pupils, teeth, and highlights with white paint pens or chalk markers.
- Create a few face-free pumpkins as a calm backdrop between character pumpkins.
Decorative Extras Around the Pumpkins
Surround your pumpkins with simple shapes and seasonal icons that don’t overwhelm the scene. This keeps the focus on guests in photos while still feeling festive.
- Add paper leaves, vines, and stars in coordinating colors.
- Hang a small banner above the backdrop with a phrase like “Pumpkin Patch” or “Spooky Smiles” using large, easy-to-read letters.
- Use a separate color (like green or purple) sparingly to avoid visual clutter.
Layering and Depth: Making the Wall Photo-Ready
Layered elements give your backdrop a more polished, three-dimensional effect. Guests will appear framed by the design rather than standing in front of a flat wall.
Overlap and Stagger Elements
Place some pumpkins slightly overlapping others to suggest a pile or patch. Combine flat wall decor with a few small props on the floor for natural depth.
- Lean a couple of real or artificial pumpkins at the base of the wall.
- Add a hay bale, crate, or low stool where kids can sit or stand.
- Hang a few cutouts slightly away from the wall using string for a floating look.
Use Lighting to Create Dimension
Good lighting makes every photo clearer and can emphasize the shapes and colors of the backdrop. Even a simple string of lights can make the pumpkin wall sparkle.
- Wrap fairy lights around the outer frame of the backdrop or along a banner.
- Place LED candles safely on the floor or in lanterns near the base.
- Avoid harsh, single overhead lights that cast strong shadows on faces.
Kid-Friendly Crafting and Involvement
Letting kids help build the photo wall turns the project into a memory before the party even starts. Assign age-appropriate tasks so everyone feels involved and safe.
- For younger kids: coloring pumpkin shapes, placing stickers, helping choose face expressions.
- For older kids: tracing, cutting, gluing faces, and arranging pumpkins on the wall.
- Give each child a “signature pumpkin” with their name or initials hidden in the design.
Styling the Photo Zone
Once the wall itself looks complete, set up the area in front to make taking photos easy and fun. Small styling touches can help even shy guests feel comfortable posing.
Arrange Props and Seating
Keep props simple and sturdy so they survive a full evening of use. Arrange them where kids can reach them without climbing or stretching too far.
- Use a basket or wooden crate to hold masks, hats, and small signs.
- Add one or two stools, a bench, or a small chair for seated pictures.
- Leave enough open floor space for group photos and costumes with large wings or skirts.
Guide Guests with Simple Cues
Even with a great backdrop, some guests may not realize it is meant for photos. Clear, friendly cues encourage people to step in and pose.
- Hang a small sign nearby that says something like “Photo Spot” or “Strike a Pumpkin Pose”.
- Keep a phone tripod or simple stand close by so people can take group shots hands-free.
- Offer a few suggested poses to kids: “Show off your scariest face,” “Hold your pumpkin bucket,” or “Point at the silliest jack-o’-lantern.”
Safety and Practical Tips
A photo wall is meant to be enjoyed, touched, and explored, especially by children. Build it with durability and safety in mind so you can relax once guests arrive.
- Use removable adhesives on painted walls to avoid peeling paint later.
- Keep cords taped down and lights firmly attached or placed out of reach.
- Avoid real candles near paper or fabric; choose flameless LED candles instead.
- Test the backdrop by gently tugging a few pieces to check that everything is secure.
Ideas to Customize Your Pumpkins
You can easily adapt this pumpkin wall to suit different themes or age groups. Use these ideas as starting points and then tweak them to match your family’s traditions and party plans.
- Storybook pumpkins: Decorate a few pumpkins as friendly characters with big eyes and soft smiles.
- Monster mash: Give pumpkins horns, mismatched eyes, and wiggly mouths for a silly monster look.
- Glow-in-the-dark: Use neon paper, reflective tape, or glow paint that reacts under blacklight.
- Photo countdown: Number a row of pumpkins to create a “countdown to Halloween” that doubles as decor.
Cleaning Up and Reusing Pieces
After Halloween, you can save parts of your backdrop for next year. Reusable items help stretch your budget and cut down on waste.
- Carefully peel off pumpkin cutouts and store them flat between cardboard sheets.
- Save neutral pieces, such as plain pumpkins and leaves, for general fall decor.
- Wind up lights and store them in labeled bags or boxes so you can find them for other holidays.
Frequently Asked Questions
How much time does it take to make a pumpkin photo wall?
For a basic setup with a paper backdrop and several pumpkin cutouts, expect to spend around two to three hours, including cutting, arranging, and taping. If you add lighting, banners, and props, allow a little more time, especially if kids are helping.
Can this be done in a small space or apartment?
Yes. A pumpkin photo wall can be scaled down to fit a narrow hallway, the back of a door, or a small corner wall. Focus on a single column of pumpkins or one oversized pumpkin centerpiece instead of a wide mural.
What if I do not have much crafting experience?
This project is very forgiving. Simple shapes and bold colors look great on camera, even if the edges are not perfect. Using templates like bowls and lids for circles and pre-cut letters or stickers can make the process even easier.
Is it safe to place real pumpkins near the backdrop?
Real pumpkins are fine if they are stable and placed on flat surfaces such as crates, steps, or sturdy boxes. Check occasionally during the event to ensure none have rolled or become trip hazards, and keep them away from electrical cords and plugs.
How can I make the backdrop last more than one night?
Choose thicker materials like cardstock or foam sheets for pumpkins, avoid areas where the backdrop will be brushed constantly, and reinforce corners with extra tape. If possible, keep the setup indoors or under cover so wind and moisture do not damage it.
Final Touches for an Unforgettable Pumpkin Wall
Once your background, pumpkins, and props are in place, step back and take a few test photos from different angles. Adjust any dark spots, crooked pieces, or empty spaces, then relax and enjoy watching your guests transform your pumpkin wall into a collection of Halloween memories.