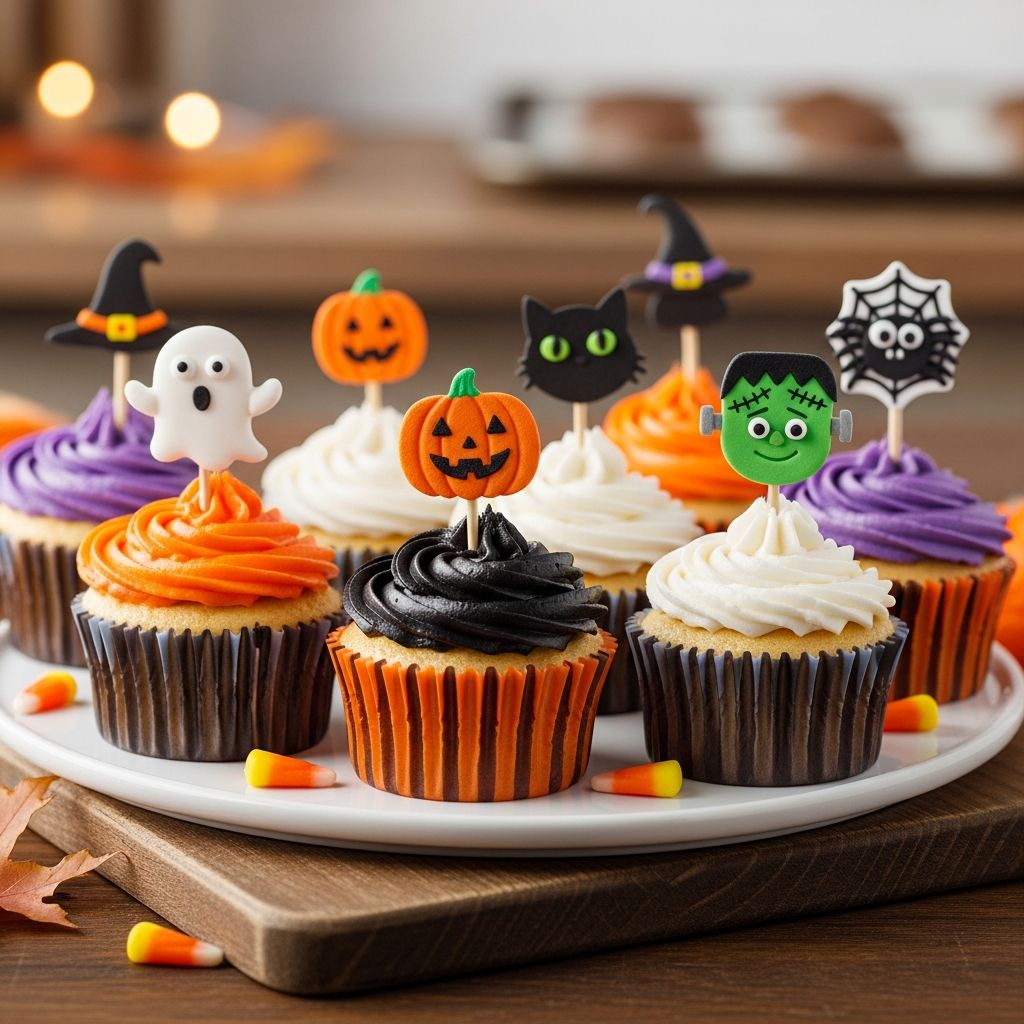
If cupcakes are on your Halloween party menu, a set of cute toppers can instantly take them from everyday treats to spooky-sweet showstoppers. This guide walks you through designing, printing, assembling, and displaying your own Halloween cupcake toppers using simple supplies and easy techniques.
Why Cupcake Toppers Are Perfect for Halloween
Halloween is one of the easiest holidays to decorate for because simple images—like pumpkins, ghosts, and bats—are instantly recognizable and look delightful perched on top of cupcakes. Toppers let you add big personality without needing advanced piping skills or complex baking tricks.
Printable or DIY toppers are also budget-friendly, especially if you are hosting a classroom celebration, neighborhood trunk-or-treat, or family party and need to decorate dozens of treats at once. By creating your own, you can match your party colors, personalize messages, and reuse your designs year after year.
Planning Your Toppers: Theme, Style, and Color
Before you grab scissors or turn on your printer, take a moment to plan the look and feel of your toppers. A little planning up front will help every cupcake look coordinated and intentional, even if you mix and match designs.
- Choose a main theme: Classic cute Halloween (pumpkins and smiling ghosts), friendly monsters, witchy details, or vintage black-and-orange are all easy themes to pull together.
- Pick 2–3 main colors: Traditional orange and black always work, but you can soften things with mint, lavender, or teal for a more whimsical approach.
- Decide on a style: Do you want simple silhouettes, cartoon faces, or hand-drawn doodles? Keeping the style consistent makes mixed designs look like they belong together.
Once you settle on a direction, sketch a quick list of topper designs that fit your theme so you have a creative roadmap.
Clever Halloween Topper Design Ideas
Your toppers can be as simple or as detailed as you like. Focus on clear shapes, bold lines, and expressive faces so they still read well from across a party table.
Classic Icons With a Cute Twist
- Smiling pumpkins: Round pumpkins with oversized eyes and tiny triangle noses, drawn in soft orange and topped with curly green vines.
- Friendly ghosts: Simple white ghost shapes with rosy cheeks and little arms lifted like they are waving hello instead of trying to scare anyone.
- Mini bats: Chubby bats with rounded wings and sweet grins; try them in charcoal gray or deep purple instead of harsh black.
- Sweet candy pieces: Wrapped candies and lollipops in pastel orange, purple, and lime green for a candy-shop feel.
Character Toppers Kids Will Love
- Gentle monsters: One-eyed or three-eyed creatures with fuzzy edges, sprinkled freckles, and goofy smiles.
- Sleepy vampires: Cute little vampires with tiny fangs, a bowtie, and a cape that looks more adorable than eerie.
- Kawaii skeletons: Cartoon skulls with heart-shaped eyes and tiny bow accessories in your party color.
- Bookish witches: Witches wearing glasses, reading spell books, or stirring hot cocoa instead of potions.
Text-Based and Banner Toppers
Not every topper needs a face or character. Short phrases can quickly communicate your party vibe.
- Use phrases like “Boo!”, “Trick or Treat”, “Too Cute to Spook”, or “Monster Munch”.
- Combine small text circles with character toppers so guests see a mix of images and words on the dessert table.
Supplies You Will Need
Most of what you need for Halloween cupcake toppers is inexpensive and easy to find at craft stores or online. Start with a basic kit, then customize the details depending on whether you prefer printed or hand-drawn toppers.
| Item | Why You Need It | Tips |
|---|---|---|
| Cardstock (white or colored) | Provides a sturdy base so toppers do not flop over. | Choose 65–80 lb weight for inkjet printers; avoid glossy if coloring by hand. |
| Printer or markers | Allows you to create designs either digitally or by hand. | Use pigment-based inks or permanent markers so colors do not smudge. |
| Scissors or circle punch | Used to cut out your topper shapes. | A 2 inch to 2.5 inch circle punch speeds up the cutting process. |
| Food-safe sticks | Secures toppers into the cupcake frosting. | Lollipop sticks, bamboo skewers (trimmed), or decorative paper straws work well. |
| Adhesive | Holds the stick between layers of cardstock. | Use double-sided tape or a glue runner to avoid wrinkling the paper. |
| Optional embellishments | Add texture and sparkle. | Try glitter glue, small sequins, or washi tape borders for extra flair. |
Designing and Printing Your Toppers
If you enjoy using design software, you can create your toppers on a computer and print them on cardstock. If not, simple hand-drawn designs work beautifully and add a charming, homemade touch.
Digital Design Tips
- Use any program that supports shapes and text, such as a free online design tool or basic word-processing software.
- Create circles or other shapes about 2 inches wide so they stand out above the frosting without overwhelming the cupcake.
- Set your document to high print quality and test one sheet on regular paper before using cardstock.
Hand-Drawn Toppers
- Lightly sketch your designs in pencil on a sheet of cardstock, spacing them out so there is room to cut around each shape.
- Outline with a black pen or fineliner, then color in using markers or colored pencils for rich color.
- Trace around small plates, jar lids, or cookie cutters to keep your shapes consistent.
Whether you print or draw, aim to fit as many toppers as possible on each page to conserve cardstock, especially if you are decorating for a large group.
Cutting, Layering, and Assembling
Once your designs are on cardstock, it is time to turn them into sturdy toppers. This is a great step to involve older kids or friends, especially if you have a long guest list.
Step-by-Step Assembly
- Cut out shapes: Use scissors for detailed shapes or a punch for circles. Do your best to keep the edges smooth; small imperfections will disappear once they are on cupcakes.
- Prepare backing pieces: For double-sided toppers, cut blank circles or matching shapes to glue to the back of each design.
- Attach sticks: Place a dab of adhesive on the back of the design, lay the stick in the glue, and press the backing piece over it to sandwich the stick.
- Let them dry: If using liquid glue, allow enough drying time so sticks do not shift when you insert them into the cupcakes.
Finishing Touches
- Add glitter glue to pumpkin stems, bat wings, or ghost cheeks for sparkle.
- Use a white gel pen to add tiny highlights to eyes so characters feel lively and expressive.
- Outline shapes with a slightly darker color to give the illusion of depth and help them stand out in photos.
Matching Frosting and Cupcakes to Your Toppers
The cupcakes themselves can be simple; the toppers and frosting colors do most of the visual work. Choose flavors you know your guests enjoy, then coordinate the frosting with your topper designs.
- Neutral base, colorful topper: Vanilla or chocolate frosting in white, cream, or cocoa allows bright toppers to pop.
- Color-blocked cupcakes: Frost half your batch in orange and half in purple, then pair pumpkins with the purple frosting and friendly ghosts with the orange.
- Textured frosting: Use a star tip to pipe swirls or rosettes; the extra height helps toppers sit upright and gives more visual drama.
Sprinkles, crushed cookies, or a drizzle of colored ganache can echo the shapes or colors in your toppers, tying the whole display together.
Display Ideas for a Wow-Worth Dessert Table
How you present your cupcakes can be just as important as how you decorate them. With a few simple props, you can turn your dessert table into the centerpiece of your Halloween celebration.
- Use tiered stands to create height and make every cupcake visible.
- Place black or patterned paper under your cupcake stands to frame the display.
- Cluster cupcakes by design—ghosts on one tier, pumpkins on another—for a strong visual impact.
- Add a small sign or chalkboard with a fun phrase like “Cupcake Cauldron” or “Monster Bakery”.
If you are serving outdoors, consider using clear covers or large glass jars to protect the cupcakes while still showing off the toppers.
Kid-Friendly Crafting and Safety Tips
Decorating with toppers is a wonderful activity to share with children, whether you are hosting a pre-party craft session or decorating as a family on a quiet afternoon.
- Let younger kids color pre-drawn designs while adults handle cutting and hot glue.
- Choose rounded sticks or cut sharp skewers so they have blunt ends before inserting them into frosting.
- Keep toppers out of reach of toddlers until they are placed securely in cupcakess, especially if you use small sequins or embellishments.
Encourage kids to sign the back of their creations or add their initials so they can proudly point out which toppers they made at the party.
Time-Saving Strategies for Busy Hosts
If you are juggling costumes, party games, and trick-or-treat plans, you might not have hours to craft detailed toppers. Fortunately, there are plenty of shortcuts that still look charming and intentional.
- Limit yourself to two designs, such as pumpkins and ghosts, to speed up cutting and assembly.
- Print designs in black and white and let kids or guests color them in with markers at the party.
- Use colored cardstock and simple silhouettes—no intricate faces—to keep the process fast.
- Prepare toppers a week in advance and store them flat between sheets of tissue paper.
Even if your cupcakes start from a bakery box or mix, handmade toppers make them feel thoughtful and special.
Frequently Asked Questions
How far in advance can I make Halloween cupcake toppers?
Paper toppers made from cardstock can typically be made up to two weeks in advance, as long as you keep them in a dry place away from direct sunlight to prevent fading. Store them in a box or large envelope so they do not bend or collect dust before the party.
What is the best size for cupcake toppers?
Most standard cupcakes look balanced with toppers that are about 2 to 2.5 inches wide. Oversized designs may tip over or look out of proportion, while very small toppers can disappear in tall swirls of frosting.
Do I need special food-safe materials?
The paper portion of the topper should not touch the cake directly, but the stick does. Lollipop sticks and unprinted paper straws are good options because they are designed to be used with food and are smooth, without splinters.
Can I reuse Halloween cupcake toppers?
If the sticks and paper stay clean and dry, you can gently wipe the sticks, remove any frosting residue, and store the toppers flat for next year. Avoid reusing toppers that have been heavily splattered with frosting or damaged during serving.
What if I do not own a printer?
You can still create charming toppers using colored cardstock, markers, and simple shapes traced from household items. Hand-lettered words, doodled ghosts, and bat silhouettes are all easy to draw and give your party a more personal touch.
With a stack of cardstock, a handful of markers, and a bit of imagination, you can craft Halloween cupcake toppers that feel completely unique to your celebration. Whether you love friendly ghosts, silly monsters, or magical pumpkins, these little decorations will make every cupcake on your table look festive, photogenic, and ready for a night of sweet, slightly spooky fun.