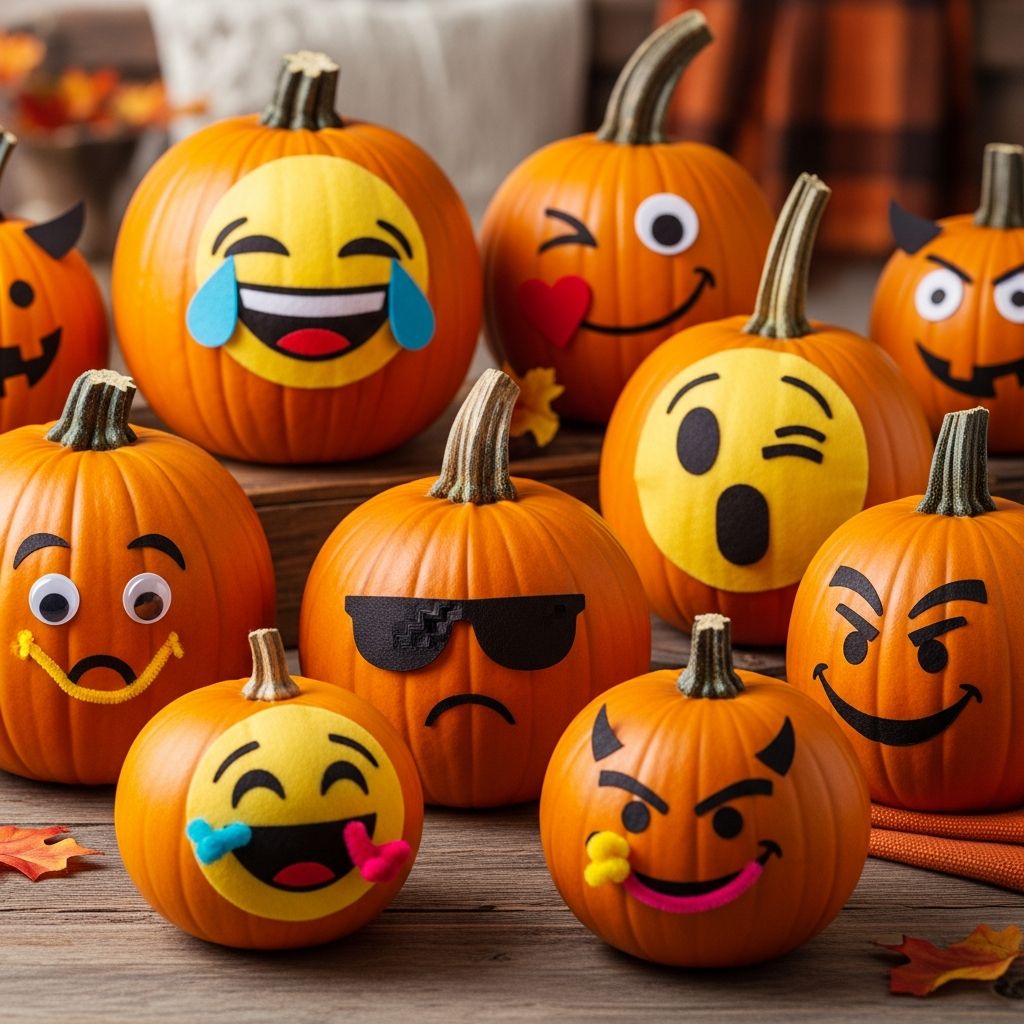
Emoji pumpkins are a fun way to blend Halloween decorating with the visual language everyone already uses on their phones. Instead of carving, you’ll turn small pumpkins into bright yellow emoji faces using paint, imagination, and a few simple tools.
Why Emoji Pumpkins Are Perfect for Families
Traditional pumpkin carving can be messy, time-consuming, and not always ideal for young kids. A painted emoji pumpkin project keeps the fun of decorating while avoiding sharp tools and complicated carving patterns. It also lets everyone choose faces that match their personalities—silly, spooky, loving, or completely unique.
Because emojis are simple graphic shapes, they translate beautifully onto small, round pumpkins. Bright colors and playful expressions make these pumpkins pop on front steps, party tables, or classroom displays, and they’re easy to customize for any age or skill level.
Planning Your Emoji Pumpkin Project
Before opening any paint bottles, take a few minutes to plan your emoji lineup. A little preparation will help the activity go smoothly, especially if you’re crafting with kids or a larger group.
- Decide how many pumpkins you want to decorate and where they will be displayed.
- Choose a mix of emojis—happy faces, spooky twists, or expressions that match each family member.
- Set up a protected workspace with plenty of room for drying pumpkins between paint layers.
- Gather reference images of emojis on a phone or printed sheet so everyone can see the details clearly.
Choosing the Right Pumpkins
The type and size of pumpkins you choose will affect how easy they are to paint and how your finished emojis look. Real and faux pumpkins each have advantages, so choose what fits your needs and budget.
| Type | Pros | Cons | Best For |
|---|---|---|---|
| Real mini pumpkins | Natural texture and charm; Inexpensive and widely available in fall; Biodegradable after the season. | Limited life span before they soften; Surface can be bumpy and irregular; Must be stored in a cool area to last longer. | Seasonal porch displays; Short-term classroom or party decor; One-time craft events. |
| Faux craft pumpkins | Reusable year after year; Often smoother surfaces for easier painting; Lightweight and easy to store. | Higher upfront cost than real pumpkins; May require a primer for best paint adhesion; Less “authentic” than real pumpkins. | Long-term decor collections; Families who decorate early in the season; Crafters who like to reuse projects. |
Look for pumpkins that are as round as possible with a stable base. Flatter spots on the front will make it easier to paint smooth circles, eyes, and mouths, especially for younger artists.
Supplies You Will Need
You don’t need specialized art tools to create impressive emoji pumpkins. Most of the necessary supplies are standard craft materials you may already have at home.
- Small pumpkins (real or faux), scrubbed and dried if real.
- Water-based, non-toxic acrylic craft paint in yellow, black, white, red, blue, brown, and pink.
- Paintbrushes in several sizes—one larger brush for background color and smaller brushes for details.
- Pencil or washable marker for sketching emoji faces before painting.
- Palette or disposable plate for mixing custom colors.
- Cups of water for rinsing brushes and paper towels or rags for blotting.
- Protective covering for your work surface such as newspaper, cardboard, or a plastic tablecloth.
- Optional: clear sealer (matte or gloss) if you want to protect your finished designs.
- Optional: painter’s tape or low-tack tape for masking off clean lines or geometric accents.
Step-by-Step: Painting a Classic Emoji Face
This basic process works for most round yellow emoji designs. Once you understand the core steps, you can adapt them for laughing, winking, or heart-eyes faces simply by changing the details.
- Prep the pumpkin.
Wipe the pumpkin with a damp cloth to remove dirt and let it dry fully. If the surface is very glossy, lightly scuff it with fine sandpaper or apply a thin layer of white paint or primer so the yellow color will appear brighter.
- Paint the yellow base.
Use a medium or large brush to cover the front and sides of the pumpkin with yellow paint. Allow the first coat to dry, then add a second (and possibly third) coat for a solid, even color with no orange showing through.
- Lightly sketch the face.
With a pencil, outline the eyes, mouth, and any special details such as hearts, tears, or tongues. Keep the lines light so they will disappear under the paint. Adjust shapes until the expression looks balanced and clear.
- Fill in the main features.
Use a small round brush and black or brown paint to fill in the eyes and mouth. Focus on clean curves and strong contrast so the face is easy to recognize from a distance.
- Add accent colors.
Paint hearts, tongues, cheeks, or tears in red, blue, pink, or white. Let each color dry before painting adjacent shapes to prevent smudging or muddy edges.
- Outline and refine.
Once the colors are dry, go back with a steady hand and outline key shapes using dark paint or a permanent marker. Crisp outlines sharpen the design and help the expression stand out in dim evening light.
- Seal and display.
If your pumpkins will be outside, apply a clear acrylic sealer to protect them from light moisture and scuffs. Place them in a cool, shaded area whenever possible so the colors stay vibrant all season.
Creative Emoji Variations to Try
Once you’ve painted one classic face, it’s easy to create an entire cast of pumpkin characters. Think about which emojis your family uses most often or which ones best capture Halloween vibes.
- Laughing with tears: Emphasize arched, gleeful eyes and large blue tear shapes angled from the corners for an over-the-top giggle.
- Heart eyes: Replace the eyes with bold red hearts and keep the mouth simple and content for a sweet, lovestruck pumpkin.
- Winking and tongue out: Paint one eye closed as a curved line, the other as a wide-open circle, and finish with a big grin and bright pink tongue.
- Spooky mash-ups: Combine ghostly white bodies, vampire teeth, or dramatic eyebrows with classic emoji expressions for a Halloween twist.
- Personalized faces: Change hair color, add glasses, or incorporate initials to create emoji portraits of family members or party guests.
Kid-Friendly Adaptations and Classroom Ideas
Emoji pumpkins are especially popular with kids because they instantly recognize the faces and understand the expressions. With a few adjustments, this project works well in classrooms, scout groups, or neighborhood gatherings.
- Pre-paint the pumpkins yellow so children can focus only on the facial features.
- Offer simple emoji templates printed on paper for kids who prefer tracing rather than drawing freehand.
- Use washable paint or markers for very young children and protect clothing with smocks or old T-shirts.
- Encourage kids to name their emoji pumpkins and write short stories about the characters.
- Display the finished pumpkins in a row and let classmates guess each emoji’s mood or message.
Displaying Your Emoji Pumpkin Gallery
The joy of this craft doesn’t end when the paint dries. Thoughtful display ideas help your emoji pumpkins become part of your overall Halloween decor theme rather than just random accents.
- Front step conversation: Arrange several pumpkins in a line so they look like they’re reacting to one another, from shocked to laughing to unimpressed.
- Candy table centerpiece: Cluster a group of emojis on a tray surrounded by wrapped treats for an instant party focal point.
- Message row: Pick emojis that tell a short “sentence” and put them in order along a mantel, shelf, or windowsill.
- Glow-up display: Place battery-operated tea lights nearby or use string lights behind the display to highlight the faces at night.
- Photo booth props: Set the pumpkin characters at different heights using boxes or crates and let guests pose with their favorites.
Safety and Clean-Up Tips
Even though this is a no-carve project, a few basic precautions will keep things low-stress and mess under control. Taking a moment to plan for clean-up makes the activity more enjoyable for everyone.
- Cover tables and floors near the workspace with newspaper or a plastic sheet.
- Use only non-toxic, water-based paints, especially when crafting with kids.
- Keep water cups and paints in the center of the table to prevent spills.
- Provide baby wipes or damp cloths for quick hand clean-up between colors.
- Let pumpkins dry completely before moving or stacking them to avoid smears and fingerprints.
Frequently Asked Questions
How long will painted emoji pumpkins last?
Real painted pumpkins typically last one to three weeks, depending on temperature, moisture, and whether the skin is intact. Keep them in a cool, shaded place and avoid direct rain to extend their life. Faux pumpkins, once painted, can be stored and reused for many Halloweens as long as they are kept dry and protected from crushing.
Do I need to carve or hollow out the pumpkins first?
No carving is required for this project. Leaving the pumpkins whole helps them last longer and keeps the craft safer for children. Because the focus is on surface painting, you simply clean the outside and then apply paint.
What kind of paint works best on pumpkin skin?
Water-based acrylic craft paint adheres well to pumpkin surfaces and offers bright, opaque coverage. It dries quickly, comes in many colors, and can be used with a brush or sponge applicator. For extra durability, especially outdoors, a clear sealer can be sprayed or brushed on after the design is fully dry.
Can I use markers instead of paint?
Permanent markers and paint markers can be useful for outlining features and drawing smaller details. For large areas like the yellow face, regular paint still tends to give a smoother, more even finish. If working with younger kids, you can skip paint entirely and let them decorate white or yellow faux pumpkins using washable markers.
How do I keep the yellow base coat from streaking?
Streaks often occur when the brush is too dry or the paint layer is too thin. Apply multiple thin coats rather than one thick coat, allowing each layer to dry before the next. Using a soft, flat brush and painting in consistent strokes around the pumpkin also helps create a smoother finish.
Final Thoughts on Emoji Pumpkin Crafting
Emoji pumpkins offer a playful, approachable way to celebrate Halloween for both kids and adults. With just a few supplies and a handful of expression ideas, you can create a colorful cast of characters that feels modern, familiar, and uniquely your own. This no-carve project is easy to adapt to different ages, spaces, and styles, making it an ideal tradition to revisit every autumn with fresh emoji faces and new stories to tell.