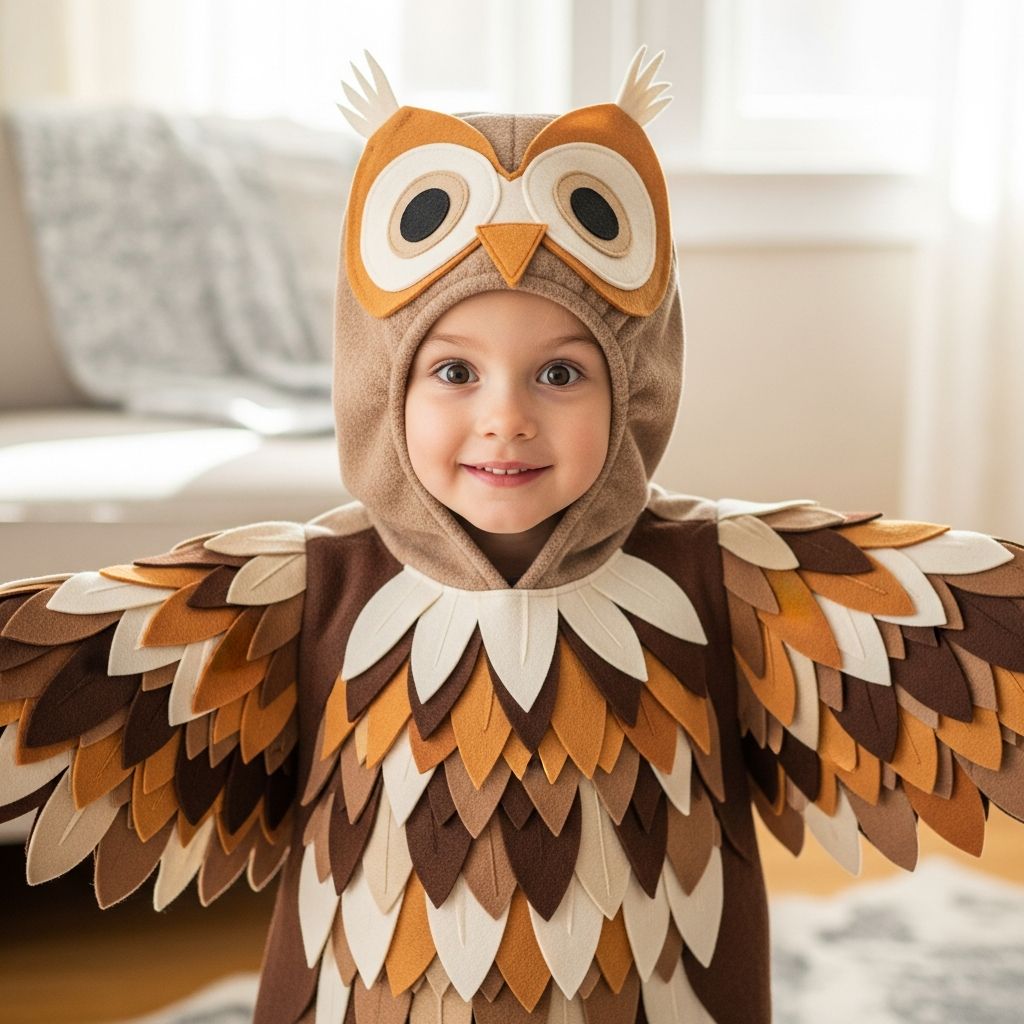
When your child announces at the last minute that they absolutely must be an owl, you do not need a sewing degree or a big budget. With a T-shirt, some fabric scraps, and a bit of cardboard, you can create a charming, wearable owl costume in an evening.
This guide walks you through an easy, flexible approach inspired by classic handmade costumes, but reorganized and simplified so you can adapt it to whatever time, tools, and supplies you already have at home.
Why Choose an Owl Costume?
Owls make fantastic kids’ costumes because they are instantly recognizable, cozy, and very forgiving of improvisation. You can lean into realistic browns and grays, or go wild with bright colors and patterns. It all still reads as “owl” thanks to a few key visual cues: layered feathers, big eyes, and a beak.
- Comfortable: Built on a T-shirt or sweatshirt, the costume wears like regular clothes.
- Layerable: You can add warm layers underneath for cold-weather trick-or-treating, which pediatric guidance recommends to prevent hypothermia in colder climates.
- Customizable: Works for toddlers up through older kids with minor size tweaks.
- Budget-friendly: Great way to use leftover fabric, felt, or old clothing.
Materials & Tools Checklist
You can sew this costume or make a mostly no-sew version using strong fabric glue. Adjust based on what you have.
Essential Base Pieces
- 1 dark-colored T-shirt or sweatshirt (ideally a bit loose)
- Leggings, pants, or tights in a matching or coordinating color
- Closed-toe shoes (safer than open-toe for trick-or-treating).
Feather & Wing Supplies
- Fabric or felt scraps (about 50–70 feather pieces for a child)
- Optional: an old pillowcase, sheet, or fleece throw for wings
- Fabric glue or hot glue gun (adult use only)
- OR thread and a sewing machine / needle for stitching
Mask & Eye Details
- Card stock or thin cardboard (for mask and beak)
- Elastic cord, ribbon, or an old headband to hold the mask
- Child-sized sunglasses (optional base for the mask)
- Markers, paint, or colored paper for decorating the face
Basic Tools
- Fabric scissors or sharp craft scissors
- Pencil, chalk, or washable fabric marker
- Ruler or small cup for tracing circles
- Safety pins or clips for testing placement
Planning Your Owl’s Look
Before you cut a single feather, decide on the overall style. This keeps the process fast and avoids redoing work.
| Style | Color Palette | Best For |
|---|---|---|
| Woodland Owl | Browns, grays, cream, dark green | Nature themes, forest parties |
| Snowy Owl | White, light gray, silver, a bit of black | Harry Potter group costumes, winter events |
| Rainbow Owl | Bright mixed colors | Preschool parties, playful birthdays |
| Night Sky Owl | Navy, black, star patterns, gold accents | Halloween night and cosmic themes |
Ask your child to help choose the owl type and colors. Involving kids in design decisions can increase their sense of ownership and creativity, which child development research often associates with positive emotional outcomes.
Step 1: Creating Simple Fabric Feathers
The “feathers” are just small leaf-shaped pieces of fabric. You can cut them by eye or make a quick template.
Make a Reusable Feather Template
- Cut a small oval from cardboard, about the size of two stacked bottle caps (roughly 2–3 cm wide).
- Trim one end into a gentle point to resemble a teardrop.
- Use this as your template, tracing around it onto fabric scraps.
Cutting Feathers Efficiently
- Fold fabric layers so you can cut several feathers at once.
- Alternate colors to get a mix that looks feathery when layered.
- Aim for 3–4 rows of feathers on the shirt, with 12–18 feathers per row depending on the size of the child.
Do not worry about perfect uniformity. Slightly different shapes and sizes make the costume look more like real plumage.
Step 2: Adding Feathers to the Shirt
Work from the bottom hem upward, overlapping the feathers like shingles.
Layout & Test Fit
- Lay the shirt flat on a table.
- Place a row of feathers along the bottom, points facing downward and slightly overlapping.
- Use safety pins or clips to hold the first row in place temporarily.
Attach with Sewing (Long-Lasting Option)
- Sew a straight line across the tops of the feathers, leaving the lower half loose.
- Repeat with the next row, overlapping the previous row by about half the feather height.
- Continue until you reach the chest area.
Attach with Fabric Glue (Fast No-Sew Option)
- Lift each feather and apply a narrow strip of fabric glue at the top edge.
- Press firmly and let the row set for a few minutes before starting the next.
- Follow the glue manufacturer’s instructions for drying time and ventilation.
Finish by arranging a final row as a rough “collar” of feathers near the neckline. Avoid covering the neck opening so the shirt remains easy to pull on and off.
Step 3: Quick Fabric Wings
Wings give the costume major impact but can be very simple.
Option A: Pillowcase or Sheet Wings
- Have your child stretch out their arms.
- Lay a pillowcase or rectangle of fabric behind them and mark armspan width and shoulder height.
- Trim the bottom edge into a gentle curve or scallops to suggest feathers.
- Attach the top corners of the wings to the shoulders of the shirt with stitching or strong safety pins.
- Add small loops (fabric strips, elastic, or ribbon) near the lower edges of the wings for the child’s wrists.
Option B: No-Sew Fleece Wings
- Fold a piece of fleece in half.
- Trace half a “cape” shape from neck to wrist and cut through both layers.
- Cut small slits for wrist loops and tie in short ribbon pieces.
- Attach the neck area to the shirt with a few stitches or clips so the wings stay centered.
If you are short on time, skip separate wings and rely on the feathered shirt alone. The costume will still read as an owl.
Step 4: Crafting an Owl Mask or Headpiece
Big eyes and a beak instantly signal “owl.” You can choose a flat mask or a soft headband-style piece.
Simple Flat Mask
- Draw a wide mask shape on card stock: two big eye circles and a pointed top center between them.
- Cut out the mask and the eye openings.
- Glue or tape smaller circles of colored paper or felt around the eyes to create layered “eye rings.”
- Cut a triangle of card or felt for the beak and glue it between the eyes, pointing downward.
- Punch holes at the sides and tie on elastic or ribbon to fit your child’s head.
Mask on Sunglasses (Great for Younger Kids)
- Cut the mask shape as above, but leave space for the sunglasses arms.
- Cut eye openings slightly larger than the sunglass lenses.
- Use tape to attach the mask to the front of sturdy plastic sunglasses.
- This keeps vision clear while still looking like an owl.
To promote safety, make sure the mask does not significantly obstruct peripheral vision, especially if your child will be near traffic or crossing streets at night.
Soft Headband Option
- Use a plain knit hat or soft headband as a base.
- Cut felt circles for eyes and a felt beak.
- Glue or stitch them onto the front so they sit above the child’s eyebrows.
- Optional: add two small “ear tufts” from triangles of felt at the top.
Step 5: Finishing Touches & Accessories
Small details can bring the owl personality to life.
- Claws: Use colored socks or mittens in yellow or brown to suggest talons.
- Tail Feathers: Add a few extra feathers to the back hem of the shirt or wings.
- Patterned Feathers: Mix in a few polka-dot or striped fabrics to hint at real owl markings.
- Glitter & Sparkle: A few sparkly feathers or sequins can make a “magical” owl for fantasy themes.
Practical Safety Tips for Kids’ Costumes
While making a costume, keep basic safety in mind so your child can enjoy wearing it comfortably and confidently.
- Flame safety: Avoid very loose, dangling fabrics near open flames such as candles or fire pits.
- Trip hazards: Keep feather rows and wings above ankle length to reduce tripping risk.
- Visibility: Add reflective tape or a light-colored layer to the back of the costume if your child will be outside at dusk or dark.
- Breathability: Choose soft, breathable base layers. Overheating can occur if kids wear thick costumes indoors for long periods.
- Secure fastenings: Make sure pins, clips, or glued pieces are firmly attached so they do not become choking hazards for young children.
Time-Saving Variations
If your deadline is very tight, simplify the process with these shortcuts.
- Only front feathers: Decorate just the front of the shirt that will be visible in photos.
- Printed base: Start with a shirt that already has a feather or bird pattern and add only a few extra rows.
- Paper feathers: Use construction paper for feathers if you are making a one-evening party costume.
- Hoodie owl: Skip wings entirely and just decorate a hoodie with feathers and a face on the hood.
Quick Troubleshooting Guide
| Issue | Likely Cause | Fast Fix |
|---|---|---|
| Feathers flop or fall off | Not enough glue or stitches only at the very edge | Reinforce the top of each feather with extra glue or a short stitch. |
| Neckline feels tight | Feathers placed too close to collar | Remove the innermost row and reattach slightly lower down. |
| Mask slips down | Elastic too loose or heavy decorations | Shorten elastic or switch to a headband or sunglasses base. |
| Child says it itches | Rough fabric or exposed glue against skin | Add a soft T-shirt layer underneath and trim any scratchy edges. |
Frequently Asked Questions (FAQs)
How long does this kids’ owl costume take to make?
For a basic version with front feathers and a simple mask, plan about 1–2 hours. Adding full wings and more detailed feathers might extend the project to 3 hours or more, depending on how much your child helps.
Can I make this costume entirely without sewing?
Yes. Use fabric glue or a low-temperature hot glue gun (handled by an adult) to attach feathers and wings. Just allow enough drying time so the glue fully cures before your child wears the costume.
What age range is this owl costume suitable for?
The method works for toddlers through older kids. For babies and toddlers, keep pieces larger and more securely attached, and avoid small detachable decorations that could become choking hazards.
What should my child wear under the costume in cold weather?
Dress your child in warm layers—thermal shirt and leggings or a light fleece—under the owl shirt and wings. Pediatric organizations emphasize layering and protecting extremities (hat, gloves, warm socks) for outdoor events in cool climates.
How do I wash the costume after Halloween?
If the feathers are sewn, most cotton shirts can be gently machine washed and air-dried. If heavily glued, spot-clean by hand and lay flat to dry. Always test a small area first to see how the materials react to water.
References
- Winter Weather: Staying Safe Outdoors — Centers for Disease Control and Prevention (CDC). 2023-01-10. https://www.cdc.gov/disasters/winter/duringstorm/outdoor-safety.html
- Winter Health & Safety Tips — American Academy of Pediatrics (AAP). 2022-12-15. https://www.healthychildren.org/English/safety-prevention/at-play/Pages/Winter-Sports-Safety.aspx
- Halloween Safety — American Academy of Pediatrics (AAP). 2022-10-18. https://www.healthychildren.org/English/safety-prevention/on-the-go/Pages/Halloween-Safety-Tips.aspx
- The Importance of Play in Promoting Healthy Child Development and Maintaining Strong Parent-Child Bonds — American Academy of Pediatrics. Pediatrics Journal. 2012-01-01. https://doi.org/10.1542/peds.2011-2953