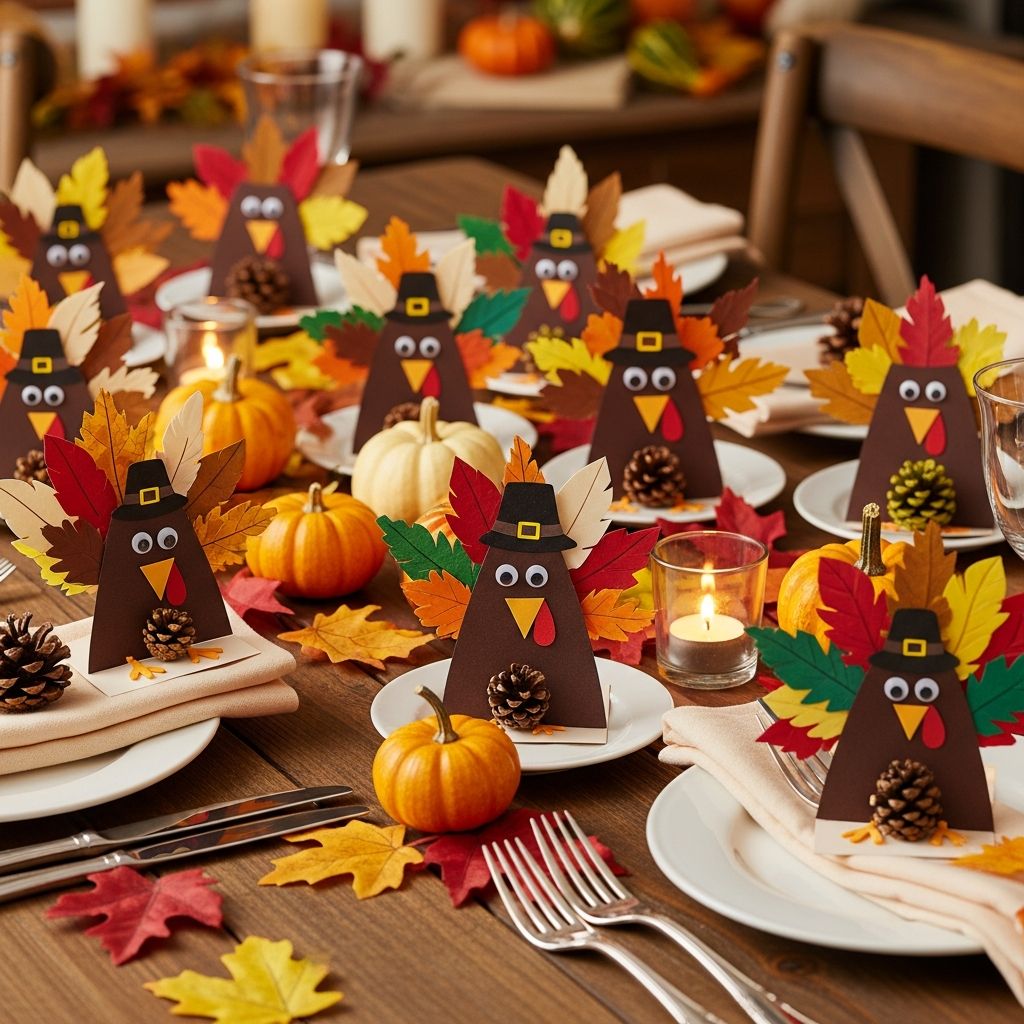
Handmade turkey place cards add warmth, color, and personality to your Thanksgiving table, transforming simple name tags into tiny works of art and treasured keepsakes.
Why Turkey Place Cards Are Worth the Effort
Place cards do much more than tell guests where to sit; they signal that each person is expected, welcomed, and celebrated. When those cards look like cheerful turkeys, they also add a playful touch that instantly makes the table feel more relaxed and inviting.
Whether you are hosting a formal dinner or a casual potluck, custom turkey place cards can:
- Set the tone for the meal with color and creativity.
- Occupy kids with a meaningful pre-dinner activity.
- Double as small gifts guests can take home as mementos.
Planning Your Turkey Place Card Project
Before you reach for scissors and glue, spend a few minutes thinking through your design so the craft fits your timeline, budget, and table style. This planning step helps you avoid last-minute stress on a busy holiday.
Consider the following questions as you plan:
- Will these be quick, kid-made turkeys or more polished, adult-crafted decorations?
- Do you prefer bright, playful colors or a muted, rustic palette that matches your existing decor?
- How many guests are coming, and how much time do you realistically have?
Recommended Supplies
This project is flexible, so you can adapt the materials to whatever you already have in your craft bin. The list below shows one easy mix-and-match set of supplies.
- Cardstock or heavy construction paper in brown, orange, red, yellow, and accent colors.
- Fine-tip markers or gel pens for names and details.
- Glue stick or tacky glue; double-sided tape for quick assembly.
- Scissors; optional craft punches for circles or scalloped shapes.
- Googly eyes, buttons, or drawn eyes for facial expressions.
- Optional extras: patterned scrapbook paper, twine, glitter pens, or tiny clothespins.
| Style | Key Materials | Best For |
|---|---|---|
| Colorful & playful | Bright cardstock, googly eyes, markers | Kids’ tables and casual gatherings |
| Rustic & natural | Kraft paper, twine, muted tones | Farmhouse or nature-inspired decor |
| Minimal & modern | Neutral cardstock, simple line drawings | Contemporary place settings |
Step-by-Step: Classic Standing Turkey Place Card
This version stands on its own and features a round turkey body with layered paper feathers in back. It is sturdy enough for curious kids to handle yet simple enough to complete in batches for a large table.
1. Create the Base Card
The base gives your turkey somewhere to stand and holds the guest’s name. Think of it like a tiny folded tent.
- Cut a rectangle of cardstock approximately 4 inches by 6 inches.
- Fold it in half to make a tent shape, so the folded front is about 4 inches wide and 3 inches high.
- Decide whether the turkey will be centered or slightly off to the side to leave more room for the name.
2. Assemble the Turkey Body
The body is the focal point, so choose a brown or patterned paper that contrasts nicely with your base card color.
- Cut a circle about 2 inches in diameter for the body and a smaller circle for the head.
- Glue the head slightly overlapping the top of the body.
- Add two eyes: draw them on, stick on googly eyes, or use tiny punched circles.
3. Add Beak, Wattle, and Feet
These tiny details bring the turkey’s personality to life and make each place card feel unique.
- Cut a small orange triangle and glue it just below the eyes to form the beak.
- Cut a red teardrop or squiggle shape and glue it alongside the beak as the wattle.
- Draw or glue on simple stick-like orange feet near the bottom of the body.
4. Layer the Feathers
Paper feathers are the most eye-catching part of the project. Varying colors and heights creates a sense of movement and fullness.
- Cut several feather shapes from colored paper: you can use simple long ovals, teardrops, or slightly pointed leaf shapes.
- Arrange them behind the turkey body in a fan shape before gluing to check spacing and color distribution.
- Glue the feathers to the back of the body, then glue the entire turkey to the folded card base.
5. Write the Guest’s Name
The final step turns your turkey into a true place card and can be as formal or playful as you like.
- Use a fine-tip pen or brush marker for a clean line.
- Write the guest’s name beneath or beside the turkey, leaving enough white space around it to keep it legible.
- Optional: add a short message like “So thankful for you” in smaller letters to make it extra special.
Kid-Friendly Turkey Place Card Variations
If you are crafting with children, choose versions that emphasize stamping, gluing, or sticking rather than precise cutting. Imperfect lines and smudges only add to the charm here.
Below are three playful options that keep little hands busy while adults finish cooking or setting the table.
Painted Thumbprint Feathers
For this version, fingerprints become feathers in a simple semi-circle around a central turkey body. Each child’s unique prints become part of the design, turning the place cards into mini keepsakes.
- Have kids dip thumbs in washable paint and press along the top half of the card to form colorful feather rows.
- Once dry, adults or older kids can add a simple brown circle for the body and draw in eyes, beak, and feet.
- Write the guest’s name underneath, and note the artist’s name and year on the back.
Sticker and Shape Turkeys
When time is short, pre-cut shapes and stickers turn this craft into an easy, mostly mess-free activity.
- Pre-punch circles, triangles, and feathers; place them in small bowls at the craft area.
- Provide adhesive dots or glue sticks so children can assemble their own turkey faces and feather fans.
- Offer letter stickers so younger children can help spell out names with guidance.
Collage Turkeys with Scrap Paper
This variation makes great use of leftover wrapping paper, magazine pages, and old craft scraps. The result is a patchwork of colors and textures that looks surprisingly sophisticated.
- Cut body and feather shapes loosely from different patterned scraps; don’t worry about perfection.
- Encourage kids to create bold color combinations and overlapping layers.
- Seal the finished card with a light layer of glue stick to hold any loose edges down.
Elevated Ideas for Grown-Up Crafters
If your style leans more refined than silly, you can adapt the same basic turkey concept with subtle changes in color, texture, and lettering. A few thoughtful choices make your place cards feel custom and polished.
Muted Color Palettes
Instead of primary colors, try layering feathers in soft golds, deep burgundies, warm creams, and slate blues. These shades pair smoothly with linen tablecloths and classic dinnerware.
Metallic or pearlescent cardstock can add a hint of shine without overwhelming the table, especially when used sparingly for just one or two accent feathers.
Hand-Lettered Names
Even simple faux calligraphy can make your place cards look professionally designed. Practice a few names on scrap paper first to decide on spacing and style.
- Use a brush pen or fine liner to thicken the downstrokes of each letter.
- Keep the turkey design relatively simple so the lettering remains the star.
- Stick to black, deep brown, or a single accent color for a cohesive look.
Textured Layers and Details
Slightly raised elements add depth and shadow that make each turkey feel three-dimensional. This can be as simple as using foam tape to attach the head or a special feather.
- Add a strip of burlap, lace, or ribbon behind the turkey for a layered effect.
- Use a white gel pen to add tiny highlight dots to the eyes or feather edges.
- Finish with a small, subtle sparkle using metallic ink or tiny flat sequins.
Displaying Your Turkey Place Cards
How you arrange the place cards on the table can be as impactful as the design itself. A thoughtful layout draws attention to your work without cluttering the dining area.
Placement Options
- On top of plates: Stand the turkey place card centered on the dinner plate or salad plate for maximum visibility as guests arrive.
- In front of plates: Place the card just above the dinner knife, where it will not interfere with glassware.
- On napkins: Position the card on a folded napkin, using the color beneath it as a frame.
Coordinating with Other Decor
To keep the table harmonious, echo colors from your turkeys elsewhere: in napkins, candles, or a simple runner. Repetition ties everything together without requiring a perfectly matching set.
If your centerpiece is large or elaborate, balance it with simpler place cards, and vice versa; this way, each element has room to shine.
Turning Place Cards into Keepsakes
When the meal is over, many guests will want to slip their turkey into a bag or coat pocket. A few extra touches can help the cards hold up to travel and become sentimental reminders of the gathering.
- Use heavier cardstock or an extra backing layer to make the card more durable.
- Write a short note on the back about something you appreciate about that guest.
- Date the card so it becomes part of a yearly collection, especially for children or grandparents.
Frequently Asked Questions About Turkey Place Cards
How far in advance can these be made?
Paper turkey place cards can easily be made one to two weeks before Thanksgiving as long as they are stored flat and away from direct sunlight and moisture. If you are using glue that stays slightly tacky, layer sheets of wax paper between cards to prevent sticking.
What if I am short on time?
When you need a quick solution, simplify the design to just a drawn turkey face on a folded card with colored feather shapes or even doodled feathers behind it. You can also prepare plain folded cards in advance and add minimal turkey details and names the night before.
Can these be adapted for a kids-only table?
Yes. For a children’s table, focus on sturdy construction and interactive elements: let kids color their own turkeys, choose their feather colors, or add stickers. You can even leave the name area blank so children can trade and decorate cards for each other during dessert.
Are there non-paper options?
Absolutely. You can translate the same basic turkey shapes into felt, foam, or lightweight wood cutouts if you prefer longer-lasting place cards. Attach a small clip or stand to secure the name tag, and reuse the same turkeys year after year by swapping out the paper name strips.
What if someone’s name is very long?
For longer names, either reduce the font size slightly or break the name into two lines, centering it under the turkey. Another option is to place the turkey on one side of the card and the name on the other, giving yourself more horizontal space to write clearly.
Final Touches for a Memorable Table
Thoughtfully crafted turkey place cards are a small project with a big impact. They add color, personality, and a sense of care that guests often remember long after the leftovers are gone.
Whether made by tiny paint-covered hands or designed with meticulous, grown-up detail, these little turkeys help tell the story of your gathering—and that story is one of gratitude, creativity, and shared celebration.