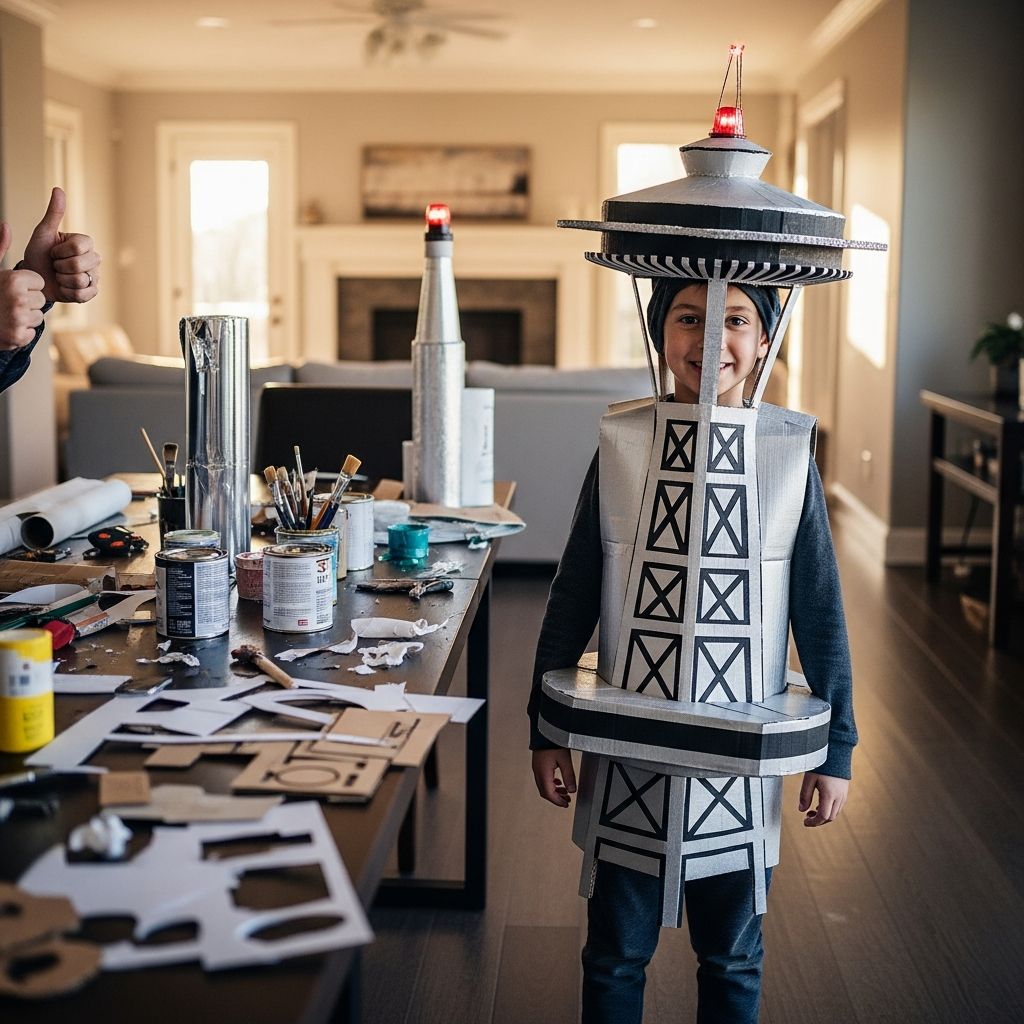
If you have a child who loves skyscrapers, space, or Seattle, a Space Needle costume is a fun project that turns ordinary cardboard into an iconic landmark they can wear. This guide walks you through planning, building, and decorating a durable, kid-friendly costume with household tools and basic craft supplies.
Why a Space Needle Costume Is a Great Idea
A Space Needle costume stands out in any crowd because it is tall, instantly recognizable, and surprisingly lightweight when built from cardboard or foam board. Unlike store-bought costumes, a homemade version can be tailored to your child’s height, comfort level, and favorite colors.
Building this costume together also becomes a hands-on lesson in design, measuring, and problem-solving. Kids can help sketch, paint, and decorate, which makes the finished piece feel even more special.
Planning Your Design
Before cutting the first piece of cardboard, spend a few minutes planning the overall shape and proportions. The real Space Needle has three main visual parts: a narrow base or column, a wider observation deck, and a pointed spire on top.
Your costume can mimic that structure in simplified form: a tube for the body, a circular or polygonal ring around the shoulders, and a tower or cone above the head. Sketch the front and side views on paper to make sure the design looks balanced.
Taking Basic Measurements
Accurate measurements help the costume feel secure instead of wobbly. Use a soft tape measure and write each measurement next to your sketch.
- Child’s height from floor to top of head.
- Shoulder width from edge to edge across the back.
- Chest circumference at the widest point.
- Desired costume height (usually a bit taller than the child but still low enough to clear doorways).
It is better to leave a little extra room around the chest and shoulders so the costume can fit over a jacket or layers if worn outdoors.
Materials and Tools Checklist
You do not need woodworking skills or fancy equipment; this costume is designed around easy-to-cut materials and common household tools. Gather everything ahead of time so you can build without stopping for supply runs.
Core Construction Materials
- Large cardboard sheets or recycled boxes (appliance boxes work especially well).
- Lightweight foam board (optional, for smooth surfaces and extra stiffness).
- Strong masking tape or painter’s tape for temporary joins.
- Duct tape or packing tape for permanent structural seams.
- Hot glue sticks and a glue gun for stronger connections.
Detailing and Painting Supplies
- Acrylic craft paints: white, gray, silver, and accent colors.
- Paintbrushes of various sizes and a small foam roller.
- Metallic or reflective tape for trim and windows.
- Permanent markers for fine lines and small details.
- Optional LED tea lights or battery-powered fairy lights for nighttime sparkle.
Tools and Safety Gear
- Utility knife or craft knife with a sharp blade.
- Heavy scissors for trimming thinner cardboard and tape.
- Metal ruler or straight edge for clean, straight cuts.
- Cutting mat or scrap cardboard to protect your table.
- Child-safe goggles or glasses for helpers, and a safe, clear workspace.
Breaking Down the Costume Structure
Think of the costume as a stack of three components that you will build and then connect: the body tube, the shoulder deck, and the upper spire. Working in sections makes the project less intimidating and easier to adjust.
Each section can be built separately on a flat surface and then test-fitted on your child before final assembly. This step-by-step approach prevents unpleasant surprises later, such as a collar that is too tight or a tower that feels heavy.
Body Tube (Central Column)
The body of the costume is a vertical cylinder or polygon that surrounds the torso. It suggests the structural legs of the Space Needle while leaving plenty of room for walking and arm movement.
A cylinder looks smooth but may be harder to form, while a hexagon or octagon is easier to assemble from straight strips of cardboard. Either option can look great once painted and detailed.
Step-by-Step Building Instructions
1. Create the Body Tube
Start by cutting a long strip of cardboard that matches the desired height of the body section, usually from just above the child’s hips to the upper chest or shoulders. The length of the strip will determine the circumference of the tube.
- Wrap the strip loosely around your child to test the fit, marking where the edges meet with a pencil.
- Remove the strip and overlap the ends by about 2–3 inches to form a cylinder or polygonal tube.
- Secure the overlapped seam with masking tape on the outside, then reinforce from the inside with duct tape or hot glue.
- Trim the bottom edge so it clears the knees and does not catch on stairs or curbs.
If you prefer a more geometric look, cut several narrower panels and tape them together edge to edge, bending slightly at each seam to form a multi-sided column.
2. Add Shoulder Support
The costume must rest comfortably on your child’s shoulders without digging in or sliding down. A simple inner harness keeps the tube in place and distributes weight evenly.
- Cut two cardboard strips about the width of your hand and long enough to span from front to back inside the tube.
- Position the strips in an “X” or parallel fashion at shoulder height, checking that your child’s head can pass through the opening.
- Attach the strips firmly with hot glue and tape, reinforcing where they meet the tube walls.
- For extra comfort, wrap the top of the strips with felt or fabric, or add foam pieces where the cardboard touches the shoulders.
Adjust the height of the support so that your child’s eyes look out just above the top edge of the body tube or through a cutout window, depending on your design.
3. Build the Observation Deck
The observation deck is the signature ring near the top of the Space Needle. In costume form, it can sit around the shoulders like an exaggerated collar or halo.
- Draw a large circle or polygon on cardboard that extends several inches beyond the tube on all sides to form the outer rim.
- Draw a smaller inner circle that matches the outer diameter of the body tube; this will be the opening where the deck rests on the column.
- Cut out the large shape first, then carefully cut out the inner hole to create a ring.
- Slide the ring over the tube to test the fit, adjusting the inner opening as needed so it sits level above the shoulders.
To suggest windows and railings, you can glue an additional thin strip of cardboard around the outer edge or use foam board to create a raised rim.
4. Construct the Spire
The upper spire can be as simple or elaborate as you like, as long as it remains lightweight and well balanced. A tall cone is quick to make, while a tiered tower with stacked shapes looks more architectural.
- For a cone, draw a large circle on cardboard, cut out a wedge, and roll the shape into a point, securing the seam with tape and glue.
- For a tiered tower, create two or three boxes or trapezoids in decreasing size and stack them vertically.
- Attach the completed spire centered on top of the observation deck ring, making sure the connection area is wide and well reinforced.
- Check the balance by gently rocking the costume; if it leans, add small counterweights or trim excess material from the heavier side.
Connecting All the Sections
Once the body tube, deck, and spire are complete, it is time to integrate them into one solid costume. Patience at this stage will pay off in stability and safety.
Work on a flat surface and enlist a second adult or older child to help hold pieces in place while you tape and glue.
Assembly Steps
- Place the body tube upright, then lower the observation deck ring over it until it rests at the height you marked earlier.
- Secure the inner edge of the ring to the tube with tape on both the top and underside, then reinforce with hot glue along the seam.
- Position the spire on top of the ring, aligning it with the central axis of the tube below.
- Attach the spire with a generous amount of hot glue and cross-strips of tape that run from the spire down to the deck surface.
After assembly, try the costume on your child for a few minutes to ensure it feels stable. Make any necessary adjustments before moving on to painting.
Comfort, Movement, and Safety
A costume that looks amazing but is uncomfortable will not get worn for long. Plan for ventilation, clear vision, and easy bathroom breaks from the start.
Leave arm openings wide enough for free movement and avoid placing rigid elements too close to the face. Soft padding and smooth edges go a long way toward keeping kids happy.
Key Safety Considerations
- Weight: Keep the spire light so the costume does not strain the neck or shoulders.
- Visibility: Make sure your child can see the ground clearly in front of them.
- Mobility: Test walking, turning, and climbing a step to check clearance.
- Weather: Choose paint and decorations that can handle light rain if used outdoors.
Painting and Decorating
Paint transforms plain cardboard into a metallic landmark. Begin with a base coat to even out the surface, then build up details with darker and lighter shades.
Mix a small amount of black into gray paint for shadows under ledges and ridges, and add white highlights to edges that you want to appear brighter or more reflective.
Decoration Ideas
- Use silver or holographic tape to represent windows and railings around the observation deck.
- Add tiny LED lights around the rim for a night-time glow.
- Paint simple city skyline silhouettes near the base to suggest the tower’s height.
- Include your child’s name or a fun “observation deck” sign in a visible spot.
Example Dimensions by Age Group
The following table provides sample measurements to help you estimate proportions. Always customize based on your child’s actual size and comfort.
| Age Range | Approx. Child Height | Body Tube Height | Observation Deck Diameter | Spire Height |
|---|---|---|---|---|
| 4–6 years | 100–120 cm | 45–55 cm | 55–65 cm | 25–35 cm |
| 7–9 years | 120–140 cm | 55–65 cm | 65–75 cm | 35–45 cm |
| 10–12 years | 140–155 cm | 65–75 cm | 75–85 cm | 40–50 cm |
Time and Budget Estimates
Knowing how long the costume might take and what it may cost makes planning easier. Most families can complete the project over a weekend with basic materials.
| Project Element | Estimated Time | Estimated Cost (USD) |
|---|---|---|
| Planning and sketching | 30–45 minutes | $0 (paper and pencil) |
| Cutting and shaping cardboard | 1.5–2 hours | $0–$10 (if buying extra cardboard) |
| Assembly and reinforcement | 1–1.5 hours | $5–$10 (tape and glue) |
| Painting and decorating | 2–3 hours plus drying time | $10–$20 (paints, brushes, lights) |
Tips for Storage and Reuse
After the big event, your child may want to keep the costume as a play prop or room decoration. A little planning during construction can make storage easier.
Consider building the spire or deck as removable sections that can be detached and stacked. Store the costume in a dry spot away from heavy objects that could crush the cardboard.
SEO-Friendly FAQ About DIY Space Needle Costumes
How long does it take to make a Space Needle costume?
Most parents can complete a basic version in one weekend, especially if they cut cardboard on one day and paint on the next. Allow extra time for paint to dry before final assembly and for children to try the costume on and request adjustments.
What is the best material for a Space Needle costume?
Large corrugated cardboard sheets are the easiest and most affordable base, and they are lightweight enough for kids to wear. Foam board or poster board can be added on top to create smoother surfaces, curved edges, and more polished architectural details.
How do I keep the costume from tipping over?
Keep the spire small and light, make the base wide enough for stability, and test balance frequently during construction. A snug shoulder support inside the body tube also helps distribute weight and prevents the costume from shifting when your child moves.
Can this Space Needle costume be worn outside in the rain?
Light mist or drizzle is usually fine if the costume is sealed with acrylic paint or a clear spray sealer, but heavy rain can soften cardboard and weaken tape. If you expect wet weather, keep the costume under cover as much as possible and bring clear tape for quick field repairs.
Is a Space Needle costume comfortable for young children?
With wide arm openings, padded shoulder supports, and smooth edges, the costume can be comfortable even for younger kids. Always have your child walk, sit, and turn while wearing the costume at home first so you can fix any pressure points or tight areas before the big outing.
Can I adapt this design for adults?
Yes, the same principles apply for adult costumes; you will simply scale up the measurements and reinforce joins more thoroughly. Adding adjustable straps similar to backpack straps can also help support the extra height and weight for taller wearers.
Final Thoughts
A DIY Space Needle costume is a rewarding project for families that enjoy creativity, engineering, and a bit of playful drama. With cardboard, paint, and a thoughtful plan, you can build an eye-catching, comfortable costume that kids will be excited to wear again and again.