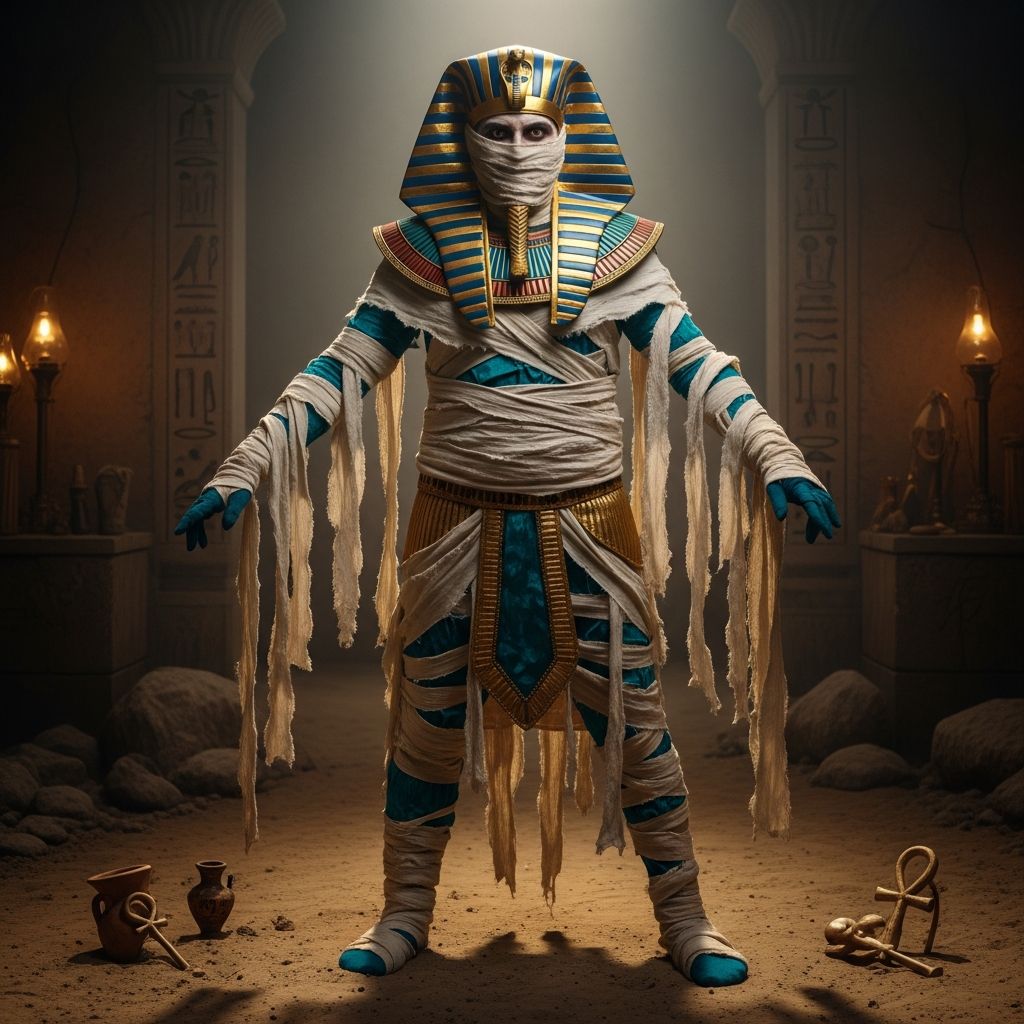
A Pharaoh mummy costume combines the spooky fun of classic Halloween mummies with the bold, regal look of ancient Egyptian royalty. This guide shows how to build a unique, budget-friendly costume using simple supplies, while keeping it comfortable and safe for a night of trick-or-treating.
Why Choose a Pharaoh Mummy Costume?
Most mummy costumes focus only on bandages, but adding Pharaoh details like a collar, headdress, and decorative belt instantly makes the look more memorable and recognizable. Instead of purchasing a pre-made outfit, you can customize colors, patterns, and accessories to match your child’s personality or your preferred style.
- Great for kids and adults because it layers easily over regular clothing.
- Works with low-cost materials, many of which you may already own.
- Perfect for school events, neighborhood parties, and themed photos.
Core Elements of the Costume
A Pharaoh mummy costume has two main visual themes: the wrapped, weathered look of a mummy and the structured, ornate accessories of an Egyptian ruler. Designing your costume around these two ideas keeps the look cohesive without needing professional sewing skills.
| Element | Purpose | Suggested Materials |
|---|---|---|
| Mummy base | Provides texture and the classic “wrapped” appearance. | Old sheets, fabric strips, gauze, or bandage-style wraps. |
| Pharaoh headdress | Signals royal status and frames the face. | Long-sleeve T-shirt, scarf, or rectangular fabric piece. |
| Decorative collar | Adds color, pattern, and Egyptian-inspired design. | Cardstock, cardboard, felt, or foam sheets plus markers/paint. |
| Belt and sash | Defines the waist and elongates the silhouette. | Fabric strip, ribbon, or wide band of paper-backed foil. |
| Optional mask | Enhances the Pharaoh theme while hiding modern clothing. | Cardstock, elastic, crayons or colored pencils. |
Materials and Tools Checklist
Before starting, gather everything you need in one place so you can decorate, wrap, and assemble without interruption. Adjust this list according to what you already have at home.
- Plain base clothes: long-sleeve shirt and leggings or pants in white, beige, or light gray.
- Wrapping materials: torn cotton sheets, muslin, old pillowcases, or rolls of gauze.
- Adhesives: fabric glue, hot glue (for adults to use), or strong tape.
- Cardstock or lightweight cardboard for the collar, belt decorations, and optional mask.
- Coloring tools: colored pencils, markers, or acrylic paint.
- Elastic or ribbon to secure a mask or back of the collar.
- Safety pins or clips to attach wraps without restricting movement.
- Optional embellishments: gold-colored paper, metallic tape, faux gems, glitter glue.
Step 1: Build the Mummy Base
Start with the comfortable clothing layer, because all other costume pieces will sit on top of it. Choose breathable fabric that allows easy walking, running, and climbing stairs.
- Prepare fabric strips. Cut or tear long strips of light-colored fabric between 2–4 cm wide. Tearing gives a frayed, aged edge that fits the mummy theme, while cutting looks cleaner and more controlled.
- Plan your wrapping pattern. For children, focus on the arms and legs, leaving room at the knees and elbows so nothing feels tight or stiff when they move.
- Attach key anchor points. Use small dots of fabric glue or discreet safety pins at the start and end of each strip. Weave and crisscross the strips loosely without fully covering every inch of the base clothing.
- Add dimension. Layer a few shorter strips that dangle or hang partially free to give the costume movement. Avoid wrapping feet and hands too tightly, especially if gloves and shoes need to be removed.
Step 2: Create an Egyptian-Style Collar
The broad collar is one of the most striking parts of an Egyptian-inspired outfit, and it can be made entirely from craft materials. Use bright colors to stand out against the pale mummy wraps.
- Draw the base shape. On a sheet of cardstock or thin cardboard, sketch a large “C” shape that will rest on the shoulders and surround the upper chest. Cut out the center so it fits comfortably around the neck without touching the throat.
- Design the pattern. Divide the collar into segments using light pencil lines, then decorate with geometric shapes, rows of dots, or stylized symbols. Think in bands of color: blues, golds, reds, and blacks show up well in dim Halloween lighting.
- Color and seal. Use markers or colored pencils for detailed work. If you paint the surface, let it dry completely and consider adding a thin layer of clear glue or varnish for durability.
- Secure the back. Cut a slit at the back of the collar so it opens like a necklace. Punch small holes at each open end and tie a short ribbon through the holes so you can fasten it behind the neck.
Step 3: Fashion a Simple Pharaoh Headdress
A Pharaoh headdress can look complex, but a stretchy long-sleeve T-shirt or rectangular scarf can mimic the signature draped sides around the face. Keep it light so it doesn’t feel hot or heavy.
- Pick the base fabric. Choose a shirt or scarf in a dark color or bold stripes. If using a shirt, place the neck opening on top of the head so the sleeves drape down each side of the face.
- Shape the sides. Adjust the sleeves or fabric edges so they fall evenly on both sides. Use small clips, a few stitches, or tape (hidden on the inside) to keep the pieces aligned.
- Add decorative stripes. Apply bands of metallic tape or strips of colored paper across the headpiece horizontally. Spacing them evenly creates a structured, royal look without needing precise tailoring.
- Secure the fit. Use a soft fabric band or elastic around the forehead, under the headdress, to keep it from slipping when walking.
Step 4: Add a Belt and Front Panel
The belt and hanging front panel help break up the wrapped fabric visually and echo the style of traditional Egyptian garments. They also provide another place to showcase color and pattern.
- Create the belt. Cut a long strip of fabric or stiffened paper wide enough to be visible over the mummy wraps. It should wrap around the waist with a little overlap at the back or side.
- Decorate the center. Add a large geometric design, stylized sun, or simple crossed lines in contrasting colors. Attach small shapes made from metallic paper or foam for a three-dimensional effect.
- Attach the front panel. Cut a separate rectangle that hangs from the center front of the belt to about the knees. Glue or sew this rectangle to the inside of the belt so it drapes straight down.
- Fasten safely. Use hook-and-loop tape, snaps, or ties at the back so the belt can be removed quickly in case the costume needs to come off.
Optional: Make a Pharaoh-Style Face Mask
A face mask can exaggerate the dramatic look of the costume, but it should never make breathing or seeing difficult. Consider painting the face instead if the costume is for very young children.
- Draw the mask base. On cardstock, sketch a face shape that covers from forehead to just above the mouth, leaving enough space for comfortable movement. Cut out eye holes that match the wearer’s eye position.
- Add Pharaoh details. Draw strong eyebrows, decorative lines around the eyes, and simple patterns on the cheeks and forehead. Color them using bright, high-contrast shades to stand out in low light.
- Attach the band. Punch small holes near the temples, then knot a length of elastic through each hole. Adjust the elastic so the mask fits securely but not tightly.
- Test visibility. Have the wearer walk, look around, and climb a step or two while wearing the mask. If they struggle to see or breathe comfortably, enlarge the openings or switch to face paint.
Finishing Touches and Styling Ideas
Once all main pieces are complete, small details can elevate the costume from “homemade” to “photo-ready.” Use accessories thoughtfully so they enhance the Pharaoh theme instead of distracting from it.
- Use washable face paint to draw eyeliner-like lines around the eyes and small hieroglyph-inspired shapes on the cheeks or hands.
- Add simple cuffs on the wrists made from cardboard bands covered in metallic tape or painted gold.
- Choose comfortable shoes in neutral or metallic colors, then wrap a few loose strips of fabric around the ankles to tie them into the mummy look.
- Lightly dust some of the fabric strips with brown or gray craft paint to create an aged, “just unearthed” vibe.
Safety and Comfort Tips
A costume should always be safe and practical, especially for children who will be out after dark. Make adjustments wherever necessary to keep motion, vision, and warmth in mind.
- Avoid wrapping fabric too tightly around joints, chest, or neck areas.
- Leave hands mostly free so doors, flashlights, and candy bags are easy to handle.
- Use flame-resistant fabrics when possible and keep long dangling pieces short enough to avoid tripping.
- Consider adding reflective tape to the back of the collar or belt, especially if walking near roads at night.
Variations for Different Ages and Settings
One advantage of this costume design is its flexibility: you can simplify or enhance details depending on time, budget, and the age of the wearer. Small changes can help the same basic idea work at multiple events.
- Toddlers: Use fewer wraps, skip the mask, and keep accessories soft and lightweight.
- School-age kids: Emphasize craft time by letting them color their own collar and belt.
- Teens and adults: Experiment with more elaborate face paint, layered jewelry, and additional props like a staff or scroll.
- Indoor parties: Focus on detailed artwork and shimmer, since lighting is usually brighter.
Frequently Asked Questions
How long does it take to make this costume?
The total time depends on how detailed you make the decorations. Expect one to two hours for basic wrapping and a simple collar, plus extra time if children want to color or paint intricate patterns.
Can this be made without sewing?
Yes, the design relies mostly on glue, tape, and knots instead of sewing. Using safety pins sparingly and choosing stretchy base clothing help the costume hold together without stitching.
Is it comfortable enough for a full evening?
The costume can be very comfortable if built over soft base clothing and wrapped loosely. Always test the outfit for at least 15–20 minutes at home so you can adjust tight spots before the event.
Can I wash any parts of the costume?
The base clothing can typically be washed as usual once you remove glued or pinned-on strips. Paper-heavy pieces like the collar and mask are best stored flat and reused rather than washed.
How can I store the costume for next year?
Detach removable items like the collar, belt, and headdress, then fold each piece gently. Store them in a labeled box or garment bag in a dry place, ready to be reassembled or updated for another Halloween.