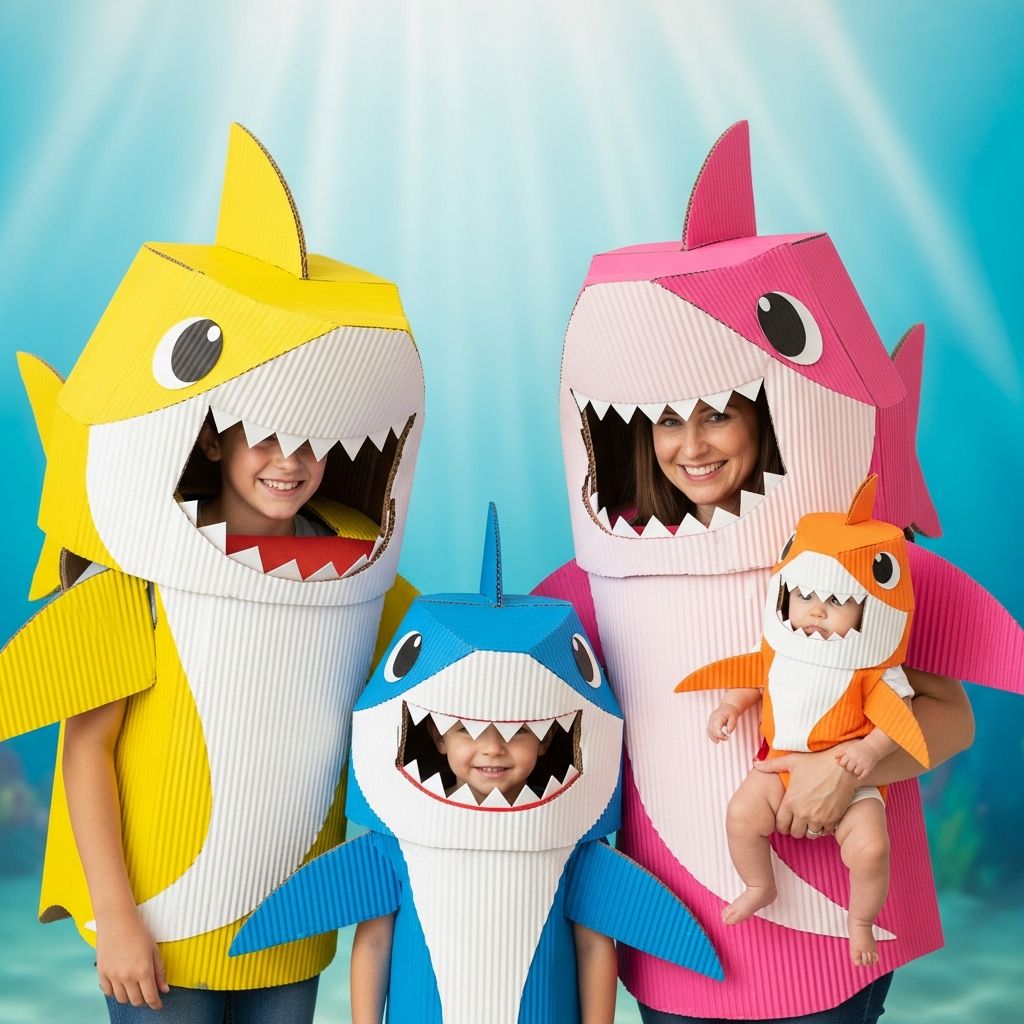
Transform leftover cardboard into an entire Baby Shark family costume set that is lightweight, budget-friendly and totally customized to your crew. Forget store-bought suits; this guide walks you through planning, building and decorating playful shark outfits for kids and adults using basic craft supplies and a bit of imagination.
Why Choose DIY Baby Shark Costumes?
Baby Shark–inspired costumes are wildly popular with young kids and instantly recognizable to other families. Building them yourself lets you tailor the fit, colors and details to each family member, whether you’re making a tiny Baby Shark or a towering Grandparent Shark. Cardboard makes it easy to cut bold shapes, paint bright colors and assemble costumes without needing advanced sewing skills.
- Budget-friendly: Reuse cardboard boxes and a small set of paints instead of buying multiple store-bought costumes.
- Customizable: Adjust the size, color and personality of each shark so every family member feels like the star.
- Family project: Kids can help paint, choose colors and add details like eyelashes, freckles or glitter.
Planning Your Shark Family Look
Before pulling out the scissors, decide what your shark “cast” will be. Most families stick to four or five characters, but you can easily expand. Assign a color and simple personality cue to each shark so they feel distinct in photos and on Halloween night.
| Character | Suggested Color | Fun Personality Twist |
|---|---|---|
| Baby Shark | Bright yellow | Tiny fins, oversized smile, blushy cheeks |
| Mommy Shark | Hot pink or coral | Lipstick smile, lashes, maybe a bow |
| Daddy Shark | Ocean blue | Broader body, bold eyebrows or a tie |
| Grandma Shark | Lavender or teal | Glasses painted around the eyes, pearls drawn on |
| Grandpa Shark | Gray or navy | Painted mustache, suspenders, or a cap |
Once colors are assigned, sketch a rough lineup of your shark family on scrap paper. This helps you see how tall each costume should be and where eyes, mouths and arm holes will sit for comfort.
Materials and Tools Checklist
Gather everything at once so you can build a small assembly line and work on multiple sharks in stages. Most supplies are inexpensive and available at craft, hardware or discount stores.
Core Materials
- Large flat cardboard sheets (roughly torso-to-knee length for each wearer)
- Acrylic paint or spray paint in shark body colors (yellow, pink, blue, gray, etc.)
- White, black and red acrylic paint for teeth, eyes and mouths
- Foam balls or thick cardboard circles to use as 3D eyes
- Strong tape (duct tape or packing tape) for reinforcement
Tools and Safety Items
- Box cutter or craft knife for adults only
- Sharp scissors for trimming details
- Cutting surface (self-healing mat, scrap panel, or extra cardboard)
- Pencils, markers and a ruler or measuring tape
- Hot glue gun and glue sticks (low-temp for safety if kids are near)
- Drop cloth or old newspaper to protect floors while painting
Optional extras like glitter glue, metallic markers, adhesive gems or felt scraps can add sparkle and texture to your sharks without much extra effort.
Measuring for a Comfortable Fit
A cardboard costume should be big and bold but not so large that it’s difficult to walk or climb stairs. Take a few quick measurements for each wearer so the shark body sits comfortably and the arm openings are easy to use.
- Height: Measure from shoulder to just above the knees to decide your costume length.
- Width: Measure across the chest and add a few inches on each side to allow for movement and clothing layers.
- Arm opening height: Mark where arms naturally hang when relaxed; this will guide where to cut side holes or handle openings.
Write each person’s name and measurements directly on their assigned cardboard piece. That way you won’t mix up Baby Shark with Daddy Shark as you cut.
Designing the Shark Silhouette
There is no need for a perfect template; a stylized shark outline looks playful and forgiving. Think of the costume as a tall oval with a tail on one side and a pointy head at the top. Start lightly in pencil so you can adjust proportions before cutting.
Basic Shape Guidelines
- Draw a gentle curve at the top for the shark’s head rather than a sharp triangle to avoid fragile corners.
- Sketch a wide, rounded body that narrows slightly at the bottom to avoid hitting knees and stairs.
- Add a side tail that sticks out just enough to show in photos but not so far that it snags on doorways.
Once the body is drawn, mark the location of the mouth opening, eye placement and any arm or hand holes. Leave extra space between the mouth and the bottom edge so smaller kids do not feel like they are peeking out of the teeth.
Cutting the Body and Fins
Cutting cardboard is an adults-only task. Keep children at a different table while using craft knives and move slowly around curves to reduce jagged edges. If you are nervous about cutting freehand, slice along a ruler for straight sections and only trim curves after the main shape is removed.
- Cut the main body
Follow your pencil outline with a box cutter, pressing gently and making several light passes rather than one deep cut. - Open the mouth
Draw a wide mouth line; cut out an oval or curved rectangle where the wearer’s face will appear. Round the corners so they do not irritate cheeks or chin. - Create fins separately
On extra cardboard, sketch a dorsal fin (top), side fins and a tail extension if your design needs it. Slightly exaggerate their size so they are visible from a distance.
When all the pieces are cut, gently sand or fold down any rough edges. You can reinforce delicate fins with extra layers of cardboard or strips of tape along the back.
Building Comfortable Handles and Straps
There are two main ways to wear a cardboard shark: holding it like a shield with built-in handles, or wearing it like a sandwich board with straps over the shoulders. The right option depends on the wearer’s age and how long they will be in costume.
Handle-Style Wear (Great for Toddlers)
- Cut two vertical slots near the middle of the shark body to create hand holds.
- Reinforce the area around each slot with tape on both sides.
- Ensure the openings are large enough for gloved or mittened hands if Halloween is cold in your area.
Strap-Style Wear (Ideal for Older Kids and Adults)
- Use wide ribbon, strong fabric strips or duct tape folded into straps.
- Glue or tape straps securely to the inside top of the shark body so it hangs like a sign in front of the torso.
- Test the length while the wearer moves, sits and reaches for candy to confirm the shark doesn’t bump their knees.
Adding a thin foam strip or folded fabric at the shoulder contact points will make the costume much more comfortable during long trick-or-treat walks.
Painting the Shark Bodies
Paint brings the sharks to life, so take your time and allow for drying between steps. Cover your work area and wear old clothing, especially if using spray paint outdoors.
- Base coat
Paint the entire front of each shark in its main body color. Let it dry, then repeat for better coverage and paint the back if it will be visible. - Underbelly shape
Using white paint, add a large oval or crescent along the lower front to suggest a shark belly. Blend the edges slightly with a dry brush for a softer look. - Details and shading
Darken a small amount of base color with black or brown to brush along the edges and fins for dimension. Add a thin darker outline around the mouth to make it pop.
If young children are helping, assign them broad areas like the base coat and keep smaller detail work for an adult or older child with steady hands.
Creating Eyes, Teeth and Expressions
Facial details are what turn a generic shark into Baby, Mommy or Daddy Shark. Use simple shapes and bold contrasts so eyes and teeth show clearly at night and in photos.
Eyes
- Paint foam balls or cardboard circles white and let them dry.
- Add large black pupils off-center to make the sharks look like they’re glancing in a playful direction.
- Glue the eyes above the mouth with hot glue, then draw eyelids, lashes or brows directly on the cardboard.
Teeth and Mouth
- Outline the mouth opening with a thin red border to suggest gums.
- Paint small triangular teeth along the top and bottom edges of the mouth. Keep them widely spaced for a friendly look.
- For Baby Shark, use slightly rounded teeth and rosy cheeks to avoid a scary appearance.
Give each shark a unique expression: a wink for Mommy Shark, a goofy open-mouthed grin for Baby Shark or a proud smirk for Daddy Shark. Simple painted eyebrows angled differently can completely change the mood.
Adding Signature Style to Each Shark
Once the face and body are finished, personalize each costume with easy add-ons so nobody has to ask which shark you are. Small touches make a huge difference in photos and can become favorite details for kids.
- Baby Shark: Add blush circles, a tiny heart near the fin, or little stars along the belly.
- Mommy Shark: Paint bold red lips, long lashes, and maybe a necklace or bow on top of the head.
- Daddy Shark: Add a painted tie, suspenders, or a simple mustache shape.
- Grandma Shark: Draw cat-eye glasses and a pearl necklace across the belly.
- Grandpa Shark: Paint thick eyebrows, a monocle or a bow tie.
Consider adding reflective tape stripes along the edges of each shark so the costumes are more visible after dark while still blending into the overall design.
Practical Tips for Trick-or-Treating
Adorable costumes are only fun if they are wearable. Before Halloween night, schedule a short “dress rehearsal” in your yard or living room to test movement, warmth and visibility. Encourage kids to walk, bend, reach and turn as they would on a real trick-or-treat route.
- Check that kids can see the ground clearly and that the cardboard doesn’t block their peripheral vision.
- Make sure the bottom edge doesn’t hit stairs or trip small feet; trim if necessary.
- Layer clothing underneath in case the weather changes, rather than trying to modify the costume at the last minute.
Have a small repair kit ready with tape, glue dots and safety pins. Cardboard is sturdy but can still crease or tear if it gets caught on a railing or bumped in a crowd.
Eco-Friendly and Storage Ideas
Cardboard costumes are naturally more eco-conscious than many plastic options, especially if you reuse shipping boxes or ask local stores for spare cardboard. After Halloween, you can extend their life or recycle them responsibly.
- Use the shark bodies as themed bedroom decor for a while by hanging them on the wall.
- Trim the faces off to create playful shark masks for future pretend play.
- When you are ready to part with them, remove tape and non-paper embellishments and place the cardboard in your recycling bin.
Simple Baby Shark Craft Timeline
Cardboard shark costumes look impressive but can fit easily into a busy family schedule if you break the process into small, manageable sessions over a weekend.
| Day | Time | Actions |
|---|---|---|
| Friday evening | 1–2 hours | Measure each family member, sketch shark outlines, cut bodies and fins. |
| Saturday morning | 1–2 hours | Paint base colors and underbellies; paint eyes and small pieces. |
| Saturday afternoon | 1 hour | Add facial details, attach fins and eyes, reinforce straps or handles. |
| Sunday | 1 hour | Personalize each shark, test fit and adjust for comfort and visibility. |
Baby Shark Costume FAQs
How long do these cardboard costumes take to make?
Most families can complete a set of two or three shark costumes over a weekend by splitting tasks into measuring, cutting, painting and finishing. If you have several children or plan elaborate details, allow extra time for drying and adjustments.
Are cardboard shark costumes comfortable for small kids?
Yes, as long as you size the costume carefully and keep the cardboard light. Make sure arm openings are easy to reach through, the costume length doesn’t hit the knees and the straps or handles are padded where they touch shoulders or hands.
What if I don’t have large cardboard sheets?
You can tape together smaller pieces on the back to create a larger surface. Overlap the seams and cover them with strong tape before drawing your shark outline so the front looks like a single piece.
Can these costumes be worn in the rain?
Cardboard does not love heavy rain, but a light drizzle is usually manageable. If rain is in the forecast, add a clear spray sealant, keep an umbrella handy and store the costumes indoors between outings to prevent warping.
How can I coordinate outfits without everyone wearing cardboard?
Let one or two family members wear the full cardboard shark bodies, while others wear shark-themed hoodies or T-shirts in matching colors. Add simple accessories like fins made from felt or paper crowns in shark colors so the group still looks unified.
Make Your Own Shark Splash
A DIY Baby Shark family costume set turns a catchy children’s song into a creative project you can build together. With cardboard, paint and a few playful details, you’ll end up with costumes that fit your family, your budget and your imagination—while making a big splash at any Halloween party or neighborhood parade.