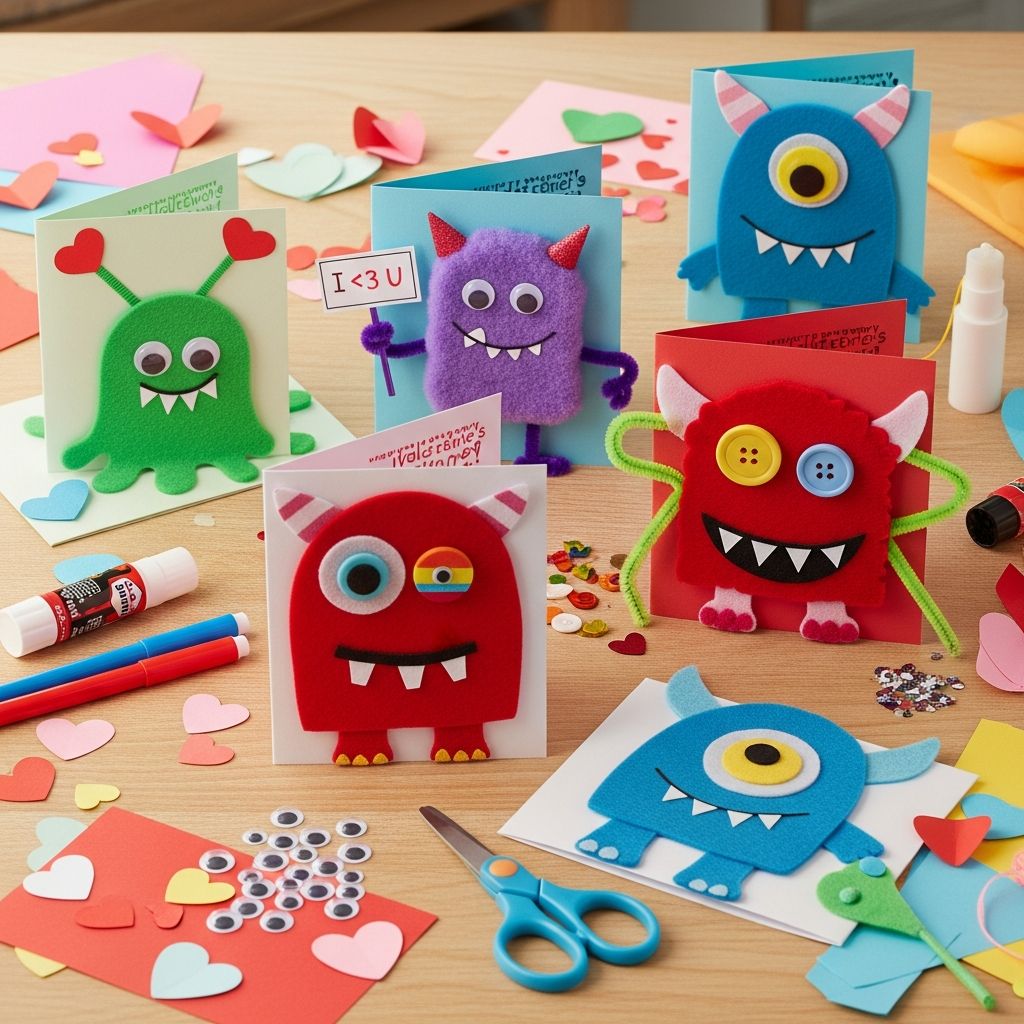
Monster-themed Valentines are a fun way to celebrate friendship with a little silliness and color. With a simple printable design, you can make enough cards for an entire class, keep costs low, and still give your child something that feels special and handmade.
This guide walks you through planning, printing, and assembling your own monster Valentines, using a printable template and a few basic craft supplies. The focus is on kid-friendly steps, stress-saving shortcuts for busy adults, and playful ideas that work for home, school, or community events.
Why Monster Valentines Work So Well for Classmates
Monster Valentines check a lot of boxes for families, teachers, and kids:
- Gender-neutral theme that appeals to many kids.
- Flexible designs that can be cute, silly, or slightly spooky (but still friendly).
- Easy to customize with different colors, eyes, and expressions.
- Print-at-home convenience, which saves last-minute trips to the store.
- Great for fine-motor practice as kids cut, glue, and sign their names.
Research on arts and crafts in early childhood shows that activities like cutting, coloring, and gluing support fine motor development, hand–eye coordination, and early writing skills. Crafting Valentines also builds social-emotional skills as kids think about classmates and practice kind messages.
Planning Your Monster Valentine Project
Before you print a single monster, take a few minutes to plan. This will help you avoid running out of supplies the night before the class party.
1. Find or Create Your Printable Monster Template
You can either design your own simple monsters or use an existing printable template as inspiration.
- Look for large, simple shapes so kids can cut them out without frustration.
- Choose monsters with bold outlines that show up clearly when printed.
- Consider designs that leave space for a message like “From:” or “You’re a friend I’m wild about” that your child can handwrite.
- Offer a mix of colors and shapes so kids feel like they’re choosing a unique monster.
If you design your own, free tools like basic drawing apps or word processors with shape tools are plenty. Keep the artwork simple; kids are usually more interested in the bright colors and funny eyes than in perfect illustration details.
2. Decide on Size and Quantity
Check how many classmates or friends your child will be exchanging with, then add a few extra in case of mistakes or new classmates.
| Group Size | Recommended Prints | Notes |
|---|---|---|
| 10–15 kids | 20–24 monsters | Plenty of room for mistakes and extras. |
| 20–25 kids | 28–32 monsters | Enough for the class plus siblings or teachers. |
| Large group (30+) | 40–50 monsters | Consider simpler designs to save time. |
3. Gather Your Supplies
A basic monster Valentine setup usually needs just a handful of low-cost items:
- Printable monster valentine PDF or your own printed designs
- Cardstock or thick paper (for durability)
- Child-safe scissors
- Glue sticks or double-sided tape
- Markers or crayons for decorating and writing names
- Googly eyes or paper eyes
- Optional: mini treats, stickers, or small toys
Using basic craft materials in the classroom can support creative thinking, problem-solving, and persistence as kids experiment with different ways to arrange pieces and decorate.
Printing Tips for Bright, Sturdy Monsters
Printed Valentines need to survive backpacks, desks, and little hands. A few adjustments while printing can make a big difference.
Choosing the Right Paper
- Use cardstock between 65–110 lb for sturdy cards that don’t flop over.
- If you only have regular copy paper, consider gluing the printed monsters onto colored construction paper to reinforce them.
- For eco-conscious families, look for recycled cardstock or print on one side of previously used sheets (as long as the other side isn’t confidential).
Printer Settings That Help
- Select the “Best” or “High” quality print setting so colors look rich.
- Turn on “Fit to page” only if your template is larger than your paper size.
- If you want kids to color the monsters themselves, choose black-and-white or outline-only designs and print in grayscale.
Giving children opportunities to color or decorate designs themselves may increase their engagement and sense of ownership in the craft.
Step-by-Step: Assembling Your Monster Valentines
Once your monsters are printed, it’s time for the fun part: crafting. This process can be split over a couple of days or done in one sitting, depending on your child’s attention span and your schedule.
Step 1: Cut Out the Monsters
Invite kids to do as much of the cutting as they can safely manage.
- For preschoolers, pre-cut the main shapes and let them focus on decorating.
- For early elementary kids, lightly trace cutting lines if the outlines are very complex.
- Offer chunky scissors with comfort grips for little hands.
Fine-motor activities like cutting along lines support handwriting readiness and strength in the small muscles of the hands.
Step 2: Add Eyes, Mouths, and Monster Details
This is where the monsters come to life. Set out options and let kids mix and match.
- Use googly eyes for a 3D look, or draw simple circles with markers.
- Cut teeth, horns, and tongues from scrap paper.
- Draw freckles, spots, stripes, and fur with crayons or markers.
- Create “friendly scares”: big teeth and big hearts together keep the mood silly, not scary.
Step 3: Attach Messages or Treats
You can keep the focus on the card itself, or add something small.
- Print or handwrite short phrases like:
- “You’re monstrously awesome!”
- “I’m wild about being your friend.”
- “Have a monstrously fun Valentine’s Day!”
- Leave space for kids to write their names and a classmate’s name if the school requests it.
- If attaching treats, consider non-food options such as:
- Monster stickers
- Mini pencils or erasers
- Temporary tattoos
Some schools recommend limiting sugary treats for classroom parties and encourage non-food items instead, to support healthier environments.
Step 4: Let Them Dry and Organize
Before stacking the cards, make sure any glue is completely dry to prevent sticking.
- Lay the finished Valentines in a single layer on a table or floor.
- Once dry, stack them in class list order, or keep them in a labeled envelope or zip bag.
- Ask your child to count their cards and compare the number to their class size—sneaking in a bit of math practice.
Monster Valentine Variations for Different Ages
Monster Valentines can be easily adapted to different developmental stages, from preschoolers to older elementary kids.
For Preschool and Kindergarten
- Use large, simple shapes and minimal cutting.
- Pre-cut monsters and let kids decorate with stickers and crayons.
- Limit steps to: choose a monster, add eyes, add a heart, sign name.
For Early Elementary (Grades 1–3)
- Let kids cut their own monsters and choose their own color combinations.
- Add a short writing component, like one sentence about what makes a good friend.
- Encourage them to give each monster a name and personality.
For Older Elementary (Grades 4–5)
- Invite kids to design their own monster on blank templates.
- Add a simple STEM tie-in, like measuring card size or estimating how many fit on one page.
- Ask them to write more personalized notes that focus on appreciation or encouragement.
Time-Saving Tips for Families and Teachers
Preparing Valentines for a whole classroom can feel overwhelming, especially if you’re short on time. These ideas help simplify the process.
- Batch your tasks: Print one evening, cut the next, decorate on the weekend.
- Prep in advance: For classroom parties, pre-cut eyes and hearts so kids spend more time assembling and less time waiting.
- Use assembly lines: In families with multiple kids, assign roles—one cuts, one glues eyes, one writes names.
- Keep extras: Store leftover monsters in an envelope for siblings, neighbors, or thank-you notes.
- Skip perfection: Crooked eyes and wobbly teeth usually make monsters more charming.
Making the Exchange Inclusive and Kind
Many schools recommend that if students bring Valentines, they bring one for every classmate to avoid hurt feelings and social exclusion. Check your school’s guidelines and talk with your child about how to make the exchange kind and inclusive.
- Encourage your child to address cards to everyone, not only close friends.
- Avoid jokes that might be misunderstood; keep messages positive and friendly.
- Consider food allergies and restrictions if you attach treats—nut-free, individually packaged, or non-food items are often best.
Simple Monster Valentine Activity Ideas for the Classroom
If you’re a teacher or classroom volunteer, monster Valentines can become a quick, structured activity instead of just a card exchange.
- Monster Design Station: Provide blank monster outlines and let students create their own versions, focusing on shapes, patterns, or symmetry.
- Writing Prompt: “My monster is a good friend because…” Students write 2–3 sentences and attach them to their monster cards.
- Math Tie-In: Have students graph eye counts (How many monsters have 1, 2, or 3 eyes?) to practice simple data collection concepts.
- Art Vocabulary: Introduce terms like texture, symmetry, and contrast as students decorate their monsters.
Storage, Display, and Keepsake Ideas
After the party, kids often come home with a pile of cards. Monster Valentines are especially fun to revisit, and you can turn them into a keepsake with very little effort.
- Binder ring flip book: Punch a hole in one corner of each card, then clip them together on a binder ring.
- Valentine garland: Clip monster cards onto string or yarn with clothespins and hang across a wall or doorway.
- Memory box: Let kids choose a few favorite monsters to store in a small box labeled with the year.
Frequently Asked Questions (FAQs)
Q: What if my child’s school does not allow candy with Valentines?
A: Focus on the printable monster card itself and add small non-food items if you like, such as stickers, pencils, or erasers. Many schools encourage non-food treats to reduce sugar intake and avoid allergy issues.
Q: How far in advance should we start making monster Valentines?
A: A week ahead is usually enough, especially if you spread the work across a few short sessions. Younger children may do best with 10–15 minute craft times, while older kids can comfortably work longer.
Q: Can I reuse the same printable monsters next year?
A: Yes. Save the digital file in an easy-to-find folder and print it again with different colors or decorations. You can also mix old and new designs so returning classmates see something slightly different.
Q: How can I support children who struggle with fine-motor tasks?
A: Offer pre-cut pieces, thicker markers, and larger monster shapes with simple edges. Give them the choice of participating in decorating, arranging pieces, or dictating messages while an adult writes. Occupational therapy research suggests adapting tools and task demands can help children successfully engage in crafts without frustration.
Q: Are monster Valentines appropriate for very young or easily scared children?
A: Keep designs friendly and colorful—round shapes, big smiles, and heart accents help monsters look cute rather than spooky. Let children choose their favorite colors and reassure them that these monsters are silly helpers for sharing kindness.
References
- Fine Motor Skills: What You Need to Know — Child Mind Institute. 2018-10-10. https://childmind.org/article/developing-childs-fine-motor-skills/
- Valentine’s Day Classroom Party Tips — U.S. Department of Education (Homeroom Blog). 2016-02-09. https://blog.ed.gov/2016/02/valentines-day-classroom-party-tips/
- Social and Emotional Learning (SEL) in the Classroom — Collaborative for Academic, Social, and Emotional Learning (CASEL). 2023-03-01. https://casel.org/fundamentals-of-sel/what-is-the-case-for-sel/
- Healthy Celebrations — Centers for Disease Control and Prevention (CDC). 2021-10-08. https://www.cdc.gov/healthyschools/npao/celebrations.htm
- National Core Arts Standards: Visual Arts — National Coalition for Core Arts Standards. 2014-06-04. https://www.nationalartsstandards.org/
- Helping Children Learn Mathematics — National Research Council, National Academies Press. 2002-01-01. https://nap.nationalacademies.org/catalog/10434/helping-children-learn-mathematics