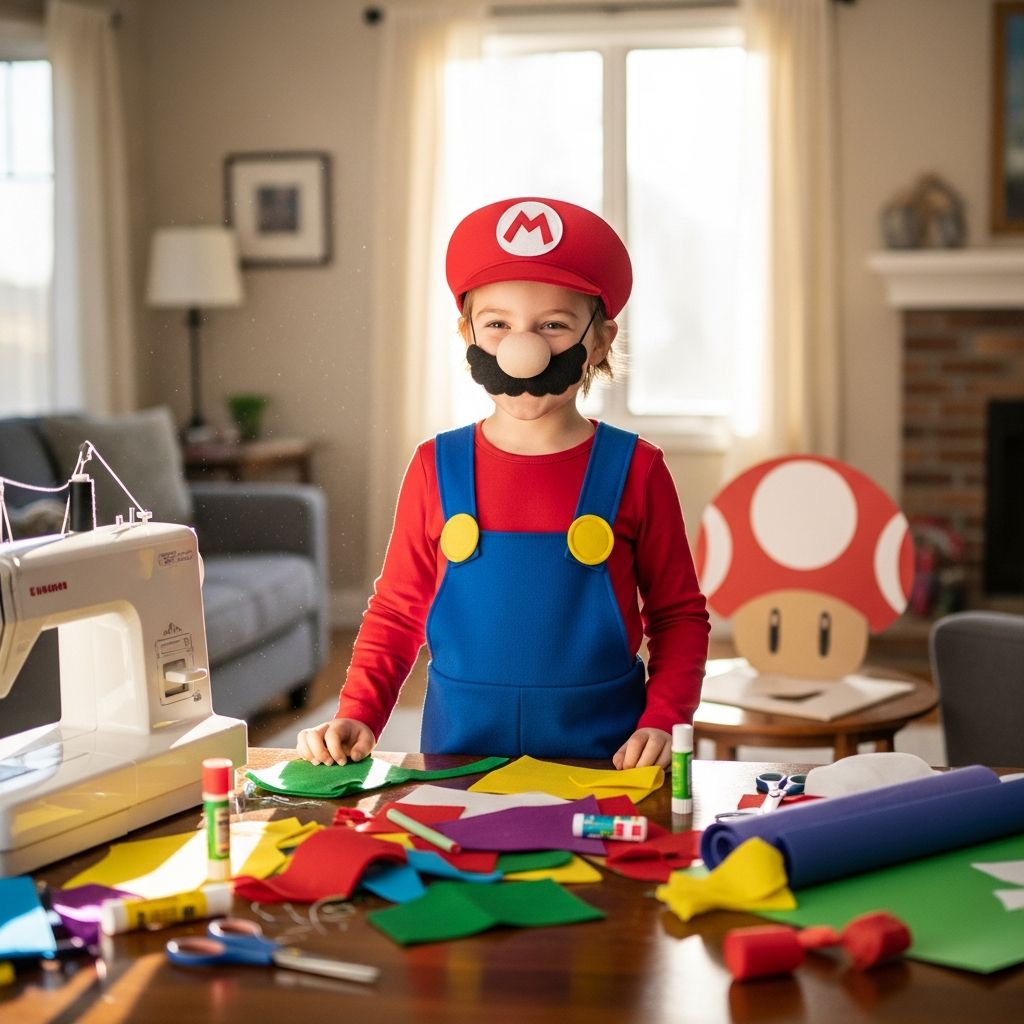
If you love the idea of dressing up as a classic video game hero but do not want to rely on store-bought outfits, this guide shows how to build a fun Mario costume from items you can easily find at home or in local shops.
Why Make Your Own Mario Costume?
Creating a Mario costume yourself gives you control over comfort, fit, and style while also keeping costs in check and allowing for playful customization. A homemade approach also lets kids participate in the process, turning costume prep into an activity rather than a last-minute purchase.
- Save money by reusing basic clothing and simple craft materials.
- Adjust the design for weather, sensory needs, or school dress rules.
- Add personal touches so your Mario feels unique, not like a mass-produced outfit.
Core Elements of a Recognizable Mario Look
Mario’s design is simple but iconic, so a few key colors and shapes instantly communicate the character without requiring a perfect replica. Focusing on these core elements keeps the project achievable for beginners while still looking great in photos.
Think of the costume as four main layers: the hat and logo, the red shirt, blue overalls or a lookalike alternative, and facial details such as the mustache and gloves.
| Component | Signature Features | Simple DIY Options |
|---|---|---|
| Hat | Red cap with white circle and red letter | Plain red cap plus felt or paper logo glued or stitched on |
| Top | Bright red long- or short-sleeve shirt | Any red t-shirt, sweatshirt, or thermal top |
| Overalls | Blue bib shape with large yellow buttons | Real denim overalls, blue suspenders, or a fake bib made from fabric or felt |
| Face & hands | Brown mustache, big nose, white gloves | Face paint or stick-on mustache, costume gloves or winter gloves |
| Shoes | Brown work-style shoes or boots | Any brown or dark shoes; boot covers optional |
Gathering Supplies from Around the House
Before buying anything new, check closets and toy bins for pieces that can double as costume parts; often a basic red shirt and denim already live in most wardrobes. Craft drawers and school supplies may also provide enough paper, felt, or cardboard for accessories.
- Search for: red shirt, blue jeans or overalls, any red cap, white or light-colored gloves, and brown shoes.
- Collect basic tools: scissors, safety pins, tape, fabric glue or hot glue (with supervision), markers, and scrap fabric or felt.
Step-by-Step: Building the Mario Hat
The hat is one of the most visible parts of the costume and can be made from an existing cap or a simple fabric base. If you already have a red cap, you are halfway finished and only need to add Mario’s logo.
Using a Ready-Made Red Cap
- Cut a circle from white felt, craft foam, or sturdy paper that fits comfortably on the front of the cap.
- Cut or draw a bold red letter “M” for the center of the circle.
- Attach the logo to the cap using fabric glue, double-sided tape, or hand stitching; keep the logo centered and slightly above eye level.
No Cap? Create a Simple Fabric Hat
If a red cap is not available, a basic hat shape can be sewn or glued from red fabric. This does not need to be perfect to look playful and photo-ready.
- Trace a large circle or oval from red fabric for the crown and a rectangle strip for the band.
- Gather or fold the circle onto the band and secure with stitches or strong glue for a soft, slouchy cap.
- Add the white circle and red “M” logo on the front once the base is assembled.
Creating the Red Shirt and Blue Overall Effect
The red-and-blue combination is the heart of the outfit, but it does not require real workwear overalls; layering and color blocking can visually mimic the design with more comfortable clothing. Aim for a bright red top and a medium or dark blue bottom as the foundation.
Option 1: Using Real Overalls
- Pair denim or blue overalls with a red long-sleeve shirt or t-shirt worn underneath.
- Attach two large yellow “buttons” to the overall bib using felt circles, craft foam, or painted cardboard.
- If the overalls are a different color, consider covering parts with blue fabric panels pinned or temporarily stitched on.
Option 2: Fake Overalls with Suspenders
If overalls are not available, blue suspenders can create a similar look while remaining comfortable for school or indoor events.
- Wear a red shirt tucked into blue jeans or blue joggers.
- Add blue suspenders over the shoulders to suggest overall straps.
- Attach yellow circles made from felt or cardboard where the suspenders meet the waistband to represent buttons.
Option 3: Overalls Illusion with a Fabric Panel
Another approach is to create a false bib that can be worn over any pants, which is especially helpful if the costume is for a quickly growing child.
- Cut a rectangular panel from blue felt or sturdy fabric to sit on the chest.
- Add two long strips as straps that go over the shoulders and attach to the back of the pants with clips or safety pins.
- Glue or sew yellow circles where the straps meet the chest panel to finish the classic Mario style.
Finishing Touches: Mustache, Gloves, and Shoes
Small accessories bring personality to the outfit and help children feel fully in character, but they should still be safe and comfortable for play. Each accessory can be made from soft materials and attached in ways that are easy to remove when needed.
DIY Mario Mustache Ideas
- Felt mustache on a stick: Cut a mustache shape from brown or black felt, glue it to a craft stick or straw, and let kids hold it for photos.
- Elastic strap mustache: Attach the felt mustache to a piece of elastic that goes around the head like a mask, adjusting length so it sits comfortably under the nose.
- Face paint: Use skin-safe face paint or eyeliner to draw a soft, curved mustache directly above the upper lip.
Gloves and Footwear
White gloves help complete the familiar cartoon look but can be improvised from many different styles. Shoes do not need to be exact; focus on neutral or brown tones that will not distract from the rest of the costume.
- Use cotton winter gloves, costume gloves, or even old sports gloves if they are mostly white.
- Choose brown or dark shoes; if none are available, you can slip simple brown felt covers over existing sneakers.
Comfort, Safety, and Kid-Friendly Adjustments
Costumes should be fun to wear for more than a quick photo, so keep comfort and mobility in mind while assembling each part. Children may need to move easily in classrooms, playgrounds, or neighborhood sidewalks.
- Avoid sharp pins or stiff cardboard near the face and neck; tuck sharp points into fabric or tape them down securely.
- Keep hats snug but not tight, and consider using hair clips or a chin strap for active kids so hats do not fall over their eyes.
- Choose lightweight fabrics if the costume will be worn indoors, and add layers underneath in colder weather instead of heavy outer pieces that hide the design.
Budget-Friendly Tips and Substitutions
It is tempting to buy character-branded items, but simple solid-colored pieces often look just as good once everything is assembled. Prioritizing reusable clothing and craft supplies also reduces waste after the event.
- Borrow items such as overalls, hats, and gloves from friends or relatives for a one-night costume.
- Shop thrift stores for basic red and blue clothing that can become everyday wear after Halloween or a party.
- Use paper or recycled cardboard for logos and buttons if craft foam or felt are not available; seal them with clear tape for durability.
Ideas for Siblings, Friends, and Family
Once one Mario costume is finished, it is easy to extend the theme to siblings and friends by adjusting colors and accessories. A coordinated group costume can be built gradually, starting from the same basic approach of solid shirts, simple hats, and minimal accessories.
- Luigi: Swap the red shirt and hat for green while keeping the blue overalls style.
- Princess-inspired look: Use a pink dress or skirt with a homemade crown and white gloves.
- Mushroom or helper characters: Build simple caps or headbands with colored circles added for playful, low-effort side characters.
Simple Photo and Prop Ideas
Props do not need to be complicated to create fun, themed photos; they mainly serve to reinforce the playful world of the costume. Lightweight props made from cardboard or foam are safer and easier to carry than heavy toy versions.
- Create cardboard “blocks” by drawing question marks or brick patterns on square pieces and attaching them to sticks.
- Hold inflatable or foam toys in matching colors to hint at in-game tools without needing screen-accurate replicas.
- Use colored balloons or paper cutouts in the background to echo the game’s landscapes in family photos.
Frequently Asked Questions About DIY Mario Costumes
How long does a basic Mario costume take to make?
Many families can assemble a simple Mario outfit in one afternoon, especially if a red shirt and blue pants are already available. The most time-consuming part is usually crafting the hat logo and any extra details like the mustache or boot covers.
Can this costume work for both kids and adults?
Yes, the same basic formula of red shirt, blue bottoms, and a red hat works at any age; only the sizes and some comfort adjustments change. Adults may prefer more structured hats or sturdier mustache materials, while children often do better with soft fabrics and washable face paint.
Is sewing required for this project?
Sewing is optional; many pieces can be attached using fabric glue, double-sided tape, or safety pins hidden inside seams. Basic hand stitching can make the costume stronger, but simple no-sew methods are enough for single-event wear.
What if my child does not like hats or mustaches?
The costume can still feel recognizable without those elements by emphasizing color, overalls style, and gloves. Consider printing a small symbol on the shirt or adding a themed patch so the character is clear even without the hat or facial hair.
How can I store or reuse the costume after the event?
Detach removable pieces like logos, mustaches, and felt panels, then fold everything into a labeled bag or box with a few photos of the finished costume for reference. Many of the clothing items can return to everyday use, while craft pieces can be recycled into future dress-up or school projects.
With a few basic garments, some craft supplies, and a bit of imagination, anyone can assemble a playful DIY Mario costume that feels comfortable to wear and fun to customize. The focus on simple colors and soft materials makes this project approachable even for beginners, while still delivering a character that is instantly recognizable in photos, classrooms, and neighborhood parades.