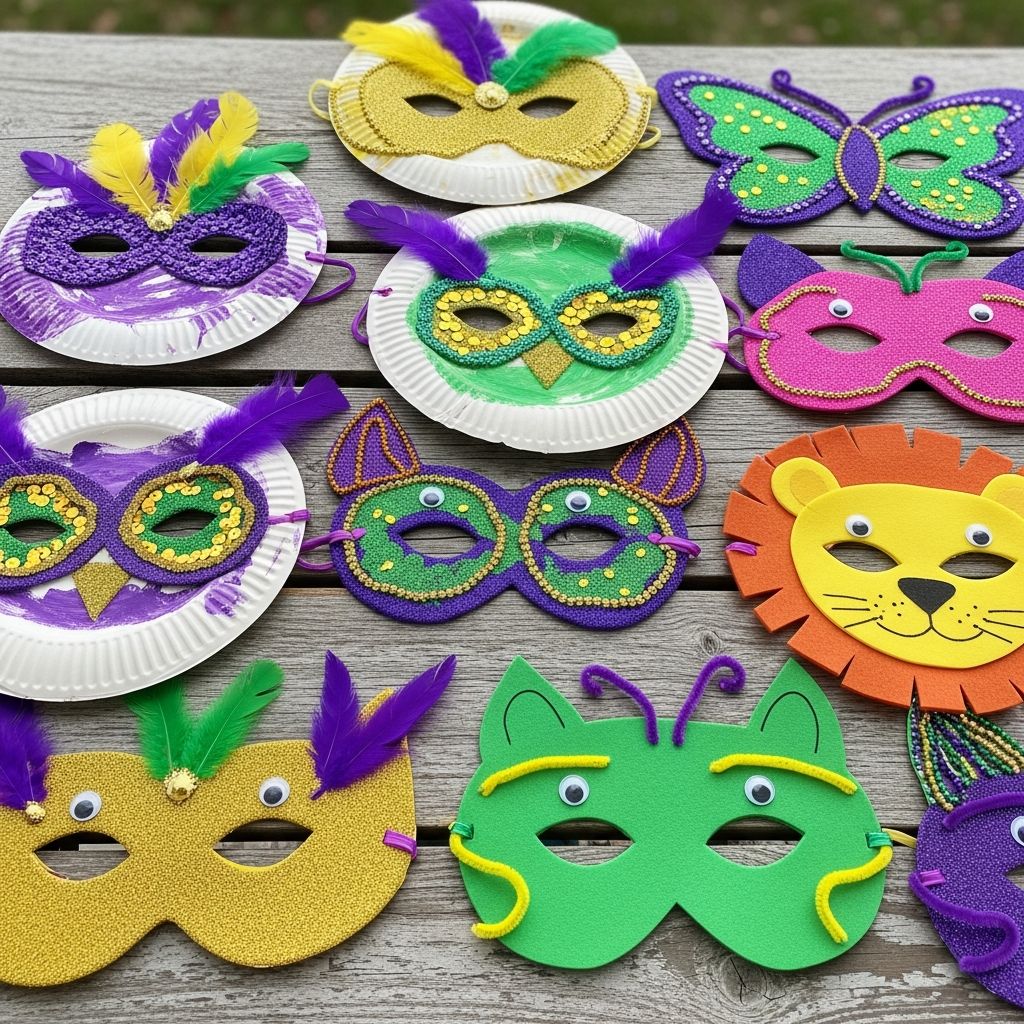
Mardi Gras is the perfect excuse to break out bold colors, sparkly decorations, and piles of craft supplies so kids can design masks that feel magical, silly, or completely over-the-top. Instead of buying flimsy plastic masks, you can turn an afternoon at home into a creative celebration that lets children experiment with shapes, textures, and patterns while learning about a fun cultural tradition.
Why Mask-Making Is Perfect for Kids
Making Mardi Gras masks at home is more than a craft; it is a hands-on way for children to explore color theory, practice fine motor skills, and enjoy open-ended creativity. Kids get to make choices about design, which supports independence and confidence while giving them something festive to wear for parades, parties, or pretend play.
This project also adapts easily to different ages and attention spans. Young children can stick on large, simple decorations, while older kids can design layered patterns, experiment with recycled plastics, or even build matching crowns and accessories to go with their masks.
Gathering Supplies: Basic and Recycled Options
You do not need specialty materials to create impressive Mardi Gras masks for kids. A combination of basic craft supplies and items from your recycling bin gives you plenty of options for shapes, textures, and structural support.
- Base materials: thin cardboard (like cereal boxes), paper plates, or clean plastic packaging
- Adhesives: low-temperature glue guns (for adults or older kids), strong craft glue, or double-sided tape
- Decorations: feathers, ribbon, stickers, sequins, buttons, yarn, paper scraps, pom-poms, foil, or leftover party decorations
- Drawing and color: washable markers, crayons, colored pencils, child-safe paint, and permanent markers reserved for adults or supervised older kids
- Handles and fasteners: elastic cord, string, chopsticks, craft sticks, or dowels
- Recycled extras: plastic bottles, milk jugs, snack boxes, and plastic trays from packaging, all washed and dried before use
Choosing a mix of new and reused materials also opens up conversation about sustainability. Children see firsthand how everyday items can be transformed into something beautiful and fun instead of going straight into the trash.
Mask Base Styles: Choosing the Right Shape
Before kids start decorating, you need to decide on the mask base. The base determines comfort, visibility, and how easy the finished mask will be to wear. Try offering a few options so each child can choose the style that feels right.
| Base Type | Best For | Pros | Things to Watch |
|---|---|---|---|
| Half-face cardboard or paper plate | Most ages, quick projects | Easy to cut, lightweight, uses common supplies | Needs careful eye-hole placement for comfort |
| Clear plastic base | Older kids who like unusual materials | Allows kids to see through areas without cutting eye holes; strong but flexible | Requires permanent markers and closer adult supervision |
| Full-face mask with nose | Costume play and dramatic designs | Covers more of the face, great for bold decoration | Can feel heavy if overloaded with decorations |
| Stick-held masquerade mask | Kids who dislike straps or elastic | No pressure on the face; easy to share or pose for photos | Requires one hand to hold it up during play |
Step-by-Step: Simple Cardboard Mask
This basic project is a great starting point for families trying Mardi Gras mask-making for the first time. You can scale it up with more detailed decorations or keep it simple for a short, fun activity.
- Sketch and cut the base.
- Draw a large oval or curved shape on thin cardboard or a paper plate to cover the area around the eyes.
- Cut out the shape with scissors, rounding any sharp points so the edges feel smooth against the skin.
- Mark and cut eye openings.
- Hold the blank mask gently against the child’s face and use a pencil to mark where the eyes should be.
- Remove the mask and cut almond-shaped or circular openings, then refine them until the child can see comfortably.
- Paint or color the base.
- Invite kids to cover the base with Mardi Gras colors such as purple, green, and gold, or any bright palette they like.
- Encourage them to create stripes, zigzags, dots, swirls, or color blocks before adding any three-dimensional decorations.
- Add texture and sparkle.
- Glue on feathers, sequins, foil pieces, or tissue paper to build dimension.
- Cluster decorations near the outer edges to avoid blocking the child’s vision.
- Attach a handle or strap.
- For a handheld mask, tape or glue a chopstick or craft stick to the back of one side.
- For a wearable mask, punch a hole on each side and tie on elastic or ribbon, adjusting the length so it fits snugly but comfortably.
- Let it set and test fit.
- Allow glue and paint to dry completely before wearing.
- Test the mask and trim any edges or decorations that feel scratchy or block the child’s view.
Creative Decorating Ideas Kids Love
Once the base is ready, decorating is where kids really shine. Offer a wide variety of materials on a tray or in small containers, then step back and let children experiment with layering and pattern-making.
- Color themes: Stick with traditional purple, green, and gold for a classic Mardi Gras look, or challenge kids to design masks in rainbow, neon, or monochrome schemes.
- Symmetry vs. wild designs: Some children enjoy mirroring shapes on each side of the mask, while others prefer asymmetrical, free-form designs with clusters of feathers on just one side.
- Mixed textures: Combine soft feathers, shiny foil, smooth beads, and rough glitter paper to create masks that invite kids to explore by touch as well as sight.
- Personal symbols: Encourage kids to add shapes that represent favorite animals, hobbies, or initials so each mask feels unique and meaningful.
Talk about how costumes and masks often tell stories or show personality. Asking children what their mask says about them can lead to imaginative play and storytelling once the craft is finished.
Working Safely with Kids and Glue
Mask-making sometimes involves tools and materials that are best handled with care. Planning ahead for safety keeps the experience fun and avoids frustrating mishaps like decorations falling off or accidental burns from hot glue.
- Use low-temperature glue guns only with close supervision and reserve the task of squeezing the glue for adults or responsible older children.
- Offer double-sided tape or strong liquid glue as safer options for younger kids who want to attach decorations independently.
- Set up a designated gluing station with a protective mat or scrap cardboard so surfaces stay clean and fingers are less likely to end up in sticky puddles.
- Choose non-toxic paints and markers intended for children, and keep permanent markers for adults or well-supervised older kids working on plastic pieces.
Remind children to keep masks away from their mouths and to avoid covering the nose or face so much that breathing feels uncomfortable. A short comfort check after the mask is finished helps make sure kids enjoy wearing their creations.
Eco-Friendly Twist: Using Household Recyclables
One of the most satisfying parts of making Mardi Gras masks at home is discovering how many materials you already have on hand. Clean food containers and packaging can become exciting additions that add strength and transparency to kids’ designs.
- Milk jugs: The slightly textured, opaque plastic is ideal for cutting into small shapes like stars, leaves, or diamonds that kids can color with markers and attach to their masks.
- Clear plastic packaging: Flat pieces from toy or gadget packaging can serve as see-through mask bases or be cut into colorful spikes once decorated with permanent markers.
- Cardboard boxes: Cereal or cracker boxes make sturdy bases and can also be cut into crowns, headbands, or extra details to layer on top of the mask.
- Plastic bottles: The curved surface of bottles can be opened, flattened, and cut into flame-like or feather-shaped pieces for dramatic, three-dimensional accents.
Before crafting, wash and dry all recycled materials thoroughly and trim away sharp edges. Older children can help inspect and prepare these items, turning the process into a mini lesson about reuse and resourcefulness.
Beyond Masks: Crowns and Carnival Accessories
Once kids finish their masks, they often want to keep decorating. Extending the project into crowns and accessories makes the experience feel like a full costume workshop and keeps the creative momentum going.
- Recycled crowns: Cut a strip from a cardboard box or plastic bottle, then snip it into spikes or curves and tape the ends together to fit the child’s head. Add stickers, marker designs, and layered shapes for a regal look.
- Mini capes or sashes: Use old fabric, scarves, or even tissue paper taped to string to make lightweight, fluttering accessories.
- Wands and scepters: Glue foam shapes or cardboard stars to the tops of craft sticks and decorate them to match the mask’s color scheme.
Creating a full set of carnival pieces encourages pretend play long after Mardi Gras has passed. Children can stage parades through the living room, invent characters, or put on a mini performance for family members.
Tips for Crafting with Groups
Mardi Gras mask-making is an excellent activity for classrooms, playgroups, or parties, but a little planning makes group crafting run smoothly. Thinking through timing, supply distribution, and cleanup ensures kids focus on creativity instead of waiting for materials.
- Prep mask bases ahead of time by pre-cutting simple shapes and eye holes for younger children, leaving only the decorating for the group session.
- Organize supplies into shared trays or bins at each table so kids do not have to crowd a single supply station.
- Set up a drying or “display” area where finished masks can rest while glue sets, and where children can admire each other’s work.
- Build in time for a short “parade” at the end, allowing everyone to show off their creations before taking them home.
For larger groups, consider rotating kids through stations—painting, decorating, and handle-attachment—so each step has enough space and support.
Simple Cleanup and Storage Ideas
Glitter, feathers, and paint can get messy, but a few small habits keep this project manageable. Setting expectations at the beginning also helps children take responsibility for their creative space.
- Cover tables with newspapers or a plastic cloth and give each child a small tray or piece of cardboard as a personal workspace.
- Use a handheld vacuum or lint roller to collect stray glitter and tiny sequins instead of trying to brush them off by hand.
- Store finished masks on a shelf, hanging from clothespins on a string, or flat in shallow boxes to protect fragile decorations.
- Label the back of each mask with the child’s name and the year so it becomes a keepsake and a memory of that year’s celebration.
Keeping leftover materials in a clearly marked box means you will be ready for future projects, not just for Mardi Gras but for any costume or imaginative play idea that arises.
FAQs About DIY Mardi Gras Masks for Kids
What age is best for this craft? Preschoolers through tweens can enjoy making Mardi Gras masks, but the level of independence will vary. Younger children do best with pre-cut bases and larger decorations, while older kids can safely handle more detailed cutting and careful placement of small embellishments. How long does a typical mask take to make? Plan for about 30–60 minutes, depending on drying time and how intricate the decoration becomes. Quick versions with stickers and markers can be finished in one short session, while layered, painted designs may take longer if children want to add several rounds of detail. Can these masks be reused for other events? Absolutely. With a few color or detail changes, Mardi Gras masks can be repurposed for school plays, dress-up boxes, Halloween costumes, or themed birthday parties. Encouraging kids to treat them gently and store them carefully helps them last beyond a single holiday. What if a child dislikes wearing masks on the face? Some kids enjoy the decorating but prefer not to cover their faces. In that case, turn the design into a wall decoration, door sign, or handheld prop. You can also attach the mask to a hat or headband so it functions more like a costume accessory than facewear. Do masks have to use traditional Mardi Gras colors? No. While purple, green, and gold are traditional, children should feel free to explore any color palette that excites them. Letting go of strict color rules keeps the project playful and supports experimentation with combinations they might not usually try.