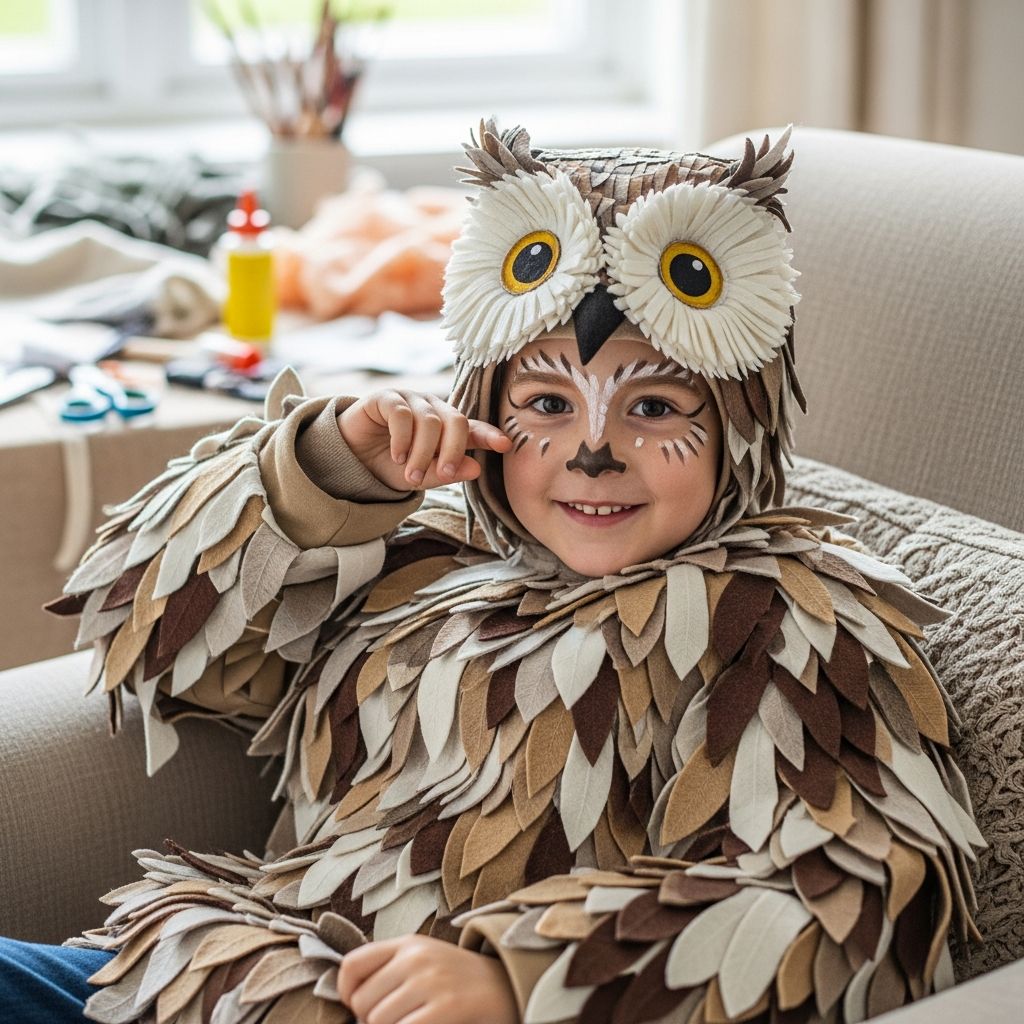
If a costume party or Halloween crept up on you, a handmade owl outfit is one of the fastest, most forgiving, and most charming solutions you can create with basic supplies and a little imagination.
Why an Owl Costume Is Perfect in a Time Crunch
Owls are instantly recognizable, which means even a simple DIY costume looks cute and intentional, not rushed. You can tailor the colors and details to your child’s favorite palette, from realistic browns to rainbow fantasy feathers.
Because the base of this costume is just regular clothing with soft add-ons, kids stay comfortable and warm, and you can assemble everything in one relaxed afternoon instead of wrestling with a complicated pattern.
Planning Your Owl Costume: Key Choices
Before cutting into anything, decide how much time you have, how permanent you want the costume to be, and whether sewing is an option or you need a totally no-sew project.
- Time available: If you have less than an hour, choose glue or safety pins instead of stitching.
- Reusability: Use removable wings and a separate mask if you want the clothing to go back into your child’s regular wardrobe.
- Comfort level: Avoid stiff cardboard on areas that bend, like elbows and knees, and keep anything around the eyes light and secure.
Quick Comparison of Owl Costume Styles
| Style | Main Pieces | Skill Level | Best For |
|---|---|---|---|
| Feathered T-shirt | Long tee with layered fabric “feathers” on the front | Beginner (no-sew friendly) | Very fast costumes and indoor parties |
| Wing Cape | Half-circle cape with scalloped edge and feather rows | Beginner to intermediate | Kids who like to spread their wings and run |
| Mask + Plain Clothes | Paper or felt eye mask plus neutral outfit | Beginner | Ultra last-minute or classroom dress-up days |
| Full Feathered Top & Wings | Decorated shirt plus detachable wings and headpiece | Intermediate | Photo-worthy Halloween or themed events |
Essential Materials You Probably Already Own
The beauty of an owl costume is that it can be built around everyday basics, then dressed up with scraps and simple craft supplies rather than specialty materials.
- Dark or neutral T-shirt or long-sleeve top (brown, gray, navy, or black work well)
- Leggings, sweatpants, or a skirt to match or coordinate with the shirt
- Fabric scraps, felt sheets, old T-shirts, fleece, or even an outgrown pillowcase for “feathers”
- Sharp scissors suitable for fabric
- Fabric glue, hot glue (for adult use only), or a simple needle and thread
- Cardstock or thin cardboard for the mask base and beak
- Elastic, ribbon, or an old headband to hold the mask or ears in place
- Markers, fabric paint, or crayons for coloring details
You can upgrade the look with optional extras such as glitter, small buttons for eyes, or a bit of faux fur, but they are not required to achieve a charming final costume.
Step 1: Design Your Owl’s Personality
Owl costumes are more fun when they reflect your child’s personality, so start by deciding what kind of owl you’re making instead of jumping straight into cutting and gluing.
- Classic forest owl: Browns, tans, and creams with simple round eyes.
- Snow owl: Mostly white with soft gray or black spots on a pale base layer.
- Rainbow owl: Bright, mixed colors from old T-shirts, bandanas, or craft felt.
- Night sky owl: Dark blue or black with scattered silver and gold feathers.
Choosing a palette before you start cutting feathers keeps the design cohesive and also helps you decide what to pull from your scrap pile or donation bag.
Step 2: Create Simple Fabric Feathers
Instead of complicated patterns, you only need one small feather shape that you repeat many times; the layering will make them look detailed and impressive.
- Cut a small feather template from scrap cardstock in a teardrop or rounded triangle shape about the width of your child’s palm.
- Trace this template onto your fabric pieces in groups, mixing colors within your chosen palette.
- Cut each feather out, rounding the bottom edge and leaving the top straight so it’s easy to attach in rows.
- Optional: Snip tiny “notches” along the sides of each feather for a more textured, feathery edge.
Thinner fabrics such as cotton jersey drape nicely, while felt holds its shape and does not fray, so using a mix can give the final costume pleasant depth.
Step 3: Build the Feathered Owl Body
The body of your owl costume can be as simple as a T-shirt front covered in overlapping feathers that form a soft chest panel, leaving the sleeves and back mostly plain for comfort.
- Lay the shirt flat on a table and slide a piece of cardboard inside to prevent glue from seeping through to the back.
- Starting at the bottom hem, place a row of feathers with the points facing down and the straight edges along an invisible line.
- Glue or stitch across the straight tops of the feathers, keeping the lower halves free so they can move.
- Work upward in rows, overlapping each new row over the row below like shingles on a roof.
- At the chest area, slightly curve the rows to follow the shape of the neckline, making the feather panel narrower as you approach the top.
You can cover only the front of the shirt for speed, or continue a few rows around the sides for a more finished look while still keeping the back mostly free of bulk so the costume is easy to sit in.
Step 4: Add Simple Owl Wings
Wings are the most dramatic part of the costume, but they can be made quickly as a cape or as panels that attach under the arms with elastic loops or safety pins.
Option A: Quick Cape-Style Wings
- Fold a large piece of fabric or an old sheet in half and cut a big half-circle roughly from wrist to wrist when your child’s arms are stretched wide.
- Cut a smaller half-circle out of the straight edge to create a neck opening, then trim the outer curved edge into wide scallops to suggest feathers.
- Attach a short piece of elastic or ribbon to each front corner of the cape to tie or fasten at the neck.
- Glue or stitch rows of feathers along the scalloped edge, working inward a few rows until you like the density.
- Add small loops of elastic at the outer corners for your child’s wrists so the cape lifts when they spread their arms.
Option B: Under-Arm Wing Panels
- Cut two long wedges of fabric that run from shoulder to wrist on each side, with the wide end at the wrist.
- Decorate the outer edges with feathers, gluing them in staggered rows that taper toward the shoulders.
- Secure the narrow end to the side seam or underarm of the shirt, either by hand stitching or with sturdy safety pins.
- Attach elastic loops at the wrists or sew the outer corners to a pair of fingerless gloves or cuffs.
Both wing options make the costume feel more animated, and because they are separate pieces, you can remove them easily if your child gets tired or too warm.
Step 5: Craft an Easy Owl Mask
An owl mask instantly completes the transformation, and you can keep it very simple while still making a big impact by focusing on exaggerated eyes and a small beak.
Paper or Cardstock Mask
- Draw a wide, rounded mask shape on cardstock that covers the upper half of the face, then cut out two large eye holes.
- Glue layering rings of contrasting paper or felt around the eye holes to make them prominent and owl-like.
- Fold a small triangle of cardstock in half and attach it between the eyes as a beak, pointing downward.
- Punch a hole at each side and tie on elastic or string so the mask can be worn comfortably without needing to be held.
Headband or Hat Alternative
- Decorate a plain knit hat with felt circles for eyes and a small felt triangle for the beak sewn or glued to the front.
- Attach two small ear-tuft triangles of felt at the top of the hat to suggest owl ears without being heavy.
- For a headband, glue the eyes, beak, and ears to a strip of felt, then wrap and secure it around the band.
Using a hat or headband can be especially helpful for younger children who dislike masks but still want to play along as a wise little owl.
Styling the Rest of the Outfit
The clothing underneath the feathers and wings does not need to be fancy; using solid colors that match or complement your owl theme keeps the look cohesive without extra work.
- Base layers: Long-sleeve tops and leggings in a single color give the impression of soft plumage.
- Footwear: Brown or black shoes or boots blend in with the costume and are practical for trick-or-treating.
- Outerwear: For cold nights, slip a neutral jacket under the wings or choose an oversized hoodie as the feathered base.
If your child loves accessories, add a small drawstring “forest treasure” bag or a toy book labeled with something owl-ish like “Book of Night Secrets” for extra character.
Quick Safety and Comfort Checklist
A costume is only successful if your child can actually move, play, and see clearly while wearing it, so build in a few minutes for adjustments and testing.
- Make sure masks do not block peripheral vision and that eye openings are large and smooth at the edges.
- Keep glue and any hard embellishments away from areas that bend or rub, such as the back of the knees and inside elbows.
- Secure long or dangling pieces so they will not get caught on door handles or playground equipment.
- For younger children, use soft elastic and lightweight materials rather than stiff board or heavy felt.
Having your child walk, spin, flap their wings, and sit down in the costume before leaving the house is the easiest way to catch any small problem spots.
No-Sew vs. Low-Sew: Which Should You Choose?
Both no-sew and low-sew approaches can produce a sturdy owl costume, so the right choice depends on how quickly you need to finish and how often the costume will be worn.
| Approach | Pros | Cons |
|---|---|---|
| No-Sew (fabric glue, safety pins) | Very fast; kid-friendly; good for single-night events | Feathers may peel or shift after multiple wears or washes |
| Low-Sew (simple straight stitches) | More durable; feathers stay in place; washable | Takes longer and requires basic sewing tools |
If you are down to the wire, glue and pins are your allies; if you have a little extra time and plan to keep the costume for dress-up play, a few lines of stitching are worth the effort.
Fun Ways for Kids to Help
Involving your child in making the costume turns a last-minute scramble into a creative memory, even if you handle the trickier cutting and fastening steps yourself.
- Let them choose the color scheme for the owl’s feathers and eyes.
- Have them trace the feather template, sort colors into piles, or arrange feathers in each row before you glue.
- Encourage them to decorate the mask with drawn patterns, dots, or tiny stars to express their idea of a magical owl.
When kids help build their own costume, they often feel more comfortable wearing it and take pride in “showing off” their handmade creation to friends and family.
Frequently Asked Questions About DIY Kids’ Owl Costumes
How long does this costume take to make?
For a very simple version with a feathered shirt front and a basic paper mask, expect about one to two hours, depending on how quickly you cut and glue. Adding wings and extra details can stretch the project into a longer afternoon, but the steps are still beginner-friendly.
What if I do not have fabric scraps?
You can cut feathers from old T-shirts, flannel pajama pants, pillowcases, or even an old tablecloth that is headed for the donation pile. If fabric is still limited, mix it with sturdy colored paper or craft foam for a layered look that uses fewer textile pieces.
Can this idea work for different ages?
Yes, the same basic approach scales up or down easily: use smaller feathers and fewer layers for babies or toddlers, and enlarge the feathers and wings for older kids or even adults. The secret is to keep the base clothing size appropriate and then adjust the feather size to look proportional.
How do I store the costume after Halloween?
Let any glued sections dry completely, then fold the shirt and wings carefully so the feathers lie flat, and store them in a large zipper bag or box. Keeping the mask in a separate flat envelope or folder prevents it from bending or cracking between seasons.
What can I do if the mask bothers my child?
If a full face mask feels itchy or restrictive, switch to a soft hat or headband with owl eyes and a small beak on the front. Another option is to paint a simple owl pattern around the eyes with face paint and skip the mask or hat entirely.
Turning a Simple Outfit into a Magical Memory
A last-minute kids’ owl costume does not need elaborate sewing or expensive supplies; thoughtful layering of simple shapes is enough to create fluttery wings and a wise little face. With a few scraps, an old T-shirt, and twenty or thirty minutes of focused crafting, you can help your child fly into their event feeling proud, comfortable, and wonderfully owl-like.