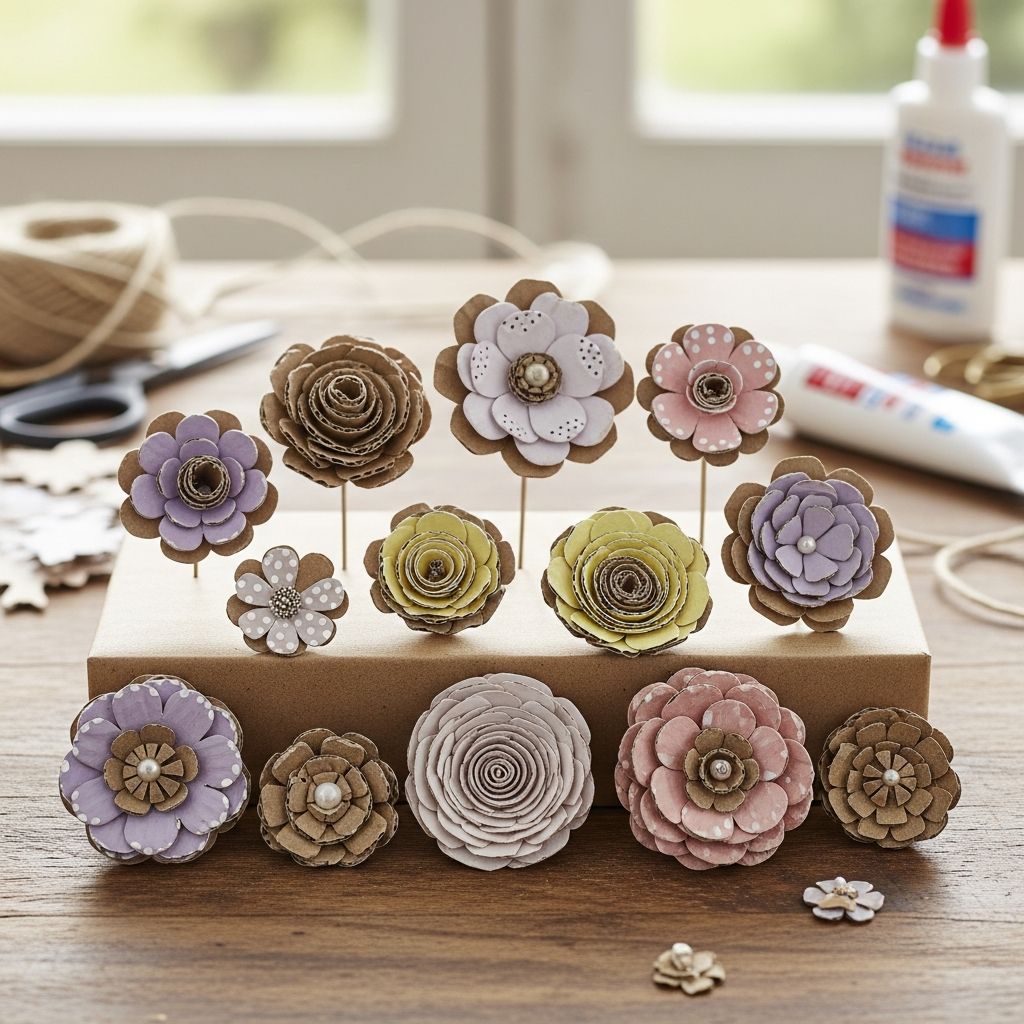
Cardboard flower pins are a simple, eco-friendly way to turn everyday packaging into a meaningful Mother’s Day gift. Instead of buying another store-bought trinket, this project invites families to slow down, create together, and give something that carries both creativity and love.
Using recycled cardboard, a few basic art supplies, and your imagination, you can design colorful blossoms that Mom can wear proudly on a sweater, bag, or jacket. This guide walks through everything from choosing the right cardboard to adding the final protective finish, so even beginners and young kids can join in.
Why Make Cardboard Flower Pins?
Crafting with recycled cardboard offers more than a quick afternoon activity; it teaches kids about sustainability, resourcefulness, and the joy of handmade gifts. Every flower pin becomes a small reminder that beauty can grow from the simplest materials.
These pins are particularly well-suited to Mother’s Day because they blend personal effort with a wearable result. Unlike a paper card that may end up in a drawer, a sturdy cardboard pin can be enjoyed over and over, sparking conversations and memories each time it is worn.
Gathering Your Materials
One of the best parts of this project is that most of the materials are already in your home. Before purchasing anything, take a look in your recycling bin and craft box to see what you can reuse.
- Cardboard: Cereal boxes, shipping boxes, or snack boxes work well; thinner cardboard is easier for kids to cut.
- Adhesive: White craft glue for kids, strong tacky glue or a hot glue gun for adults.
- Coloring supplies: Acrylic paint, markers, paint pens, or colored pencils.
- Cutting tools: Kid-safe scissors for children and a craft knife for adult helpers if precise details are needed.
- Pin backs: Bar pin backs, safety pins, or small brooch clips.
- Sealant (optional): Clear-drying varnish or a thin layer of glue mixed with water for extra durability.
- Embellishments (optional): Buttons, sequins, fabric scraps, or beads for decorative centers.
Choosing and Preparing the Cardboard
The type of cardboard you select will affect how your flowers look and feel. Lightweight cardboard from cereal boxes cuts smoothly and is ideal for layered designs, while corrugated cardboard from shipping boxes adds texture and depth.
To prepare the cardboard, flatten the boxes completely and trim away any bent or heavily printed sections. If you prefer a neutral base color, you can peel away the top printed layer from corrugated pieces, revealing a natural brown surface that takes paint beautifully.
Designing Your Flower Shapes
There is no single correct way to draw a flower for this project; part of the charm comes from imperfect, hand-drawn shapes. You can sketch loosely or follow simple geometric ideas to guide your petals and leaves.
- Simple daisy: Draw a small circle in the center and surround it with rounded petals.
- Layered blossom: Create several flower shapes in different sizes, from large to small, and stack them.
- Abstract flower: Combine triangles, ovals, or squares arranged in a circle for a modern, graphic look.
If children feel nervous about drawing, offer a few practice sheets on scrap paper first. Once everyone is comfortable, transfer the designs to cardboard with a pencil, keeping the final pin size in mind. A good rule of thumb is to aim for flowers between 4 and 7 centimeters in diameter.
Cutting and Layering Petals
Cutting is where cardboard transforms from a flat sheet into a dimensional flower. Young kids may need help with inside curves and tight angles, so consider having adults handle the more detailed cuts while children focus on larger shapes.
Once you have several petals and flower bases, begin experimenting with arrangements before gluing anything. Stack a large flower behind a smaller one, rotate layers slightly to offset petals, or add a separate cardboard circle in the center to simulate a floral core.
- Place larger petals on the bottom for stability.
- Alternate colors and shapes in each layer for contrast.
- Press each piece flat under a book for a few minutes if the cardboard curls.
Coloring Techniques for Cardboard Blossoms
Paint and color bring your flower pins to life. Different coloring tools can completely change the style of your finished piece, from soft and subtle to bold and graphic.
| Coloring Medium | Best For | Tips |
|---|---|---|
| Acrylic paint | Bright, opaque color | Use thin layers to avoid warping the cardboard. |
| Markers | Quick colors and outlines | Great for adding fine details and patterns. |
| Colored pencils | Soft shading | Layer colors to create depth in each petal. |
| Paint pens | Bold lines and highlights | Use for dots, veins, and metallic accents. |
Consider painting the base color first, letting it dry, and then adding patterns. Stripes, tiny polka dots, petal veins, or gradient shading from the center outward all help the flowers stand out. Encourage kids to explore their favorite color palettes, whether that means realistic garden tones or fantastical rainbow blooms.
Assembling the Flower Pins
After the painted pieces are dry, it is time to assemble the pins. This step is where the project truly takes shape and begins to look like a finished accessory rather than a collection of cardboard cutouts.
- Arrange the layers: Lay out the petals and centers until you like the overall design.
- Glue from back to front: Start with the largest layer, apply glue in the center, and place the next layer on top, pressing firmly.
- Add a center detail: Glue a button, small cardboard circle, or bead cluster in the middle.
- Let it dry: Place a light book on top (with parchment or scrap paper between) to keep everything flat while it sets.
If you want extra dimension, gently curl the tips of each petal upward with a pencil before the glue fully sets. Slight bends and curves make the flowers appear more lifelike without requiring complex techniques.
Attaching the Pin Backs Safely
Turning a cardboard flower into a wearable pin is straightforward, but it requires an adhesive strong enough to withstand regular use. Adults should handle this step for younger children to ensure safety and durability.
- Flip the flower over and find the vertical center line.
- Position the pin back horizontally so that the clasp sits slightly above the midpoint; this helps the flower hang upright.
- Apply a generous dot of strong glue or hot glue to the flat side of the pin back.
- Press it firmly onto the cardboard and hold for a few seconds until it grips.
Allow the glue to dry completely before pinning the flower onto fabric. For very large or heavy designs, consider gluing an additional small rectangle of cardboard over the bar of the pin back, creating a bridge that reinforces the connection.
Personalizing Pins with Messages and Textures
Mother’s Day crafts feel even more special when they capture personal messages or memories. Cardboard offers a sturdy surface for writing and layering, making it easy to add words and textures that tell a story.
- Write short phrases on petals such as “Love,” “Joy,” or “Thank you.”
- Glue tiny hearts or stars cut from contrasting cardboard onto the petals.
- Layer snippets of patterned paper, tissue, or lace to create a collage effect.
- Incorporate a small photo in the center of the flower, sealed under a thin layer of clear glue.
Encourage kids to think about their favorite memories with Mom and translate those ideas into color choices or symbols. A flower inspired by a family picnic, for example, might pair sunny yellows with grassy greens and tiny painted ants along one petal.
Eco-Friendly Gift Presentation Ideas
Since the pins themselves celebrate reusing materials, it makes sense to present them in an eco-conscious way as well. Simple, thoughtful packaging can elevate a homemade pin into a keepsake-quality gift.
- Cut a small rectangle of cardboard, cover it with scrap paper, and pin the flower through it like a jewelry card.
- Use brown paper bags or old newspaper pages as gift wrap, adding hand-drawn flowers to echo the pin design.
- Tie everything together with leftover yarn or fabric strips instead of new ribbon.
A handwritten note taped to the back of the display card can share the story of how the pin was made and why the giver chose those specific colors or shapes. This thoughtful context often means as much to a parent as the gift itself.
Variations: Beyond Mother’s Day
Once the basic technique is familiar, cardboard flower pins can extend far beyond one holiday. By shifting the colors and symbols, the same process can serve birthdays, school events, and seasonal celebrations.
- Teacher appreciation: Use school colors and tiny letter or pencil motifs.
- Spring festivals: Focus on pastel palettes and layered petals that resemble real blossoms.
- Party favors: Create a set of small matching pins for guests to wear and take home.
- Sibling crafts: Let each child design a unique flower for another family member, building a mini bouquet of personalities.
Because the materials are inexpensive and easy to find, kids can experiment freely without fear of “wasting” supplies. The result is often a collection of unexpected, delightful designs that might not have appeared if the plan were entirely rigid.
Safety and Accessibility Tips
This project is family-friendly, but a few precautions help ensure that everyone stays safe and engaged. Adults should supervise any use of sharp blades, hot glue, or small embellishments that could pose a risk to very young children.
- Offer pre-cut shapes for toddlers and preschoolers so they can focus on painting and decorating.
- Swap hot glue for stronger liquid craft glue when working with kids who may accidentally touch adhesive areas.
- Store pins and small parts out of reach of babies and pets.
Inclusive crafting is also important. Children with limited hand strength can benefit from softer cardboard and chunkier coloring tools, while those who struggle with drawing might enjoy stamping shapes or tracing around household items like bottle caps.
Frequently Asked Questions
How long do cardboard flower pins last?
With careful handling and a light protective coat of sealant, cardboard flower pins can last for several seasons. They hold up best when kept dry, stored flat, and worn on fabrics that do not constantly rub or snag the petals.
Can these pins be made without special pin backs?
Yes, you can improvise with safety pins if pin backs are not available. Simply glue a safety pin horizontally to the back of the flower, leaving the hinge and clasp free so the pin can still open and close comfortably.
What is the best way to protect the colors?
A thin layer of clear-drying glue mixed with water or a spray sealant designed for crafts can help preserve color and add light water resistance. Be sure to test any sealant on a scrap of decorated cardboard first to make sure it does not cause smudging or color changes.
Are these suitable for classroom or group activities?
Cardboard flower pins work very well as group projects because they use inexpensive, widely available materials and can be adapted for different age levels. Preparing some steps in advance, such as pre-cutting basic flower shapes, helps larger groups complete pins within a single session.
Can I recycle the pins later?
Many of the components are recyclable, especially the cardboard, but the combination of glue, metal pin backs, and embellishments may require disassembly. Removing the metal parts before recycling the cardboard ensures that materials are sorted more effectively.
Celebrating Mother’s Day with Meaningful Making
Upcycled cardboard flower pins prove that heartfelt gifts do not need expensive supplies or complicated techniques. A single box that once held cereal or deliveries can become a bouquet of handmade blossoms that parents wear with pride.
By inviting kids to design, color, and assemble their own creations, families turn craft time into a shared experience filled with conversation and creativity. Every pin carries a story—of the hands that made it, the moments spent together, and the love at the heart of Mother’s Day.