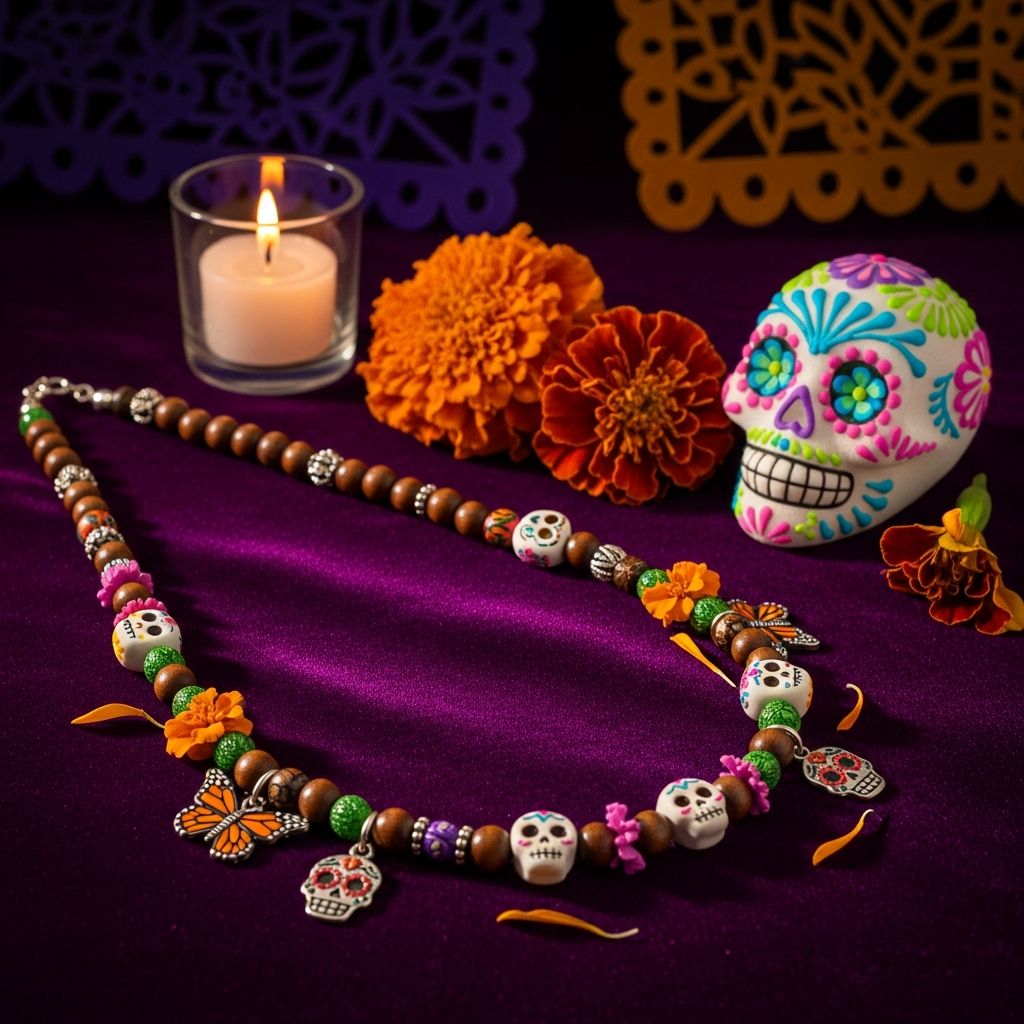
Día de los Muertos, or Day of the Dead, is a Mexican tradition that honors loved ones who have died with color, food, music, and shared memories. A handmade memory necklace is a simple, meaningful project that helps kids connect with the holiday in a gentle, creative way.
Why Make a Memory Necklace for Día de los Muertos?
Día de los Muertos is not about fear or horror; it is a celebration of life and the continuing presence of loved ones in family stories and hearts. Crafting a necklace around this theme lets children participate in the holiday at their own comfort level, using bright colors and symbols of remembrance instead of anything frightening.
This project also doubles as a quiet conversation starter. As kids design their necklaces, adults can share memories, explain the meaning of the holiday, and reinforce that talking about those who have died can be comforting rather than scary.
Respectful Inspiration from Tradition
In many Mexican communities, families build altars, decorate with marigolds, bake pan de muerto, and paint colorful skulls known as calaveras to symbolize the beauty and fragility of life. The goal of this necklace is not to copy specific religious practices, but to borrow the spirit of remembrance, bright color, and joy.
Think of this craft as a kid-friendly tribute: it hints at traditional imagery through patterns, flowers, and hearts, while centering the personal memories and stories that matter in your own family.
Supplies You Will Need
You can adapt this project to the materials you already have at home or in a classroom. Choose options that fit the age and skill level of the children involved.
- Necklace base: yarn, ribbon, twine, elastic cord, or thin fabric strips.
- Beads: plastic pony beads, wooden beads, or paper beads in bright colors.
- Charm shapes: lightweight cardboard, craft foam, air-dry clay, or shrink plastic.
- Coloring tools: markers, colored pencils, paint pens, or acrylic paint.
- Embellishments: sequins, glitter glue, tiny silk flowers, or stickers.
- Photos or drawings: mini printed photos of loved ones (optional), or hand-drawn portraits.
- Tools: hole punch, scissors, non-toxic glue, pencil, and a tray or mat to keep small pieces contained.
Planning Your Necklace Design
Before anyone reaches for the glue, take a few minutes to plan the story the necklace will tell. Ask children who they want to honor and what colors or symbols remind them of that person or pet.
- Choose one person, several loved ones, or a general “family memories” theme.
- Pick two or three favorite colors to repeat throughout the beads and charms.
- Decide whether the necklace will be symmetrical (same pattern on both sides) or playful and random.
- Sketch simple charm shapes: hearts, flowers, stars, candles, or symbolic skulls with friendly expressions.
Step-by-Step Instructions
1. Prepare the Necklace Base
Cut your cord or ribbon long enough to slip easily over the head, plus a little extra for tying. For young children, it is safest to use a breakaway clasp or tie the necklace loosely so it can be removed easily.
Wrap tape around one end of the cord to make sliding beads easier, or tie a temporary bead at one end to keep everything from falling off during stringing.
2. Create the Memory Charms
Cut out small shapes from cardboard or foam, or shape simple pieces from air-dry clay or shrink plastic according to package directions. Keep charms light so the necklace is comfortable to wear.
On each charm, invite kids to draw or paint symbols connected to memories: a grandparent’s favorite flower, a pet’s toy, a musical note for someone who loved to sing, or a tiny plate of a favorite food. Friendly skulls can be included as bright, decorated faces that represent joy instead of fear.
- Leave space for details like dots, swirls, and small hearts.
- Add glitter glue or sequins sparingly so the designs remain clear.
- Punch a hole near the top of each dried or finished charm.
3. Add Photos or Drawn Portraits (Optional)
For older kids, tiny photographs or hand-drawn portraits can make the necklace feel like a wearable altar of memories. Mount small photos on cardstock, trim into shape, and cover with clear tape or contact paper for durability.
Punch a hole at the top of each mini portrait so it can hang like a charm. Consider alternating portraits with symbolic charms so the necklace does not become too heavy or crowded.
4. String Beads and Charms
Lay out beads and charms in the planned order on a table or tray before stringing. Show kids how to create simple patterns—such as alternating colors or repeating sets—that will make the necklace look thoughtful and intentional.
- Start with a few beads near one end.
- Add a charm or portrait.
- Repeat the pattern until the necklace feels balanced and full.
- Keep at least 5–7 cm of bare cord on each end for tying.
5. Tie and Adjust
When kids are satisfied with the arrangement, tie the ends of the necklace in a secure knot or attach a clasp. Test the length and comfort by having the child slip it over their head and gently move around.
If the necklace feels heavy, remove a few beads or charms and save them for another project. Remind children that the meaning of the necklace comes from the memories it represents, not the number of decorations.
Design Ideas and Symbol Meanings
Use the table below as inspiration to talk about symbols in a kid-friendly way. You can adjust explanations to fit your family’s beliefs and comfort level.
| Symbol | Simple Meaning for Kids | How to Use It on the Necklace |
|---|---|---|
| Flower | Represents love, beauty, and the path that memories travel. | Draw flowers on charms or use tiny silk blossoms between beads. |
| Candle | Stands for light, hope, and guiding loved ones back in our stories. | Paint small candle shapes or use gold/yellow beads to suggest light. |
| Heart | Shows that love continues even when someone is no longer here. | Cut heart-shaped charms or choose many red and pink beads. |
| Friendly Skull | Reminds us that the holiday is about joy and remembering, not fear. | Draw smiling, decorated skull faces with bright colors and patterns. |
| Food or Object | Connects to something that person enjoyed in life. | Sketch tiny tacos, coffee cups, books, instruments, or favorite toys. |
Adapting the Craft for Different Ages
This project can be simplified or expanded so that toddlers, school-age children, and teens all find it engaging. The key is to match the level of detail and discussion to each child’s age and temperament.
- Toddlers and preschoolers: Focus on stringing large beads and a few pre-made charms. Keep conversation light and talk about happy memories in simple language.
- Early elementary: Let kids draw their own symbols and decide on patterns. Answer questions about death and remembrance honestly but gently.
- Older kids and teens: Encourage more detailed artwork, writing a loved one’s name on the back of a charm, or researching the holiday’s cultural background as part of the activity.
Talking with Kids About Loss While Crafting
A hands-on project can make difficult topics feel less overwhelming. As fingers stay busy, children may find it easier to ask questions or share stories than during a formal conversation.
- Let children lead. Answer only what they ask and at a level they can understand.
- Share specific, positive memories rather than general statements.
- Normalize feelings: explain that it is okay to feel sad, happy, or even both at the same time.
- Reassure them that remembering a person does not mean you are stuck in sadness; it can also be a way to celebrate their life.
Safety Tips for a Stress-Free Craft Session
Like any project involving small parts and cords, this craft requires some basic precautions. A few simple steps will keep the focus on creativity instead of accidents.
- Supervise young children with beads and small embellishments to prevent choking risks.
- Use child-safe, non-toxic glue and markers.
- Store finished necklaces out of reach of toddlers and pets.
- Consider using elastic bracelets instead of necklaces for very young crafters.
More Ways to Extend the Activity
The memory necklace can be a starting point for a whole afternoon of Día de los Muertos–inspired creativity. Combine it with simple foods, music, and storytelling to give kids a richer sense of the holiday’s meaning.
- Invite children to place their necklace near a framed photo of the person they are honoring when they are not wearing it.
- Play traditional or modern Mexican music while crafting and talk about how different cultures celebrate and remember loved ones.
- Encourage kids to write or dictate a short note or story about the person and keep it with the necklace in a special box.
Frequently Asked Questions
Is this craft only for families with Mexican heritage?
Families from any background can approach this project as a respectful way to learn about another culture while focusing on universal themes of remembrance and love. The key is to explain that Día de los Muertos is a specific tradition with deep roots and to treat it with curiosity and respect, not as a costume or joke.
What if my child is afraid of skull imagery?
You can leave skulls out entirely and focus on hearts, flowers, stars, and other comforting symbols. If your child is curious, explain that in this holiday, skulls are drawn in a friendly, colorful way to show that death is part of life and that memories can be joyful.
Can we use real religious symbols?
Whether to include religious symbols, such as crosses, is a family decision. If you choose to use them, explain their meaning in your own tradition and emphasize that they are used to honor and remember, not to decorate casually.
How long will the necklace last?
With sturdy cord and sealed artwork, the necklace can last for many seasons. Encourage children to handle it gently and store it in a safe place, perhaps bringing it out each year when your family tells stories or sets out photos of loved ones.
Can this be done in a classroom?
Yes, but it is important for educators to present the project as a cultural learning experience rather than a generic Halloween craft. Offer students the option to make a general “gratitude” or “family” necklace if they do not wish to focus on death or specific losses.
Closing Thoughts on Crafting and Remembering
A Día de los Muertos memory necklace is more than a bright accessory; it is a quiet, wearable reminder that the people we love continue to shape our stories. By turning beads and charms into symbols of shared experiences, kids and adults alike can approach the topic of loss with gentleness and creativity.
Whether you display the necklace near family photos, wear it during the season, or tuck it away as a keepsake, it can become a small but powerful tradition that grows richer with every retelling of the memories it represents.