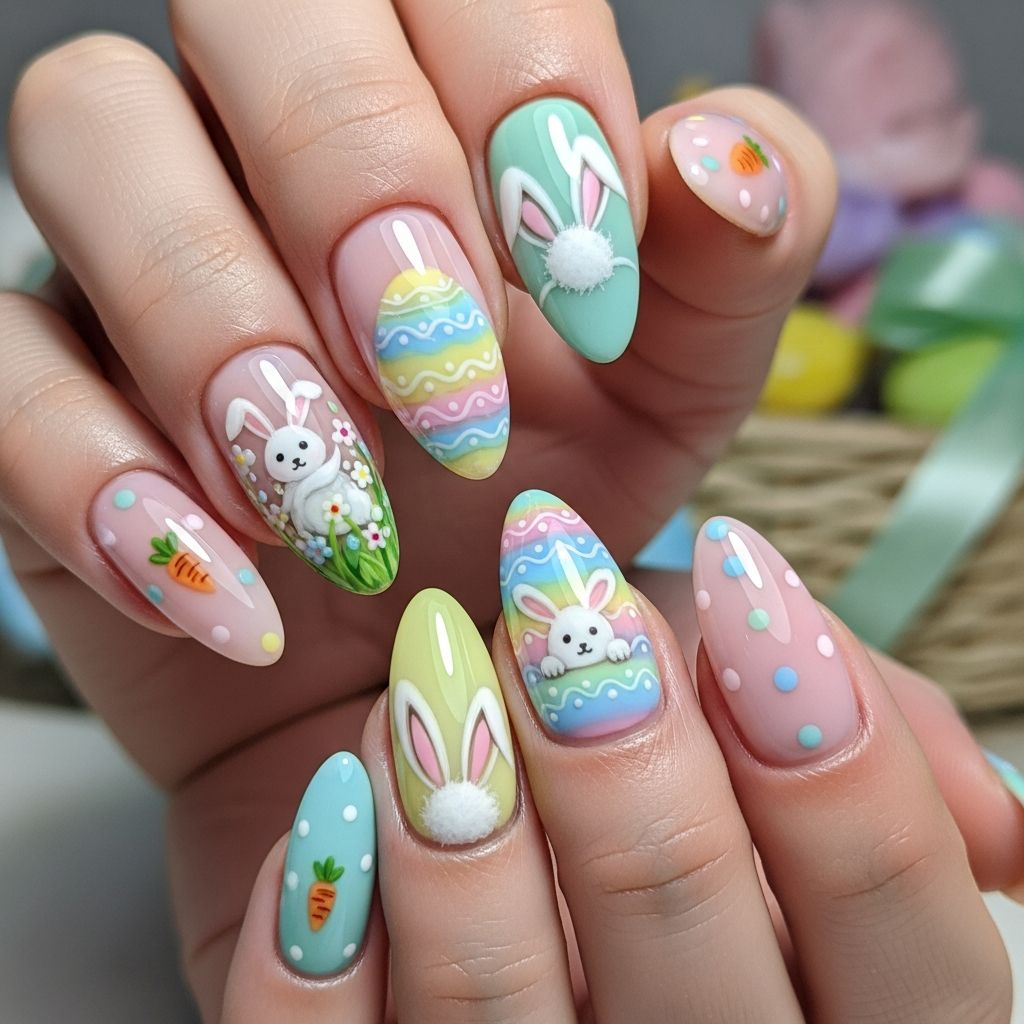
Easter is the perfect excuse to combine pastel colors, cute characters, and a touch of whimsy on your nails. Bunny nail art brings together everything people love about spring: soft hues, fresh beginnings, and a fun sense of playfulness that works for both kids and adults.
This guide walks through creative ways to design bunny-themed nails, from simple accents for beginners to more detailed looks for confident DIY artists. You will discover color ideas, technique tips, and variations that help you customize your manicure for brunch, egg hunts, or classroom parties.
Why Bunny Nails Are a Springtime Favorite
Bunny nail art captures the lighthearted spirit of the season while staying versatile enough for different ages and styles. One person might choose an understated single rabbit accent, while another covers every nail in playful characters and patterns.
Because rabbits pair naturally with pastels, florals, and Easter eggs, they are easy to mix with other motifs you may already enjoy, such as polka dots or minimalist French tips. This makes bunny manicures a fun starting point for experimenting with seasonal nail art.
Essential Tools and Supplies
Before painting, gather a small set of tools so the process feels relaxed rather than rushed. A basic kit helps create clean shapes and smooth lines, even if you do not consider yourself artistic.
- Base coat and top coat for protection and shine.
- Pastel polishes such as soft pink, mint, lilac, baby blue, and butter yellow.
- White and black polish for bunny faces, details, and eyes.
- Thin nail art brush or striping brush for ears, whiskers, and outlines.
- Dotting tools or the rounded tip of a bobby pin or toothpick for eyes, noses, and polka dots.
- Nail polish remover and cotton swabs for quick cleanups.
Gel polish and a curing lamp are optional but useful if you want longer-lasting designs. Beginners can easily work with standard polish, especially when focusing on simple, bold shapes.
Choosing Color Palettes for Bunny Designs
Color selection sets the mood for the entire manicure. Traditional Easter palettes lean toward pastel, but bunny designs can also look charming in neutral or bold combinations, depending on your style.
| Style | Base Colors | Bunny Details | Best For |
|---|---|---|---|
| Soft Pastel | Mint, lavender, baby pink | White bunny faces, pink inner ears | Classic Easter look and kids’ manicures |
| Neutral Chic | Beige, taupe, light grey | White or grey bunnies with black line art | Work-friendly designs with seasonal flair |
| Bold & Bright | Hot pink, turquoise, sunny yellow | White bunnies with colorful noses or bow ties | Parties, photos, and statement manicures |
| Monochrome | Soft pink or nude on every nail | Minimal bunny outlines in white or black | Minimalists who still want seasonal detail |
Rotating colors on different fingers creates a playful Easter-egg effect, while sticking to one base color per hand makes the bunnies themselves stand out more clearly.
Preparing Nails for Longer-Lasting Art
Good preparation helps bunny designs look crisp and last through the holiday weekend. Take a few minutes to shape, clean, and protect your nails before applying color.
- Remove old polish thoroughly so no tint or texture remains.
- Gently file nails into the desired shape, such as oval or squoval, which often suits bunny artwork well.
- Push back cuticles carefully using a cuticle stick, avoiding any cutting that might irritate the skin.
- Wash hands and dry completely to remove oils and dust.
- Apply a thin layer of base coat to prevent stains and create a smooth surface.
Allow the base coat to dry fully before moving to colored polish. Patience during these early steps pays off later, especially when you are adding small details like eyes and whiskers.
Simple Bunny Accent Nail for Beginners
The easiest way to try bunny nail art is to create a single rabbit face on one finger while keeping the others in a solid or patterned pastel. This approach is low-pressure yet still festive and eye-catching.
Step-by-step bunny accent
- Paint all nails with your chosen base color and let them dry completely.
- Choose one finger (often the ring finger) as the bunny accent.
- On that nail, use white polish to paint a half-circle near the tip; this forms the bunny’s head.
- With a fine brush, add two tall, narrow ovals above the half-circle for ears.
- Fill the ears and head with white, then allow them to dry.
- Use a dotting tool with black polish to add two small eyes on the white half-circle.
- Add a tiny pink dot for the nose and, if desired, two thin black lines on each side for whiskers.
- Finish with a clear top coat once the design is fully dry to prevent smudging.
This single bunny accent works well when paired with glitter, polka dots, or stripes on the surrounding nails, creating a balanced yet lively look.
All-Over Bunny Nails for Maximum Cuteness
If you want a bolder Easter manicure, try placing a bunny character on multiple nails. The designs do not have to match perfectly; in fact, small differences in expression or ear position can make the set more charming.
- Alternate between full bunny faces and just bunny ears peeking from the cuticle or nail tip.
- Experiment with different ear shapes, such as one floppy ear or ears pointing in opposite directions.
- Change nose colors between nails, using pink, coral, or even tiny heart-shaped details.
- Add tiny carrots, paw prints, or fluffy tails as small surprises on one or two fingers.
For a cohesive result, keep your color palette limited to three or four shades that repeat across all nails. Repetition of colors ties playful artwork together without making the design look overly busy.
Mixing Bunnies with Easter Eggs and Florals
One of the joys of seasonal nail art is combining motifs. Bunnies pair effortlessly with Easter eggs, flowers, and spring greenery, turning each hand into a tiny story of the season.
To mix motifs without overwhelming the eye, assign each nail a role within the design. For example, one nail might feature a bunny face, another a decorated egg, and the rest subtle florals or polka dots.
Sample mixed-motif layout
- Thumb: Large pastel Easter egg with stripes and dots.
- Index: Simple daisy pattern over a solid pastel background.
- Middle: Bunny face or bunny ears peeking from the tip.
- Ring: Coordinating floral or leafy design.
- Little finger: Solid glitter or tiny scattered dots.
This layout gives you variety while still feeling coordinated. Repeating a specific color or pattern, such as white dots, across several fingers unifies the design.
Kid-Friendly Bunny Nail Ideas
Children often love holiday nail art but may not sit still for tiny, intricate details. Simplifying shapes and using bolder lines helps create designs that look cute even on small nails.
- Use bigger, cartoon-like faces with large eyes and short whiskers rather than very fine lines.
- Paint only two or three accent nails per hand instead of decorating every finger.
- Limit color changes during the session to keep the process quick and fun.
- Consider quick-drying top coats to reduce smudges caused by eager hands.
If you are decorating a group of kids’ nails for a party, set up a simple “menu” with two or three bunny designs they can choose from. This keeps decisions easy and helps the painting process move smoothly.
Subtle Bunny Designs for Adults
Not everyone wants a full cartoon character on their nails, especially in professional settings. Subtle bunny designs offer a way to celebrate the season while keeping your manicure sophisticated.
Minimalist options focus on outlines and silhouettes rather than filled-in faces. A single white line drawing of a rabbit or a discreet pair of ears peeking from the edge of one nail can look artistic and modern.
- Try a nude or soft pink base with a thin white outline of bunny ears on just one finger.
- Use matte top coat for a velvety finish that enhances neutral color schemes.
- Add a tiny metallic dot, such as rose gold, at the base of the ear outline for an understated detail.
These subtle touches allow you to enjoy seasonal fun without overwhelming a minimalist wardrobe or workplace dress code.
Common Mistakes and How to Avoid Them
Bunny nail art is forgiving, but a few small adjustments can greatly improve the final look. Paying attention to drying time and brush choice helps maintain clean, crisp designs.
| Issue | Likely Cause | Quick Fix |
|---|---|---|
| Smudged faces | Top coat applied before details fully dried | Wait several minutes or use fast-drying detail polish |
| Uneven bunny shapes | Brush too large or too much polish on tool | Switch to a thinner brush and wipe off excess before painting |
| Thick, bumpy surface | Too many layers of polish or heavy-handed application | Apply thinner coats and allow each layer to dry thoroughly |
| Chipping at tips | No base coat or top coat; tips not sealed | Always use base and top coat, capping the free edge |
If a detail goes wrong, do not be afraid to remove and repaint just that section. Correcting one nail is much easier than starting the entire manicure over from the beginning.
Making Your Bunny Manicure Last Longer
After investing time in your Easter nails, a few simple habits can help the design look fresh throughout the holiday. Protective steps matter as much as the painting itself.
- Wear gloves while washing dishes or cleaning with harsh products.
- Reapply a thin layer of top coat every couple of days to reinforce the seal.
- Avoid using nails as tools for opening packages or scraping surfaces.
- Moisturize hands and cuticles regularly to reduce peeling and cracking.
Even the most delicate bunny artwork can stay vibrant for a week or more when combined with regular top coat touch-ups and gentle nail care.
Creative Variations to Try
Once you feel comfortable painting basic bunny faces, many playful variations open up. These twists help you reuse the same core idea across multiple seasons or holidays with small changes.
- Polka-dot bunnies: Add white or pastel dots around the bunny to resemble a patterned Easter egg background.
- Floral crown bunnies: Paint tiny flowers above the bunny’s head for a springtime festival look.
- Night-sky bunnies: Use a deep blue or purple base and white rabbit silhouettes for a dreamy twilight feel.
- Glitter tails: Add a glitter dot at the base of a bunny silhouette to serve as a sparkling cotton tail.
- Family of bunnies: Paint one large bunny and several smaller ones across different nails to tell a playful story.
Photographing your manicure after trying new variations can inspire future designs and show progress in your nail art skills over time.
Frequently Asked Questions About Bunny Nail Art
How long does a bunny nail design usually take?
A full bunny manicure may take 45 to 90 minutes, depending on how detailed the artwork is and how many layers you use. Simple accent nails are much quicker and can often be completed within half an hour, including drying time.
Do I need professional tools to create bunny nails?
Professional tools can make detail work easier, but they are not required. Many people achieve adorable results using household stand-ins like bobby pins, toothpicks, and small paintbrushes reserved specifically for nail art.
What if I cannot draw the bunny faces evenly?
Perfect symmetry is not necessary for charming designs. If drawing faces feels intimidating, start with simple ear shapes or silhouettes, or focus on just one detailed bunny accent while keeping the rest of the nails patterned or solid.
Can bunny nail art work on very short nails?
Yes, short nails can look especially cute with compact bunny faces or just a pair of ears peeking from the cuticle line. Focus on simpler designs with fewer details so the small canvas still appears clear and intentional.
Is it better to use gel or regular polish for bunny designs?
Both options work well, and the choice depends on how long you want the manicure to last and what tools you have available. Gel tends to be more durable, while regular polish is easier to remove and adjust if you are experimenting with new ideas.
Bring Easter Cheer to Your Fingertips
Bunny nail art blends creativity, color, and seasonal fun into a small, manageable project that anyone can enjoy at home. Whether you opt for a single, subtle rabbit or a full set of playful characters and patterns, your manicure can become a cheerful part of your Easter celebration.
With a few simple tools, a bit of patience, and a willingness to experiment, you can create spring-ready nails that showcase your personality and put a smile on everyone who notices the tiny bunnies at the ends of your fingers.