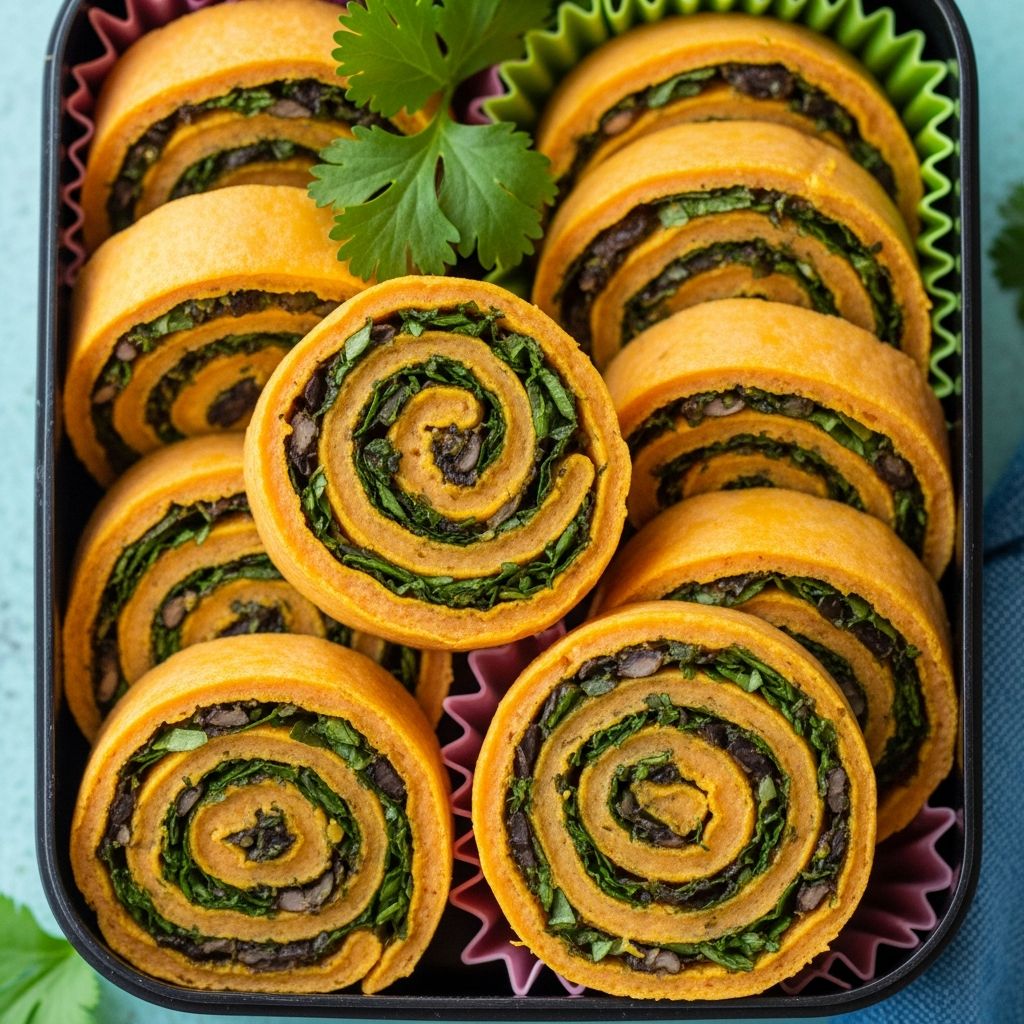
Sweet potatoes, citrus, and soft tortillas can turn an ordinary lunch into a colorful, kid-friendly feast that packs nutrition into every bite-sized spiral. These zesty sweet potato pinwheels are easy enough for kids to help make, sturdy enough for lunchboxes, and flexible enough to adapt to picky eaters.
Why Pinwheels Belong in Your Lunchbox Rotation
Pinwheel wraps are simply tortillas rolled around a flavorful filling and sliced into small rounds, but the format makes vegetables and new flavors feel fun and approachable for children. Instead of a flat sandwich that can get soggy or boring, pinwheels offer colorful swirls and tidy bites that little hands can easily grab.
Using mashed sweet potato as the base gives each roll a naturally sweet taste, soft texture, and bright orange color, while citrus adds a fresh, sunny note that keeps the filling from tasting heavy. The result is a satisfying lunch that looks cheerful and feels special without requiring complex cooking skills.
Ingredients and Simple Equipment
This recipe uses pantry-friendly ingredients and basic kitchen tools, making it realistic for a busy school morning or a relaxed weekend cooking session with kids. Feel free to adjust quantities to match how many pinwheels you need and how full you want the tortillas to be.
Core Ingredients
- Sweet potatoes (orange-fleshed, baked or steamed until tender)
- Soft tortillas (whole wheat, flour, or gluten-free as needed)
- Fresh citrus juice (orange, tangerine, or a mild lemon)
- Optional citrus zest for extra flavor (finely grated)
- A mild oil or melted butter (for smooth, spreadable texture)
- Salt and mild seasonings (such as cinnamon or mild chili, depending on your child’s taste)
Flavor Boosters and Optional Add-Ins
- Plain Greek yogurt or cream cheese for creaminess
- Finely grated cheese, such as mild cheddar or mozzarella
- Very thin carrot, cucumber, or bell pepper strips
- Fresh herbs like finely chopped cilantro or parsley
- Cooked white beans or chickpeas, mashed into the sweet potato for extra protein
Basic Tools You Will Need
- Medium bowl for mashing and mixing the filling
- Fork or potato masher
- Cutting board and a sharp knife for slicing the pinwheels
- Measuring spoons for seasonings and citrus juice
- Spoon or spatula for spreading the filling evenly
Step-by-Step: Making Citrus Sweet Potato Pinwheels
The method is straightforward: create a smooth, flavorful spread, layer it onto tortillas, roll tightly, chill, and slice. The chilling step may be the most important for getting neat swirls that stay together in a lunchbox.
1. Prepare and Season the Sweet Potato Base
- Cook the sweet potatoes until completely tender, either by baking, steaming, or microwaving. Let them cool enough to handle safely.
- Peel off the skins and place the flesh into a mixing bowl.
- Mash thoroughly with a fork or potato masher until smooth and lump free.
- Stir in a small amount of oil or melted butter to make the mixture easier to spread.
- Add citrus juice a little at a time, tasting as you go, so the flavor is bright but not sour.
- Season with a pinch of salt and, if your child enjoys it, a hint of cinnamon or very mild chili powder.
2. Customize with Extras
Once you like the base flavor, fold in any optional add-ins. This is where you can quietly increase the protein or vegetable content while keeping the mixture smooth and spreadable.
- Mix in a spoonful of Greek yogurt or cream cheese for a creamier, tangier filling.
- Stir in a small handful of finely grated cheese for a more savory profile.
- Add a few tablespoons of mashed beans for extra fiber and protein, making sure the texture stays soft.
- Fold in very finely chopped herbs if your child is open to flecks of green.
3. Assemble the Tortilla Rolls
- Lay a tortilla flat on a clean cutting board.
- Spread a thin, even layer of the sweet potato mixture across the entire surface, leaving a small empty border around the edge.
- If using thin vegetable strips, arrange them in a single layer, keeping them parallel to one tortilla edge so they roll neatly.
- Starting from the edge with the vegetable strips, roll the tortilla as tightly as possible, similar to rolling a yoga mat.
- Place the rolled tortilla seam-side down and repeat with remaining tortillas.
4. Chill and Slice into Pinwheels
- Cover the rolled tortillas and place them in the refrigerator for at least 20–30 minutes. Chilling makes the filling firmer and easier to slice.
- Using a sharp knife, trim off any uneven ends (these make perfect cook’s snacks).
- Slice the rolls into rounds about 2–3 cm thick. Adjust thickness based on your child’s age and chewing ability.
- Arrange the pinwheels cut-side up so their colorful spirals are visible.
Nutrition Snapshot: What Kids Get in Every Bite
These pinwheels are designed to tuck multiple nutrients into a familiar format. The table below gives a general sense of the benefits when the filling is built around sweet potatoes, citrus, and optional beans or yogurt, assuming standard portion sizes.
| Component | Primary Nutrients | Benefits for Kids |
|---|---|---|
| Sweet potatoes | Beta-carotene (vitamin A), fiber, slow-digesting carbohydrates | Supports vision, immune function, and steady energy through the school day. |
| Citrus juice and zest | Vitamin C and natural plant compounds | Helps the body absorb iron from other foods and adds bright flavor without excess sugar. |
| Tortillas | Carbohydrates, some protein, and depending on type, whole grains | Provides fuel for concentration and pairs well with vegetable-based fillings. |
| Optional yogurt or beans | Protein, calcium (yogurt), iron and fiber (beans) | Improves fullness, supports growing muscles and bones, and steadies appetite. |
| Optional veggie add-ins | Additional vitamins, minerals, and fiber | Gently expands the variety of vegetables your child sees regularly. |
Kid-Friendly Variations and Flavor Twists
One strength of this recipe is how easily it adapts to different preferences, allergies, and seasons. You can keep the same basic technique but shift the seasoning, add-ins, or even the type of tortilla to create fresh combinations throughout the school year.
Sweet and Mild Ideas
- Add a drizzle of pure maple syrup or honey to the mashed sweet potatoes for kids who prefer dessert-like flavors in their lunch.
- Use cinnamon and a pinch of nutmeg instead of savory spices, then pair the pinwheels with apple slices and yogurt.
- Choose plain flour or whole-wheat tortillas to keep the flavors familiar and mellow.
More Adventurous Combos
- Stir a tiny pinch of mild chili powder or smoked paprika into the filling for a gentle warmth.
- Use lime juice and a sprinkle of chopped cilantro to nudge the flavors toward a taco-style profile.
- Try spinach or tomato tortillas for extra color and subtle flavor changes.
Allergy-Friendly Swaps
- Use gluten-free tortillas made from corn or alternative grains if needed.
- Replace yogurt or cheese with a dairy-free alternative to keep the filling creamy.
- Skip nut-based ingredients and rely on seeds (such as sunflower seed butter spread thinly) where safe and appropriate.
How to Pack Pinwheels So They Survive the School Day
Even the best recipe can disappoint if it falls apart or becomes soggy before lunchtime. A few small packing techniques keep your sweet potato pinwheels looking fresh and appealing when your child opens the lunchbox.
Structural Tips
- Make sure the filling layer is thin; too much filling pushes out when sliced.
- Roll tightly and chill fully before cutting to help the spirals hold together.
- Use food-safe picks, short skewers, or silicone cups to stabilize pinwheels in the lunchbox if needed.
Preventing Sogginess
- Pat any raw vegetable strips dry with a clean towel before adding them to the roll.
- If the sweet potato mixture seems very moist, add a bit more mashed sweet potato or a spoonful of oats to thicken.
- Avoid packing juicy fruits directly against the pinwheels; instead, separate them with small containers or dividers.
Rounding Out a Balanced Lunch
Think of the pinwheels as the main component, then build the rest of the lunchbox around color, crunch, and hydration. Children are more likely to eat a balanced meal when the presentation feels playful and the textures vary.
- Add crisp elements such as snap peas, cucumber rounds, or whole-grain crackers.
- Include a fruit that contrasts with the sweet potato, such as grapes, orange wedges, or berries.
- Offer a small serving of yogurt or a dairy-free equivalent for extra protein and calcium.
Cooking with Kids: Turning Lunch Prep into a Mini Lesson
Inviting children into the kitchen to help assemble these pinwheels can turn a routine task into a small creativity and confidence boost. Simple, low-risk jobs allow even younger kids to participate while practicing coordination, counting, and decision-making.
Age-Appropriate Tasks
- Toddlers and preschoolers can sprinkle cheese, place vegetable strips, or help choose colors of tortillas.
- Early elementary school kids can help mash the sweet potatoes and stir in seasonings with supervision.
- Older children can spread the filling, roll the tortillas, and, with guidance, help with supervised cutting.
Conversation Starters While You Cook
- Talk about where sweet potatoes grow and how their color hints at vitamin content.
- Compare the flavors of different citrus fruits and let kids describe them in their own words.
- Discuss which colors they want to see in their lunchbox and how each food makes their body feel.
Sample Lunchbox Combinations Featuring Pinwheels
To make planning easier, here are a few example lunchbox lineups that feature citrus sweet potato pinwheels as the main component. Adjust portions based on your child’s age and appetite, and always follow food safety guidelines for storage and transport.
| Lunchbox Theme | Main Component | Sides | Notes |
|---|---|---|---|
| Colorful Crunch | Sweet potato pinwheels with carrot and cucumber strips inside | Green grapes, snap peas, and a small container of hummus | Ideal for kids who enjoy fresh textures and dippable items. |
| Soft & Comforting | Sweet pinwheels with cinnamon and yogurt in the filling | Banana slices, plain crackers, and a handful of raisins | Gentle on sensitive mouths or days when your child wants milder flavors. |
| Tangy Fiesta | Lime-zested pinwheels with beans and mild chili powder | Corn kernels, cherry tomatoes, and orange wedges | Great for slightly adventurous eaters who enjoy a hint of spice. |
Frequently Asked Questions
How far in advance can I make sweet potato pinwheels?
Pinwheels hold their shape best when prepared the night before or the morning of the day you plan to serve them. If you assemble them a day ahead, store the rolled but unsliced tortillas in an airtight container in the refrigerator, then slice them shortly before packing the lunchbox.
Can these pinwheels be frozen?
Freezing is possible, but the texture of both the tortilla and the sweet potato filling may change, sometimes becoming softer or a bit grainy. If you want to experiment with freezing, wrap the rolled tortillas tightly, freeze them, then thaw in the refrigerator before slicing and check the texture before sending them to school.
What if my child dislikes seeing vegetables in the swirl?
If visible vegetable strips cause resistance, hide the vegetables by grating them very finely and stirring them directly into the sweet potato mixture. Carrots and mild bell peppers work particularly well this way when cooked lightly or grated raw into the mash.
Are these suitable for very young children?
For toddlers or young preschoolers, cut the pinwheels into smaller pieces and avoid tough raw vegetables that can be hard to chew. Always adjust size, texture, and ingredients based on your child’s chewing ability and any guidance from healthcare professionals.
How can I quickly re-purpose leftovers?
Leftover sweet potato filling mixes well into scrambled eggs, quesadillas, or small baked patties. Any extra pinwheels can double as an after-school snack, especially when served with a dip like yogurt or hummus.
By turning a simple mash of sweet potatoes and citrus into bright, spiral-shaped pinwheels, you can send your child to school with a lunch that is both nourishing and genuinely fun to eat. With a handful of basic ingredients and a few thoughtful packing tricks, these wraps can become a dependable addition to your regular lunchbox lineup.