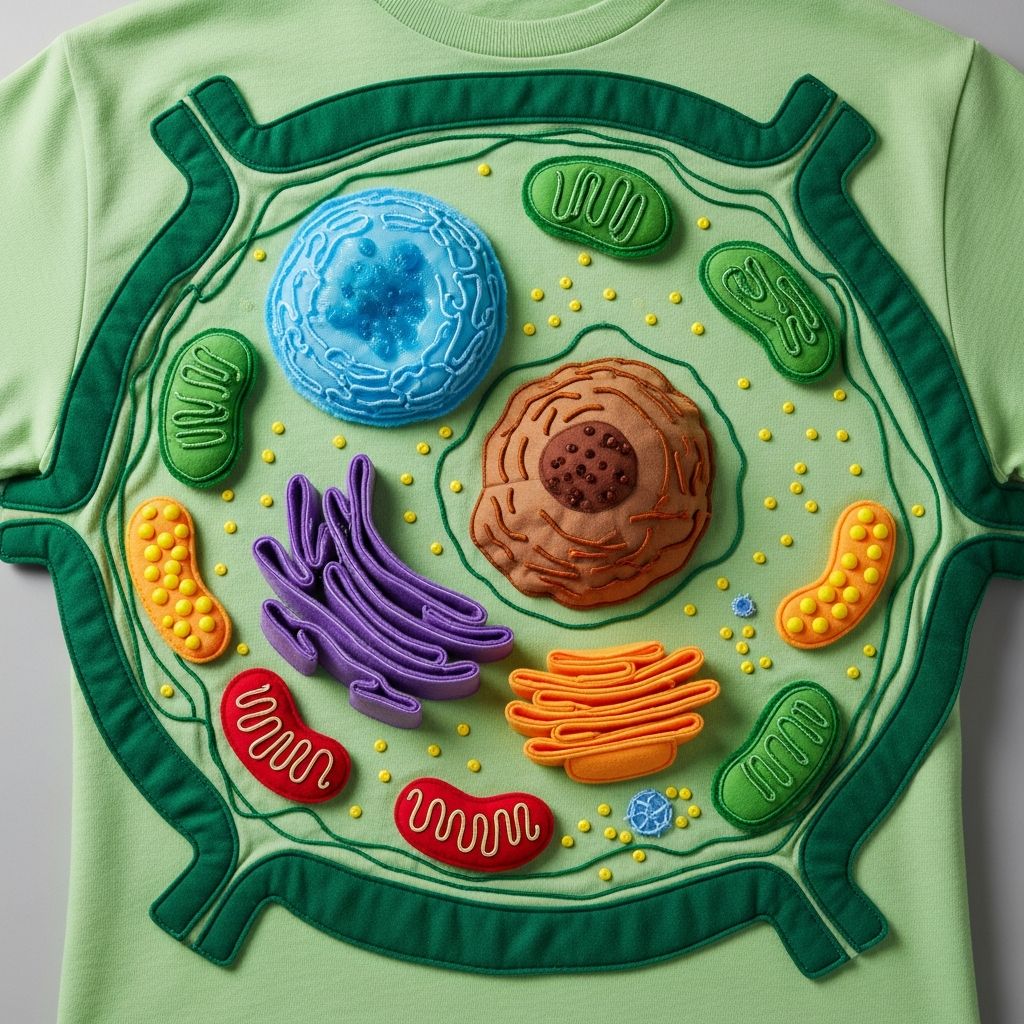
Designing a plant cell model on a T-shirt is a creative way to learn cell biology while completing a memorable, hands-on science project. This guide walks through planning, building, and presenting a wearable plant cell model that shows all the major organelles clearly and accurately.
Why Choose a Wearable Plant Cell Project?
A wearable plant cell model turns a typical cell diagram into something interactive and fun. Instead of carrying a poster or foam model, the student wears the project, making it easier to transport and more engaging during classroom presentations.
- Great for visual and kinesthetic learners who remember concepts better by building and wearing them.
- Helps reinforce the function and structure of plant cell organelles through placement, color, and labels.
- Offers a unique alternative to standard shoe-box, clay, or poster cell models.
Project Overview and Learning Goals
This project focuses on building a 2D-3D hybrid model of a plant cell on the front of a T-shirt using craft materials that visually represent each organelle. The end result should clearly show a rectangular plant cell outline with labeled structures in the correct relative positions.
The main learning goals are:
- Identify key plant cell organelles and their functions.
- Place each organelle in a realistic location within the cell layout.
- Use labels and a legend (key) so viewers can easily recognize each part.
- Demonstrate creativity while staying scientifically accurate.
Materials and Tools You Will Need
Gather all materials before starting so the student can focus on design and construction. Always choose a T-shirt size that fits comfortably with extra space on the front for the full cell.
Basic Materials
- Plain cotton T-shirt (light color works best for visibility, such as white or light green).
- Craft felt sheets or foam sheets in assorted colors.
- Fabric glue or a low-temperature hot glue gun (adult supervision recommended).
- Fabric markers or permanent markers for labels and outlines.
- Paper, pencil, and ruler for sketching the design layout.
Optional Decorative Supplies
- Pompoms, buttons, or beads for small organelles.
- Yarn or ribbon to represent endoplasmic reticulum strands.
- Sequins or glitter fabric paint for chloroplasts or vacuole highlights.
- Iron-on letters or stencils for the project title across the top of the shirt.
Understanding Plant Cell Organelles
Before building the shirt, quickly review each major organelle. The student should know what each part does so the model is meaningful instead of just decorative.
| Organelle | Role in the Cell | Suggested Material Idea |
|---|---|---|
| Cell Wall | Gives the plant cell shape, strength, and protection. | Thick rectangular border cut from green or brown felt. |
| Cell Membrane | Controls what enters and leaves the cell. | Thin inner border glued just inside the cell wall. |
| Nucleus | Holds genetic material and acts as the control center. | Circular felt piece with a smaller circle for nucleolus. |
| Cytoplasm | Gel-like interior where organelles are suspended. | Background fabric paint color inside the cell outline. |
| Chloroplasts | Perform photosynthesis to make food for the plant. | Small green ovals decorated with stripes or dots. |
| Central Vacuole | Stores water and helps maintain cell pressure. | Large, light-colored irregular shape taking up most of the center. |
| Endoplasmic Reticulum (ER) | Transports proteins and other materials within the cell. | Curved yarn or ribbon lines near the nucleus. |
| Ribosomes | Make proteins for the cell. | Tiny beads, dots of paint, or mini pompoms on ER or in cytoplasm. |
| Golgi Apparatus | Packages and ships materials around or out of the cell. | Stacked curved felt strips. |
| Mitochondria | Produce energy for the cell. | Oval shapes with a squiggly line inside. |
Planning the T-Shirt Layout
Plan the design on paper before gluing anything to the shirt. This avoids crowding and ensures that every organelle fits inside the plant cell shape.
- Measure the available space. Lay the T-shirt flat and lightly mark the outer rectangle with a washable fabric marker.
- Sketch the cell. Draw a simple rectangle on paper and block in large features like the central vacuole and nucleus first.
- Decide on color coding. Assign a different color to each organelle so they are easy to distinguish at a glance.
- Choose label locations. Plan where each label will go to avoid covering important parts of the design.
Step-by-Step Construction Instructions
Build the project in layers, starting with the largest features. Allow glue or paint to dry between layers to keep the shirt neat and wearable.
1. Prepare the Shirt
- Wash and dry the T-shirt without fabric softener so glue and paint adhere better.
- Place a piece of cardboard inside the shirt to create a smooth, firm surface and prevent glue from soaking through.
- Lightly outline the main cell rectangle using a washable marker as a placement guide.
2. Create the Cell Wall and Membrane
- Cut a large rectangle from felt to represent the cell wall, leaving a border of shirt fabric showing around the edges.
- Glue the rectangle to the shirt front, pressing it down firmly at the corners and sides.
- Cut a slightly smaller inner rectangle from another color to represent the cell membrane and glue it inside the wall.
3. Add the Central Vacuole
- Cut a large, irregular oval or bean-shaped piece from light blue or purple felt.
- Position it off-center so there is room for the nucleus and other organelles around it.
- Glue it down smoothly to avoid wrinkles, since it covers a big area.
4. Build the Nucleus and Nucleolus
- Cut a medium-sized circle for the nucleus and a smaller contrasting circle for the nucleolus.
- Glue the nucleolus to the center of the nucleus piece.
- Attach the completed nucleus near one side of the vacuole, not at the very edge of the cell.
5. Add Endoplasmic Reticulum and Ribosomes
- Arrange yarn or ribbon in curved lines wrapping around one side of the nucleus to represent the endoplasmic reticulum.
- Glue only in small sections so the strands keep a natural, wavy shape.
- Attach tiny beads, pompoms, or paint dots along some ER strands to show ribosomes.
6. Attach Mitochondria and Golgi Apparatus
- Cut several oval shapes from orange or red felt for mitochondria and draw a squiggly line across each with marker or fabric paint.
- Glue them in different spots within the cytoplasm area.
- Create the Golgi apparatus using stacked curved strips; glue them together slightly offset, then attach the stack near the ER.
7. Add Chloroplasts and Any Remaining Organelles
- Cut green oval shapes and add darker stripes or dots to show the internal structures of chloroplasts.
- Glue them mostly around the edges of the vacuole and near the cell wall.
- If your assignment requires additional organelles (such as small vacuoles or plasmodesmata), add them now in any open spaces.
8. Label All Parts Clearly
- Use fabric markers to write labels directly next to each organelle, or create small label tabs from felt or cardstock.
- Connect labels to the correct parts with short lines or arrows.
- Make sure the text is large and dark enough to read from a few feet away.
Adding Titles, Legend, and Extra Details
Finishing touches make the project look polished and help teachers and classmates understand what they are looking at immediately. Consider including a brief legend if your teacher expects it.
- Write a title such as “Plant Cell Model” or “Wearable Plant Cell” across the top chest area using fabric paint, stencils, or iron-on letters.
- Add a small legend box near the bottom edge with color codes for each organelle, especially if you keep labels short.
- Optionally, decorate the sleeves or back of the T-shirt with plant-themed designs or vocabulary words like “photosynthesis,” “chlorophyll,” or “organelles.”
Safety and Durability Tips
Because the shirt will be worn, comfort and durability matter. Plan construction so the student can move easily without pieces scratching or falling off during the presentation.
- Use soft materials against the body and avoid sharp edges, hot-glue globs, or stiff wire forms.
- Allow all glue and fabric paint to dry completely before wearing; this may require leaving the shirt flat overnight.
- Reinforce heavy pieces with extra glue or stitching if they feel loose when the student tries the shirt on.
Presenting the Wearable Cell in Class
Presentation is a big part of many science project grades. Encourage the student to speak confidently while pointing to each organelle on the shirt as it is explained.
- Introduce the project by stating that the entire design is a plant cell and briefly explaining the idea of turning it into clothing.
- Move from one part to another in a logical order: cell wall and membrane first, then large structures (vacuole and nucleus), then smaller organelles.
- Share one short fact about the function of each organelle while touching or indicating its model on the shirt.
- End by explaining why plant cells are important and how their structures help plants survive.
Possible Grading Rubric and Expectations
Every teacher uses slightly different grading criteria, but most plant cell projects are evaluated on both scientific accuracy and creativity. Planning with these common expectations in mind can help the student earn a higher grade.
| Category | Description |
|---|---|
| Accuracy | All required organelles are present, labeled correctly, and placed in reasonable positions. |
| Creativity | Original design, interesting materials, and thoughtful color choices. |
| Neatness | Clean gluing, clear labels, legible writing, and tidy layout. |
| Completeness | Project includes title, labels, and any additional elements requested by the teacher (legend, written explanation, etc.). |
| Presentation | Student explains the model clearly, speaks audibly, and answers basic questions about plant cell structure. |
Ideas for Adapting or Extending the Project
The wearable plant cell design can be adapted to different grade levels or combined with other activities. Consider changing the complexity of the model to match the student’s age and science background.
- For younger students, include fewer organelles and focus on recognizing the cell wall, chloroplasts, and nucleus.
- For older students, add more detail (such as rough vs. smooth ER or more complex chloroplast patterns) and require a short written report to accompany the shirt.
- Create a partner project where one student wears a plant cell shirt and another wears an animal cell shirt for an in-class comparison activity.
Frequently Asked Questions (FAQs)
1. How many organelles should be on the T-shirt?
Include every organelle that your teacher requires; most middle school projects expect at least the cell wall, cell membrane, cytoplasm, nucleus, central vacuole, mitochondria, chloroplasts, Golgi apparatus, endoplasmic reticulum, and ribosomes. If your assignment sheet lists additional parts, add those too so the project meets all criteria.
2. Can I wash the T-shirt after the project is over?
Whether the T-shirt can be washed depends on the adhesives and decorations used. Felt and fabric glue often survive gentle hand washing, but items like beads or pompoms may fall off, so treat the shirt more like a display piece than everyday clothing unless all materials are washable and well-secured.
3. What if I do not have fabric glue?
If fabric glue is unavailable, use a low-temperature hot glue gun with adult help, or sew larger pieces in place with needle and thread. Standard school glue is usually not strong enough to hold heavier felt pieces on fabric during wearing.
4. How long does the project take to complete?
Most students can design and assemble the plant cell T-shirt in one to two afternoons, though additional time may be needed for drying. Starting at least several days before the due date leaves time to fix mistakes, add labels, or redo pieces that do not look quite right.
5. Can this be done as a group project?
Yes, but plan roles in advance so everyone participates. One student might sketch and plan the layout, another might cut felt shapes, and another may focus on labels and final details; during the presentation, each group member can explain different organelles.
Final Thoughts
A wearable plant cell model T-shirt blends art, science, and creativity into one project that stands out on presentation day. By carefully planning the layout, choosing durable materials, and labeling each structure clearly, students gain a deeper understanding of plant cell anatomy while having fun building and wearing their work.